


tpreb6
-
Posts
78 -
Joined
-
Last visited
Content Type
Profiles
Forums
Downloads
Store
eMastercam Wiki
Blogs
Gallery
Events
Everything posted by tpreb6
-

Macro, Haas, Tool's in Magazine
tpreb6 replied to tpreb6's topic in Machining, Tools, Cutting & Probing
Colin, Thanks for the reply. I've reached out to my reseller and we are in the process of having our post edited. I did catch the G103 and EQ after posting. Can't tell you how many times I have put "=" in place of "EQ"... -
This is another Haas NGC probing program I wrote which is great for checking a distance between two surfaces in the same axis. In the X/Y from the same direction( "+" to "+", "-" to "-") or opposing directions ("+" to "-", "-" to "+"). Obviously Z is "-" to "-". This does use offsets G154P01. G154P02, G154P03 and G154P4 You can check in X, Y or Z directions and is all done with user inputs. The only variable that might have to be changed is #100, the probing safe distance. It's set to .500 which should be good for most applications. Just place the probe within .500 of the 1sr surface, Cycle Start, and you will be asked if this is the 1st pickup or 2nd. Simply select 1 or 2 on the keyboard. (IF PROBE W/IN "#100" OF SURFACE) (WHICH PICK UP ARE YOU PERFORMING?) (1st, SELECT "1" ON KEYBOARD) (2nd, SELECT "2" ON KEYBOARD) (NO = "N", PROBE IS NOT IN POSITION) Then you be asked which axis and direction. Simple select the appropriate number on the controller keyboard . (WHICH DIRECTION ARE YOU PICKING UP?) (+X= 1 ) (-X= 2 ) (+Y= 3 ) (-Y= 4 ) (-Z= 5 ) Jog to the 2nd surface and repeat the process. In the offset page the values are placed in: G154P01 = 1st pickup G154P02 = 2nd pickup G154P03 = distance between 1 & 2. X pickup in the X column, Y in the Y column and Z in the Z column. CODE BELOW and large spacing is intentional for clarity for user prompts. (DISTANCE CHECK PROGRAM) (!!!PROGRAM CLEARS/USES OFFSETS G154P01-G154P4!!!) (SURFACE TO SURFACE IN THE SAME AXIS) (X/Y checks can be in any order, ie:) (1st "+" or "-",2nd "+" or "-") (1st "+",2nd "+" and vise versa) (Z can be Low or High first) (!!!PROGRAM CLEARS/USES OFFSETS G154P01-G154P04!!!) #100= .5 (MAX PROBE DISTANCE) (1ST PICKUP WILL BE PUT IN G154P01) (2ND PICKUP WILL BE PUT IN G154P02) (DISTANCE FROM 1 TO 2 = G154P03) (PLACE PROBE NEAR FIRST SURFACE W/IN #100) (CYCLE START THE PROGRAM, FOLLOW PROMPTS) N1 #10502=0 N2 M109 P10502(ASKING IF THIS IS FIRST PICKUP) (IF PROBE W/IN "#100" OF SURFACE) (WHICH PICK UP ARE YOU PERFORMING?) (1st, SELECT "1" ON KEYBOARD) (2nd, SELECT "2" ON KEYBOARD) (NO = "N", PROBE IS NOT IN POSITION) IF[#10502EQ0.]GOTO1 IF[#10502EQ49.]GOTO2 (FIRST PICKUP - "1") IF[#10502EQ50.]GOTO3 (SECOND PICKUP - "2") IF[#10502EQ78.]GOTO112 (NO GOTO MESSAGE/RESET) GOTO1 N2 G103 P1 #20=0 M97 P150 L4 #20=0 M97 P151 L4 #20=0 M97 P152 L4 N3 #10501=0 N5 M109 P10501(USER INPUT FOR 1st PICKUP) ( 1st SURFACE PICKUP ) (WHICH DIRECTION ARE YOU PICKING UP?) (+X= 1 ) (-X= 2 ) (+Y= 3 ) (-Y= 4 ) (-Z= 5 ) IF[#10501EQ0.]GOTO3 IF[#10501EQ49.] #1=1 IF[#10501EQ49.]GOTO10 (GOTO "+X" PICKUP) IF[#10501EQ50.] #1=2 IF[#10501EQ50.]GOTO20 (GOTO "+X" PICKUP) IF[#10501EQ51.] #1=3 IF[#10501EQ51.]GOTO30 (GOTO "+Y" PICKUP) IF[#10501EQ52.] #1=4 IF[#10501EQ52.]GOTO40 (GOTO "-Y" PICKUP) IF[#10501EQ53.]GOTO50 (GOTO "-Z" PICKUP) GOTO1 N8 #10501=0 N9 M109 P10501(USER INPUT FOR 2nd PICKUP) ( 2nd, OPPOSITE, SURFACE PICKUP ) (WHICH DIRECTION ARE YOU PICKING UP?) (+X= 1 ) (-X= 2 ) (+Y= 3 ) (-Y= 4 ) (-Z= 5 ) IF[#10501EQ0.]GOTO9 IF[#10501EQ49.] #1=1 IF[#10501EQ49.]GOTO10 (GOTO "+X" PICKUP) IF[#10501EQ50.] #1=2 IF[#10501EQ50.]GOTO20 (GOTO "-X" PICKUP) IF[#10501EQ51.] #1=3 IF[#10501EQ51.]GOTO30 (GOTO "+Y" PICKUP) IF[#10501EQ52.] #1=4 IF[#10501EQ52.]GOTO40 (GOTO "-Y" PICKUP) IF[#10501EQ53.]GOTO50 (GOTO "-Z" PICKUP) GOTO8 G103P1 (______________+X PICKUP___________________) N10 G65 P9995 W154.04 A20. D#100 G103P1 IF[#10502 EQ 50.] GOTO11 #7001= #7061 GOTO110 N11 #7021= #7061 GOTO 101 (______________+X PICKUP___________________) (______________-X PICKUP___________________) N20 G65 P9995 W154.04 A20. D-#100 G103P1 IF[#10502 EQ 50.] GOTO21 #7001= #7061 GOTO110 N21 #7021= #7061 GOTO 101 (______________-X PICKUP___________________) (_______________+Y PICKUP___________________) N30 G65 P9995 W154.04 A20. E#100 G103P1 IF[#3032 EQ 1]GOTO31 IF[#10502 EQ 50.] GOTO31 #7002= #7062 GOTO110 N31 #7022= #7062 GOTO 102 (_______________+Y PICKUP___________________) (_______________-Y PICKUP___________________) N40 G65 P9995 W154.04 A20. E-#100 G103P1 IF[#3032 EQ 1]GOTO41 IF[#10502 EQ 50.] GOTO41 #7002= #7062 GOTO110 N41 #7022= #7062 GOTO 102 (_______________-Y PICKUP___________________) (_______________-Z PICKUP___________________) N50 G65 P9995 W154.04 A20. H-[#100] (SINGLE SURFACE -Z) G103P1 IF[#10502 EQ 50.] GOTO51 #7003= #7063 GOTO110 N51 #7023= #7063 GOTO103 (_______________-Z PICKUP___________________) N101 (X DIFFEENTIAL) #7041=ABS[#7001-#7021] #10188=#7041 GOTO110 N102 (Y DIFFEENTIAL) #7042=ABS[#7002-#7022] #10188=#7042 GOTO110 N103 (Z DIFFEENTIAL) #7043=ABS[#7003-#7023] #10188=#7043 GOTO110 N110 (ZERO G154P04 X, Y, Z) #7061=0 #7062=0 #7063=0 GOTO115 N112 #3000= 1 (RESET machine and RE-POSITION probe) N115 M30 (CLEAR OFFSETS G154P01-G154P04) (SUB PROGRAM) N150 G103 P1 #[7001+#20]=#0 #20=#20+20 M99 G103 P1 N151 #[7002+#20]=#0 #20=#20+20 M99 G103 P1 N152 #[7003+#20]=#0 #20=#20+20 M99
- 182 replies
-
- 2
-

-
- custom macro b
- cnc
- (and 2 more)
-
For Haas NGC I wrote this to pickup the center of X and Y and also pickup Z. Either all, just one, and in any order. There are user inputs that guide you through. This is REALLY useful for parts that are irregular to pick up or just a block. I use G154.01 G154.02 to place the X and Y values the in G154.03 the overall distance from pickup #1 to pickup #2. I even included DPRNT is your using that also. There is large spacing in the program to make it easier for the operator to to read the Asking Inputs. ***NOTE: the first moves on the X or Y are in the positive direction. #101= 54 (WORK OFFSET, 54-59 ONLY) (PROGRAM WILL PICK UP MID POINT OF X OR Y AND Z) (FIRST PICKUP, PROBE MOVES + POSITIVE, IN "X" OR "Y") (SECOND PICKUP, PROBE MOVES - NEGATIVE, IN "X" OR "Y") (1-JOG PROBE TO WITHIN .5 OF FIRST SURFACE) (2-CYCLE START/RUN PROGRAM - FOLLOW INSTRUCTIONS) (3-AFTER PROGRAM ENDS, SELECT JOG) (4-JOG PROBE TO WITHIN .5 OF OPPSOSITE SECOND SURFACE) (5-SELECT MEMORY) (6-CYCLE START/RUN PROGRAM - FOLLOW INSTRUCTIONS) (IF YOU WANT TO PICK UP Z ) (1-JOG PROBE TO WITHIN .5 ABOUT SURFACE) (2-CYCLE START/RUN PROGRAM - FOLLOW INSTRUCTIONS) (MID POINT OF BOTH PICKUPS = OFFSET SELECTED) (INDIVIUAL SURFACE PICKUPS ARE STORED IN G154P01 & G154P02) (OVERALL DISTANCE BETWEEN THE PICKUPS ARE IN G154P03) (FIRST X PICKUP=G154P01) (SECOND X PICKUP-G154P02) (OVERALL DISTANCE BETWEEN X PICKUP-G154P03) (FIRST Y PICKUP=G154P01) (SECOND Y PICKUP-G154P02) (OVERALL DISTANCE BETWEEN Y PICKUP-G154P03) #120=0 IF [#101 EQ 54] GOTO1 (WORK OFFSET MUST BE 54-59) IF [#101 EQ 55] GOTO1 (WORK OFFSET MUST BE 54-59) IF [#101 EQ 56] GOTO1 (WORK OFFSET MUST BE 54-59) IF [#101 EQ 57] GOTO1 (WORK OFFSET MUST BE 54-59) IF [#101 EQ 58] GOTO1 (WORK OFFSET MUST BE 54-59) IF [#101 EQ 59] GOTO1 (WORK OFFSET MUST BE 54-59) #3000=21 (WORK OFFSET MUST BE 54-59) N1 #10501=0 N2 M109 P10501(ASKING IF THIS IS FIRST PICKUP) (WHICH PICK UP?) (1st, SELECT "1" ON KEYBOARD) (2nd, SELECT "2" ON KEYBOARD) ( Z, SELECT "Z" ON KEYBOARD) IF[#10501EQ0.]GOTO1 IF[#10501EQ49.]GOTO4 (FIRST PICKUP - "1") IF[#10501EQ50.]GOTO5 (SECOND PICKUP - "2") IF[#10501EQ90.]GOTO220 ( Z PICKUP - "Z") GOTO1 N4 #10501=0 N5 IF[#10501EQ50.]#120 = 22222. M109 P10501(USER INPUT FOR AXIS TO PICKUP) (WHICH AXIS ARE YOU PICKING UP?) (SELECT "X" OR "Y" ON KEYBOARD) IF[#10501EQ0.]GOTO5 IF[#10501EQ88.]GOTO100 (GOTO "X" PICKUP) IF[#10501EQ89.]GOTO200 (GOTO "Y" PICKUP) GOTO1 (BEGINING OF X PICKUP) N100 IF[#120EQ22222.] GOTO101 (1ST X PICKUP IN + DIRECTION) G65 P9995 W154.01 A20. D.5 #110=#14001 GOTO 110 N101 (2ND X PICKUP IN DIRECTION) G65 P9995 W154.02 A20. D-.5 #111=#14021 (AVERAGE FOR BOTH PICKUPS IN X) #115=[[#110+#111]/2] #7041=#7021-#7001 (SETTING WORK OFFSET FOR X) IF[#101EQ54] #5221=#115 IF[#101EQ55] #5241=#115 IF[#101EQ56] #5261=#115 IF[#101EQ57] #5281=#115 IF[#101EQ58] #5301=#115 IF[#101EQ59] #5321=#115 GOTO 120 N110 M00 (AFTER PRESSING START) (THE PROGRAM WILL END) (JOG TO OPPOSITE SIDE OF PART) (START PROGRAM AND FOLLOW THE QUESTIONS) M30 N120 #10188=#14041 DPRNT[] DPRNT[] DPRNT[FIXTURE*OFFSET*#101[40]] DPRNT[X*WIDTH*#14041[24]] GOTO 250 (END OF X PICKUP) (BEGINING OF Y PICKUP) N200 IF[#120EQ22222.] GOTO201 (1ST Y PICKUP IN + DIRECTION) G65 P9995 W154.01 A20. E.5 #112=#14002 GOTO 110 N201 (2ND Y PICKUP IN -DIRECTION) G65 P9995 W154.02 A20. E-.5 #113=#14022 (AVERAGE FOR BOTH PICKUPS IN Y) #115=[[#112+#113]/2] #7042=#7022-#7002 (SETTING WORK OFFSET FOR Y) #10188=#14042 IF[#101EQ54] #5222=#115 IF[#101EQ55] #5242=#115 IF[#101EQ56] #5262=#115 IF[#101EQ57] #5282=#115 IF[#101EQ58] #5302=#115 IF[#101EQ59] #5322=#115 DPRNT[] DPRNT[] DPRNT[FIXTURE*OFFSET*#101[40]] DPRNT[Y*WIDTH*#14042[24]] GOTO 250 N210 M30 N220 (Y=YES/N=NO, ARE YOU PICKING UP Z) #10502=0 N222 M109 P10502(USER INPUT FOR AXIS TO PICKUP) (ARE YOU PICKING UP "Z" AND ARE) (YOU IN POSITION <.500 ABOVE?) (SELECT "Y" ON KEYBOARD =YES) (SELECT "N" ON KEYBOARD =NO) IF[#10502EQ0.]GOTO222 IF[#10502NE89.] XOR IF[#10502NE78.] GOTO 222 IF[#10502EQ89.]GOTO240 (GOTO "Z" PICKUP) IF[#10502EQ78.]GOTO250 (GOTO END OF PROGRAM) N240 G65 P9995 W#101 A20. H-.5 (SINGLE SURFACE Z) G103P1 N250 M30
- 182 replies
-
- 1
-
-
- custom macro b
- cnc
- (and 2 more)
-
Macro, Haas, Tool's in Magazine
tpreb6 replied to tpreb6's topic in Machining, Tools, Cutting & Probing
Colin, After hearing back from Haas, the tool table is not stored in macro so we can not retrieve them. The next best option to achieve this like you had suggested, the Graphics window. The Loop # in line 16 would need to match the number of tools being used. Would the post be easy edited for my reseller to output the header below? That way we could quickly run the graphics and if all is well, turn Block Delete on, Cycle Start, and the program would be off and running.
-
Macro, Haas, Tool's in Magazine
tpreb6 replied to tpreb6's topic in Machining, Tools, Cutting & Probing
Most lights out programs are pretty big and some running all weekend. Running in graphics would not be practical to do run....I know, neither is someone not making sure everything is set... This isn't a common occurrence but when it does happen it sucks. I just want to implement something that would help prevent it from happening. I have thought about having a dummy program for the tools that need to run but that would be time consuming all the time especially if we're running 30 or more tools-good suggestion and appreciate the input! This isn't a common occurrence or a huge problem but when it does happen it sucks. I just want to implement something that would help prevent it from happening. If I could just find out where the variables are for the tool list in the machine, I could write a macro that would run at cycle start making sure the tools for the program are in the machine. In a macro loop it would only take a few seconds to verify. We do have setup sheets and the tools listed in the program.
-
Macro, Haas, Tool's in Magazine
tpreb6 replied to tpreb6's topic in Machining, Tools, Cutting & Probing
Thank you for taking a look! The screen shot is attached.
-
Macro, Haas, Tool's in Magazine
tpreb6 replied to tpreb6's topic in Machining, Tools, Cutting & Probing
Colin, Thanks for the rely! I understand the slippery slope but the only problem we run into, not often, is a tool missed being put into the machine. We have @170ish tools already preset with the offset values (and monitoring tool life) in the controller so no further pickup needed unless a tool is at its life and needs to be replaced. By going into the tool list on the machine it shows the tools that are currently "in the machine". These values are in the controller somewhere and I would just like to read them. If were cutting steel and then have to run alum there can be quite a few tools to swap out. I would like to do a comparison of the tools, at cycle start, needed in the program to the tool listed in the controller before the operator walks away for the night. I know, should be check by the operator, which is...but...human factor. -
My question is, can we pull, or read, what tools are in a Haas machine with a NGC? I've tried searching variables, pulling variables and asking around with no luck. I've pretty much just got off the cuff, "I don't think so..." answers and I'm pretty much certain that's what the answer is. However, I am hoping to find a way. Our company doesn't believe in purchasing large mag's on machines and don't seem to mind switching out tooling (we change up to 20 tools) - they think their saving money. We run lights out a lot and occasionally miss changing out a tool and we lose an night run. I want to add a macro in the beginning of the post to verify the tools needed are in the machine before the operator leaves to run over night.
-
2023 Dynamic OptiRough depth settings.
tpreb6 replied to srbeyke's topic in Machining, Tools, Cutting & Probing
I use OptiRough on just about everything and I don't have a problem hitting flats. All flats will get left with the material I specify on the Stock page. You have to use Step up and set the Step Up to equal your step down or less but at least equal to. ex: 100% S/D - 100% S/U, 50%S/D - 50% S/U, etc. The cutter will go down your Step Down amount and then Step Up to any flats in that pass, then go down the next cut and Step Up to the flats in that pass. -
Laebs, The Dynamic Milling Toolpath is a really nice tool and once you understand it you will find a lot of places to use it. I would like to see the file also and get you headed in the right direction. I am a tool hog! I try to look at every option available, learn it, and then decide which "tool' to use in a given situation. I use solid edges a lot but I also use wireframe. It really depends on the situation. I always think that any option that I am given is a chance to make my life-programming/designing- easier!
-
Pitch in your little gems that make mcam life easier
tpreb6 replied to jlw™'s topic in Industrial Forum
Crazy^millman, Feel free to post anywhere! -
Pitch in your little gems that make mcam life easier
tpreb6 replied to jlw™'s topic in Industrial Forum
I added all my common stock in the Geometry page on the HST so I don't have to keep changing or adding Stock amounts.
- 427 replies
-
- 10
-
-
I wrote this macro to quickly check my spindle probe run out at anytime. ***This is for Next Generation Controller only and the mill will also need Rigid Tapping/Spindle Encoder.*** Just position the probe .5 or less to the left of a clean ground surface that is parallel with the Y axis. Hit Cycle Start and the program will pickup the face and then rotate 45° and pickup again. It will do this 8 times - a full 360°. When finished the TOTAL run out will be displayed in the "SIZE" field on the controller which is macro variable #10188. (---START OF PROGRAM---) (CHECK PROBE RUNOUT PROGRAM) (----NEXT GENERATION CONTROL ONLY----) (---MUST HAVE RIGID TAPPING/SPINDLE ENCODER---) (POSITION PROBE .5 OR LESS TO THE LEFT OF A) (GROUND EDGE THAT IS PARALLEL TO THE Y AXIS) (--HIT CYCLE START) (--THE PROBE WILL PICKUP IN THE +X DIRECTION) (--THE SPINDLE WILL ROTATE 45 DEGREES) (THIS WILL REPEAT 8 TIMES = 360 DEGREES) (THE TOTAL RUNOUT WILL BE IN "SIZE" FIELD) (WHICH IS VARIABLE #10188) #10188=#0 G65 P9832 (TURN PROBE ON) #100=#5021 (CURRENT X START POSITION) #101=#0 (SET VARIABLES TO NULL) #102=#0 #103=#0 #104=#0 #105=#0 #106=#0 #107=#0 #108=#0 #109=#0 #1=0 #120=0 WHILE[#120 LT 360] DO1 G103P1 G52 M19P#120 (SPINDLE POSITION) G91 M79 G31 X.5 F50. G1 X-.1 F100. G31 X.3 F4. #[101+#1]=#5061 G90 G1 G53 X#100 F100. #120=#120+45(ROTATE SPINDLE 45 DEG INC., FROM 0-360) #1=#1+1(USED TO ADVANCE PICKUP VARIABLE) END1 M19P0 #110=#101(CALC. SMALLEST X VALUE INTO #110) IF [#102 LT #101] THEN #110=#102 IF [#103 LT #110] THEN #110=#103 IF [#104 LT #110] THEN #110=#104 IF [#105 LT #110] THEN #110=#105 IF [#106 LT #110] THEN #110=#106 IF [#107 LT #110] THEN #110=#107 IF [#108 LT #110] THEN #110=#108 #111=#101(CALC. LARGEST X VALUE INTO #111) IF [#102 GT #101] THEN #111=#102 IF [#103 GT #111] THEN #111=#103 IF [#104 GT #111] THEN #111=#104 IF [#105 GT #111] THEN #111=#105 IF [#106 GT #111] THEN #111=#106 IF [#107 GT #111] THEN #111=#107 IF [#108 GT #111] THEN #111=#108 #10188=#111-#110 (TOTAL DEVIATION DISPLAYED IN "SIZE") #109=#10188 M69 P1134 (PROBE OFF) IF [#10188 LT .0005] GOTO 100 #3000=1(PROBE RUN OUT IS .0005 OR GREATER!) N100 M30 (---END OF PROGRAM---)
- 1 reply
-
- 3
-
-
Parameters of tool in Mastercam
tpreb6 replied to MR.Cua's topic in Machining, Tools, Cutting & Probing
Mr.Cua, You will have to turn on Use Tool's Step, Peck and Coolant in your Machine Group Properties.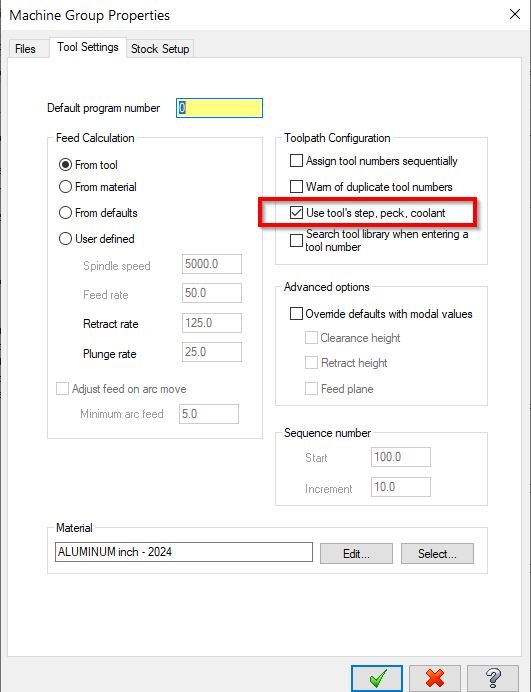
-
Parameters of tool in Mastercam
tpreb6 replied to MR.Cua's topic in Machining, Tools, Cutting & Probing
FYI, there is a bug in the Opti Rough where it does not pull the depth in. It will hopefully be fixed in the next update. -
Parameters of tool in Mastercam
tpreb6 replied to MR.Cua's topic in Machining, Tools, Cutting & Probing
I don't use #1 field but I do use the #2 field on ALL my tools. I have over 200 tools in my library and by using the rough and finish settings allows for these parameters to be automatically input into the Depth of Cut and Step over fields saving a lot time and repetition! Your drill pecks work off of this too. I have all my drilling set to Deep Hole Cycle and it uses these parameters to input the pecks. I would also suggest setting your coolant settings on all your tools by clicking the small black arrow on the left under Material-Carbide. Again, saving the repetition. -
I wrote this macro to easily find the mid point of X and Y and the Z surface for the picking up of details that are irregular shapes or just difficult to pick up with the Haas Canned Probing Cycles. -It will also will give the overall sizes in the offset page-described in directions. -I added DPRNT if you are using that functionality. -The directions are in the beginning and easy to follow. -There are large spaces in the coding to make it easy to see the questions that will come up on the controller. Hope this helps someone as it helps me all the time. Tom Prebelich (***START OF PROGRAM***) #101= 54 (WORK OFFSET, 54-59) (**MAKE SURE BLOCK DELETE IS OFF FOR FIRST PICKUP**) (PROGRAM WILL PICK UP MID POINT OF X OR Y) (FIRST PICKUP PROBE MOVES + POSITIVE, IN "X" OR "Y") (SECOND PICKUP PROBE MOVES - NEGATIVE, IN "X" OR "Y") (**MAKE SURE BLOCK DELETE IS OFF FOR FIRST PICKUP**) (1-JOG PROBE TO WITHIN .5 OF FIRST SURFACE) (2-CYCLE STAR/RUN PROGRAM) (**NOTE, BLOCK DELETE IS TURNED ON AT THIS POINT**) (3-SELECT JOG) (4-JOG PROBE TO WITHIN .5 OF OPPOSITE SECOND SURFACE) (5-SELECT MEMORY) (6-CYCLE STAR/RUN PROGRAM) (7-PROGRAM WILL ASK IF YOU WANT TO PICK UP Z) (8-SELECT N AND PROGRAM WILL END) (IF YOU WANT TO PICK UP Z CONTINUE WITH THESE STEPS) (--SELECT Y FOR YES AND HIT CYCLE START-PROGRAM WILL END) (--SELECT JOG) (--JOG PROBE TO WITHIN .5 OF THE Z SURFACE) (--SELECT MEMORY THEN CYCLE START) (--PROGRAM ASKS IF YOU ARE PICKING UP Z-THIS IS FOR SAFETY) (--PRESS Y FOR AND MACHINE WILL PICK UP Z) (MID POINT OF BOTH PICKUPS = OFFSET SELECTED) (INDIVIDUAL SURFACE PICKUPS ARE STORED IN G154P01 & G154P02) (OVERALL DISTANCE BETWEEN THE PICKUPS/WIDTH OF BLOCK ARE IN G154P03) (FIRST X PICKUP=G154P01) (SECOND X PICKUP-G154P02) (OVERALL DISTANCE BETWEEN X PICKUP-G154P03) (FIRST Y PICKUP=G154P01) (SECOND Y PICKUP-G154P02) (OVERALL DISTANCE BETWEEN Y PICKUP-G154P03) (-----REMINDERS-----) (YOU WILL BE ASKED TO PICK UP Z AT THE END) (ANSWER WITH Y=YES OR N=NO) (IF NO, PROGRAM ENDS) (IF YES, YOU WILL HAVE TO HIT CYCLE START TO CONTINUE) (-THIS PROMPTS/PREPARES THE MACHINE FOR PICKING UP Z) (JOG PROBE TO .5 OR LESS ABOVE Z PICKUP SURFACE) (HIT MEMORY AND CYCLE START WHICH WILL PICK UP Z) IF[#10503EQ123.45] GOTO 230 IF [#101 LT 54] #3000=20 (WORK OFFSET MUST BE 54-59) IF [#101 GT 59] #3000=21 (WORK OFFSET MUST BE 54-59) /N1 #10501=0 /N5 M109 P10501(USER INPUT FOR AXIS TO PICKUP) (WHICH AXIS ARE YOU PICKING UP?) (HIT "X" OR "Y" ON KEYBOARD) /IF[#10501EQ0.]GOTO5 IF[#10501EQ88.]GOTO100 (GOTO "X" PICKUP) IF[#10501EQ89.]GOTO200 (GOTO "Y" PICKUP) /GOTO1 (BEGINING OF X PICKUP) N100 /(1ST X PICKUP IN + DIRECTION) /G65 P9995 W154.01 A20. D.5 /#110=#14001 /GOTO 110 (2ND X PICKUP IN DIRECTION) G65 P9995 W154.02 A20. D-.5 #111=#14021 (AVERAGE FOR BOTH PICKUPS IN X) #115=[[#110+#111]/2] #7041=#7021-#7001 (SETTING WORK OFFSET FOR X) IF[#101EQ54] #5221=#115 IF[#101EQ55] #5241=#115 IF[#101EQ56] #5261=#115 IF[#101EQ57] #5281=#115 IF[#101EQ58] #5301=#115 IF[#101EQ59] #5321=#115 GOTO 120 N110 #3032=1(TURN BLOCK DEL ON) M30 N120 #3032=0(TURN BLOCK DEL OFF) #10188=#14041 DPRNT[] DPRNT[] DPRNT[FIXTURE*OFFSET*#101[40]] DPRNT[X*WIDTH*#14041[24]] GOTO 220 (END OF X PICKUP) (BEGINING OF Y PICKUP) N200 /(1ST Y PICKUP IN + DIRECTION) /G65 P9995 W154.01 A20. E.5 /#112=#14002 /GOTO 210 (2ND Y PICKUP IN -DIRECTION) G65 P9995 W154.02 A20. E-.5 #113=#14022 (AVERAGE FOR BOTH PICKUPS IN Y) #115=[[#112+#113]/2] #7042=#7022-#7002 (SETTING WORK OFFSET FOR Y) #10188=#14042 IF[#101EQ54] #5222=#115 IF[#101EQ55] #5242=#115 IF[#101EQ56] #5262=#115 IF[#101EQ57] #5282=#115 IF[#101EQ58] #5302=#115 IF[#101EQ59] #5322=#115 DPRNT[] DPRNT[] DPRNT[FIXTURE*OFFSET*#101[40]] DPRNT[Y*WIDTH*#14042[24]] GOTO 220 N210 #3032=1(TURN BLOCK DEL ON) M30 N220 #3032=0(TURN BLOCK DEL OFF) (Y=YES/N=NO, ARE YOU PICKING UP Z) #10502=0 N222 M109 P10502(USER INPUT FOR AXIS TO PICKUP) (ARE YOU PICKING UP "Z"?) ("Y"=YES, "N"=NO) IF[#10502EQ0.]GOTO222 IF[#10502NE89.] XOR IF[#10502NE78.] GOTO 222 IF[#10502EQ89.]GOTO225 (GOTO "Z" PICKUP) IF[#10502EQ78.]GOTO245 (GOTO END OF PROGRAM) N225 #10503=123.45 #3006=1 (AFTER HITTING START JOG Z TO POSITION AND HIT START) GOTO 250 N230 #10504=0 G103P1 N235 M109 P10504(PICKING UP "Z"?) (ARE YOU PICKING UP "Z"?) ("Y"=YES,"N"=NO) IF[#10504EQ0.]GOTO235 IF[#10504NE89.] XOR IF[#10504NE78.] GOTO235 IF[#10504EQ89.]GOTO240 (GOTO "Z" PICKUP) IF[#10504EQ78.]GOTO245 (GOTO END OF PROGRAM) N240 G65 P9995 W#101 A20. H-.5 (SINGLE SURFACE Z) G103P1 N245 #10503=0 N250 M30 (END OF Y PICKUP) (***END OF PROGRAM***)
-
Tom, Good luck! Macros are a very sore spot for me also. I have ask CNC Software to please make changes and upgrade their macro programing to make it usable. When properly working, the macro programing will save a lot of steps and time using Mastercam. The ability to use macro's will be very helpful in speeding things up and saving many repetive clicks! I have a side business in photography and use Photoshop CS2. The macros in PS are called "Actions". These actions are the life and blood of the software from a business stand point! They speed things up so much and save time. I know that well thoughtout macros in MC would do the same. Please pass your thoughts and concerns to: [email protected] Tom
-
Has anyone used one of these EDM machines? We are looking at buying a used one at a good price. however we have never operated one to see the performance. We do about 80% of burning in aluminum and 20% in steel. Your input would be appreciated.
-
Mark, Go into Customize Toolbar and go to the Category drop down menu. In there you will find Moldplus and click on it. You will be able to create a toolbar from there. HTH
-
Takashi, If I open a MCX file and run the SaveVisable is still will not work. But if I add some geometry and then run SaveVisable it will. ???
-
Oh, also if I bring in an exsiting file it does not work either. If it would matter we are using Win 2000 Pro. I hope you get this because it would be very useful to us! Thanks!
-
What does work is if you create geomtry and then use SaveVisable (as IGES). When I convert it back in the visable level and geometry is there. What does not work is if you create geomerty, save it and then use SaveVisable (as IGES). When you convert it back in the level and discription is there but not the geometry. I don't understand how saving the file would keep this from working.
-
Ok, it seems that it does not work all of the time with different files. I can create a small MCX file with some simple geometry on a few levels and it works but, when I pull up a large MCX file with several levels and alot of geometry it does not work. ??? Let me work on this some more and see if I can find a pattern as to what is working and what is not.
-
Nope wait, I tried a different file and it worked! I am going to work with this some more.
