Leaderboard


Popular Content
Showing content with the highest reputation on 01/20/2020 in all areas
-
I typically use the groove roughing toolpath in cases like this and set "number of passes" to 1 If necessary you can lie to Mastercam. Draw the grove .001" wider or make the tool .001 narrower2 points
-
Do you happen to have a licensed copy of Mastercam to use? If you are a legitimate user, hooking up RS-232 isn't hard. First hint: you don't "hook up Mastercam" to COM3. Assuming that COM3 is indeed properly configured to communicate (and your cable is correctly wired), then you need some type of "Communications Program for DNC". Now it is true that Mastercam used to ship with the "Communications utility", back in the "Version 1-9 days", but it no longer does in 2018. What Mastercam 2018 does ship with; is a license of Cimco Edit V7 or V8. (I think V7), which does allow you to "send and receive files through DNC communications". You can setup the "machine 1" in the "setup" option, to use whatever COM port you want, and match the Parity, Data Bits, Stop Bits, Baud Rate, Handshaking, and so forth, so that you can communicate with your machine through DNC.1 point
-
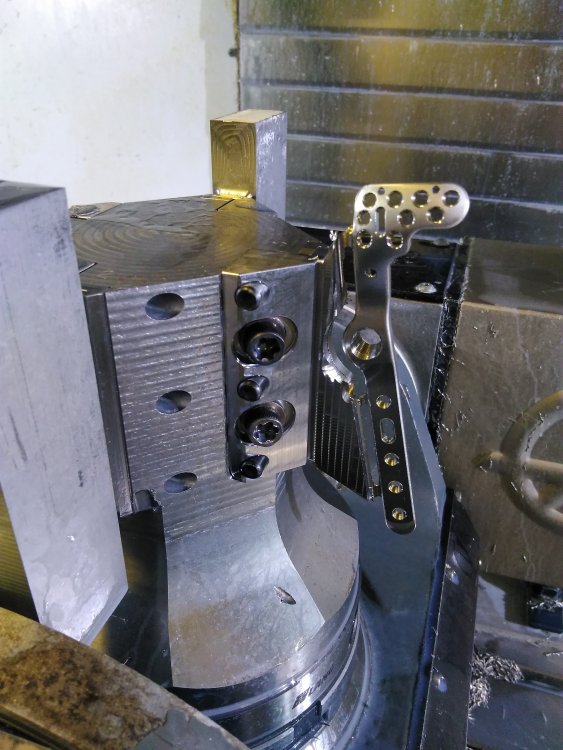
I would recommend downloading the free trial and testing. Yup. I was all excited that I got this bone plate programmed to a 1h 15m cycle time, and on the actual machine it took 1h 55m.
 1 point
 -
Hello all. I have finally taken some time to write a batch file to toggle my Mastercam.workspace file from Laptop Mode to Docking station mode, and vise versa. I have a 4k monitor so it was pretty much a requirement for me to do so. Plus I like to leave my planes and level manages on the other monitor to save space when in the dock, sick of having to redo it all the time. I am frequently in the dock and on the go multiple times a day. Anyway: Read through the batch file attached and decide if you want to use it or not. But basically it is just a toggle. It will save last exited workspace changes to the appropriate config, and then load the other config as the workspace file, flipping from one mode to the other. then you can launch the version of mastercam you have it setup for To setup (if you have a default install): update the user and mcamver variables in the batch file copy your Mastercam.workspace file and create two copies. Mastercam.lapspace and Mastercam.dockspace create an empty text file which indicates which config your Mastercam.workspace file is currently configured for: for laptop monitor create lapspace.ws for dockingstation dockspace.ws, the batch file simply checks for this file to keep track of which file is current so it knows which one to save... backup any Mastercam.workspace files you don't want to lose into a separate folder or under a backup name run batch file from any location, I keep on my desktop launch Mastercam If you don't care to press any key each time you hit the toggle and just want it to do it's thing and close, delete the pause on the line of the file. Feel free to provide feedback on or update with enhancements that would make this more useful. Toggle MCAM workspace.bat1 point
-
798 downloads
These files are intended for those who have purchased the Mastercam X7 Multiaxis Professional Courseware, available here. Files included: 4 - AXIS ROTARY TOOLPATH - AXIAL DAMPENING.MCX-7 4 - AXIS ROTARY TOOLPATH.MCX-7 4AXIS INDEX_A AXIS.MCX-7 5AX_ENGRAVING.MCX-7 AREA SETTINGS.MCX-7 AXIS SUBSTITUTION - CREATING A CONICAL HELIX DRAWING.MCX-7 AXIS SUBSTITUTION - CREATING A CONICAL HELIX.MCX-7 AXIS SUBSTITUTION - CREATING A CYLINDRICAL HELIX DRAWING.MCX-7 AXIS SUBSTITUTION - CREATING A CYLINDRICAL HELIX.MCX-7 AXIS SUBSTITUTION - ROLL THE GEOMETRY.MCX-7 AXIS SUBSTITUTION - ROTARY AXIS POSITIONING & TRANSFORM.MCX-7 AXIS SUBSTITUTION - UNROLL THE GEOMETRY.MCX-7 BARRELCAM DRAWING.MCX-7 BARRELCAM.MCX-7 CAMSHAFT.MCX-7 CURVE 5 AXIS CURVE TYPE 3D CURVES.MCX-7 CURVE 5 AXIS OUTPUT FORMAT.MCX-7 CURVE 5 AXIS REVIEW FILE.MCX-7 CURVE 5 AXIS TIP CONTROL.MCX-7 CURVE 5 AXIS TOOL AXIS CONTROL CHAIN.MCX-7 CURVE 5 AXIS TOOL AXIS CONTROL FROM POINT.MCX-7 CURVE 5 AXIS TOOL AXIS CONTROL LINES.MCX-7 CURVE 5 AXIS TOOL AXIS CONTROL PLANE.MCX-7 CURVE 5 AXIS TOOL AXIS CONTROL TO POINT.MCX-7 CURVE TYPE SURFACE EDGE ALL.MCX-7 CURVE TYPE SURFACE EDGE ONE.MCX-7 CURVE5 AXIS PROJECTION NORMAL TO SURFACE.MCX-7 CUT PATTERN 1- COLLISION CONTROL.MCX-7 CUT PATTERN 1.MCX-7 DRILL ENTITY POINTS.MCX-7 DRILL POINT _LINES TIP CONTROL ORIGINAL POINT.MCX-7 DRILL TOOL AXIS CONTROL PLANE.MCX-7 FLOW 5X-AXIS LIMITS.MCX-7 GOUGE CHECK.MCX-7 IMPELLER WITH TILTED CURVE.MCX-7 IMPELLER WITHOUT TILT CURVE.MCX-7 MOLD BOTTLE.MCX-7 MSURF CUT PATTERN SURFACE.MCX-7 PORT 5 AXIS.MCX-7 SORTING AND LINKING.MCX-7 SWARF 5 AXIS WALLS CHAINS.MCX-7 SWARF OUTPUT FORMAT 4 AXIS.MCX-7 SWARF OUTPUT FORMAT 5AXIS.MCX-7 SWARF TIP CONTROL LOWER RAIL.MCX-7 TOMBSTONE.MCX-7 TOOL AXIS CONTROL SIDE TILT.MCX-7 TURBINE BLADE.MCX-7 WORM GEAR .MCX-7Free1 point -
I usually take RS232 cable and hook it up my rear. It takes 3 farts to setup up a COM3 Port. The Baud rate is a little more complex for Mastercam 2018. You should contact your Mastercam Reseller for the exact sequence..0 points