


Aaron Eberhard
-
Posts
1,406 -
Joined
-
Last visited
-
Days Won
103
Content Type
Profiles
Forums
Downloads
Store
eMastercam Wiki
Blogs
Gallery
Events
Everything posted by Aaron Eberhard
-

Operation requires planar chain set ???
Aaron Eberhard replied to RandleXX's topic in Industrial Forum
Ah, yeah, you're doing complicated stuff there The only thing I could think of to do with a shape like that would be to create a surface on each individual shape (like, each pedal) using Surfaces > Power Surface. Then, convert that into a sheet body solid ( Solids > Solids from Surfaces). Finally, you can use Solids > Thicken or Model Prep > Push/Pull to make it thicker. Finally, you can boolean those away. But the real question is why do you need the solids removed? Just to learn how to do it? I'd toolpath directly off the wireframe you have in your image for actually cutting the part. -
Operation requires planar chain set ???
Aaron Eberhard replied to RandleXX's topic in Industrial Forum
This means that the chain (splines/lines/arcs) are not on a single plane. You have to have flat geometry to extrude a solid. The commands above have morphed into Wireframe > Project in the years since this was posted originally. If you're trying to wrap something around around a solid shape, you'll need to use Sweep instead of Extrude, though. Post up a file and someone can probably point you in the right direction. -
And the related feature, right click on a level and choose "select all entities" to select everything on that level
-
Axis Substitution posting in 1.16 degree increments
Aaron Eberhard replied to balnh's topic in Industrial Forum
I'll bet you could figure out the answer When you have a wireframe toolpath, you're handed the contour to follow. If that contour is an arc, you'll be handed an arc to follow. If it's a spline, you'll either have to fragment it based on tolerance, or, generate the toolpath then filter it back to an arc if you can . When you're handed a surface, you're not handed an arc. You have to fragment the surface based on the tolerance of the toolpath (just like a spline based Contour). You may be able to filter it back to an arc, but you may not. For example, here's an arc (black), and a duplicate of it that I used Spline From Curves (red) on. Notice the same exact Contour toolpath's vectors: That's what's happening in 3d if you use a Swept vs. (any) surfacing toolpath.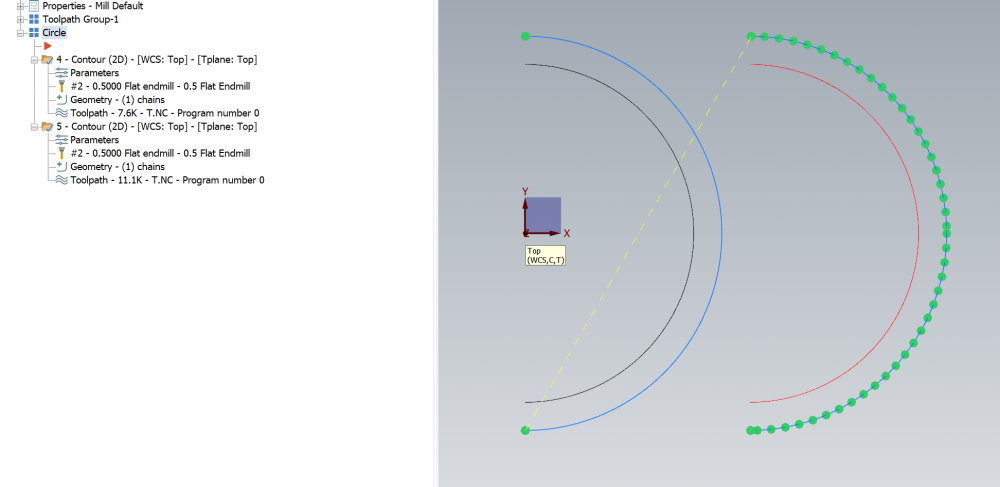
-
MachSim, CAMplete, Vericut // Cimco Probing, Productivity+
Aaron Eberhard replied to ikertx0's topic in Industrial Forum
Yep, you guys are correct on the Machsim/Postability integrated version. There is a reason for the confusion, as confusing as that is! MachSim (by MolduleWorks) has its own post processor (it has to, or else it couldn't figure out how to interpret moves from the CAM system). It's called MultiXPost (https://www.moduleworks.com/software-components/utilities/ppframework/) When you launch "Normal" Machine sim, it's using the MultiXPost to generate moves. As long as it "guesses" the same movements that your Mastercam post will make, you're good to go! If it doesn't guess correctly, though, you can be in for a surprise. An example would be that you're on a B/C machine, and MultiXPost guesses that your toolpath needs B90 C0, but, when you post out of Mastercam, it goes to B-90, C180. Both are valid solutions, but one could cause a problem and one could be fine. What the "add on" allows you to do is to swap out the MW Post Processor for the same MP post processor you'll use in Mastercam to generate the NC, so that the moves that are fed into MachSim are ran through the same engine that will write the code. That means, the X/Y/Z/A/B/C moves are calculated the same as they will be on your machine. You should always see the same B-90 C180 in both (to use my above example). The downside is that it's not simulating M codes, etc. If you have an m-code on your machine that causes the C axis to reset the counter or something, it won't see it. Probing? Won't see it. Tool changes? You guessed it. HPCC causing weird motion? You're not going to see it. You're only seeing what the toolpaths generate. The upside is that because it's not as complete (i.e., requiring a control model to simulate the control state) of a solution, it's a LOT cheaper, and because it's integrated, it's quite fast to check setups and motion. Your Mastercam reseller can give you a final price, but I believe for a "normal" 5 axis machine, it's somewhere in the $3-5k range. What I often tell people about a 5 axis toolpath: Backplot? 50% confidence that it'll run without crashing into something MachSim? 75% confidence MachSim w/ Post Integration: 95% To get to 100% confidence, you really need Vericut/NCSimul/CAMPlete/etc. -
It's kinda obscured through that link, JP. SmartUnfold - On the Mastercam.com website, go to Communities > 3rd Part Developers: https://my.mastercam.com/communities/3rd-party-developers/ You'll need to email them @ [email protected] for C++ info, I think, but # and .net has a decent bit of documentation up there. Beaten by Jake L
-
It should only be doing that if you right click on the last line of the toolpath, the one that if you left click, it back plots.. Does it do that anywhere else?
-
The middle mouse button is a keystroke like anything else, it's just in the background... Remote desktop will be using the local hardware's version of that keystroke, so if you have, say, a Logitech mouse with the Logitech software on your computer, but a 3d Connexion mouse with their software loaded on the other side, your Logitech keystoke isn't being received correctly by the 3d Connexion side. 1st thing I'd try is to remove any custom mouse drivers on your personal computer and see if that clears it up.
-
Controlling contact point in deburr toolpaths
Aaron Eberhard replied to JB7280's topic in Industrial Forum
That's what I'd do... And yeah, in any toolpath (in pretty much every general-use CAM system I'm aware of), it's only going to be using the mathematical model of the tool selected, and then only apply the custom profile after the fact for stock models/verification/etc. Otherwise the math driving the toolpaths would get REALLY complex really quickly! -
Controlling contact point in deburr toolpaths
Aaron Eberhard replied to JB7280's topic in Industrial Forum
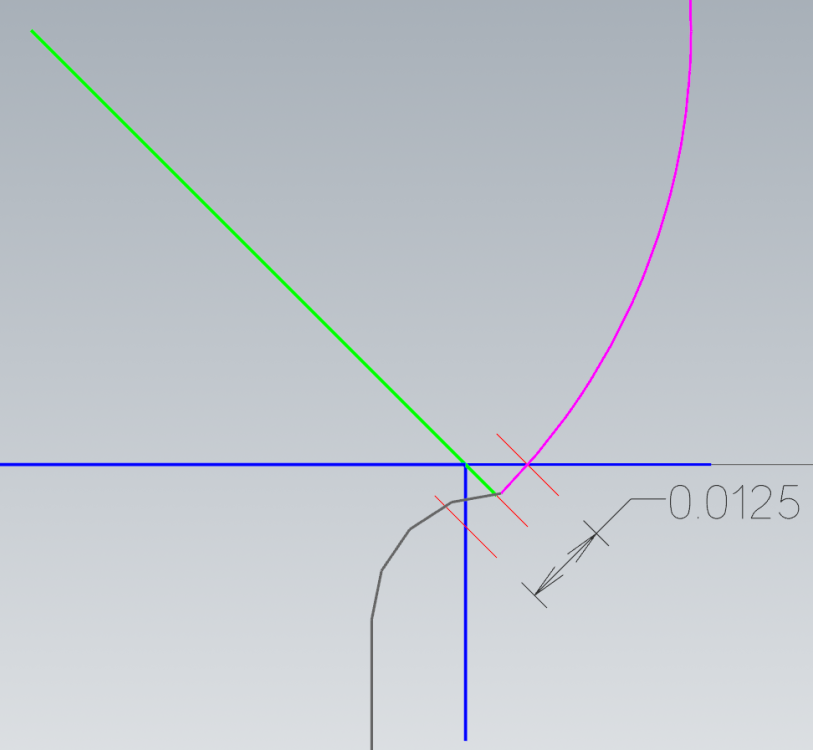
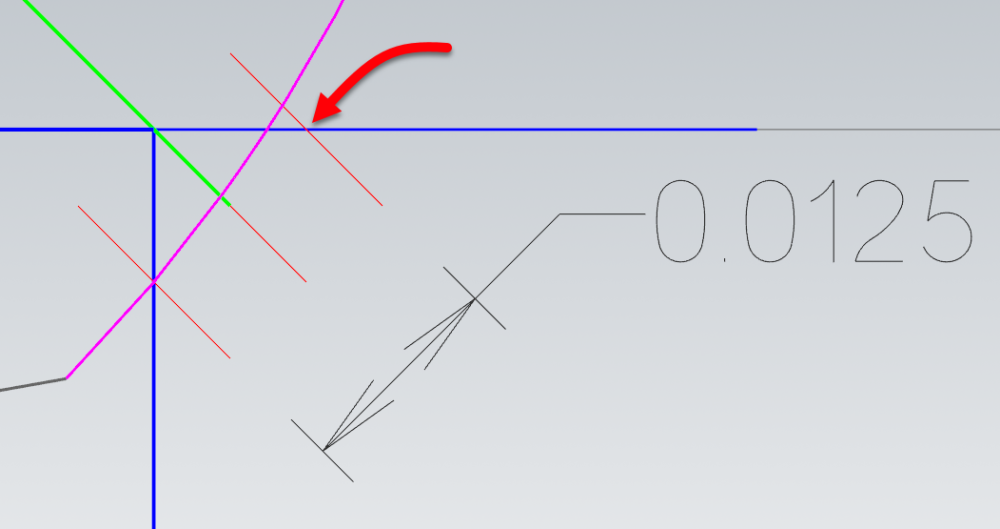
I couldn't get it to work, either. I'm guessing that it's something to do with the 3 axis engine driving it? I'd send it in to [email protected]. What you can do to make it work is to switch to 3+2. With this part, you still get 3 axis only output, but it will generate.. However, it's still cutting on the "no go" area behind the ball, just like it is when you set the cutting length longer. To be honest, though, with this cutter, I'm not sure what the desired results are in 3 axis. I mean, I know we want a perfect .0125" edge break cut like this: However, that requires the center of the ø.188 cutter to be perfectly 45° from the corner, tangent to the radius with that .0125 width. If we bring your tool profile over that, you get exactly what you see when you allow it to cut .17 length of cut, instead of .16 (remember that the toolpath will always calculate against a true ball, your custom profile is only for display/verification purposes): If you try to slide your tool down so it's not cutting with the back part of it, then it becomes impossible to maintain a constant width: I would expect it to work, though, with a constant depth (you'll have an uneven width on the two sides, of course), but that doesn't work either. I'd guess that this is an enhancement, that the algorithm team at ModuleWorks would have to handle specifically. I think you'll need to drive this one manually and report it for future improvements.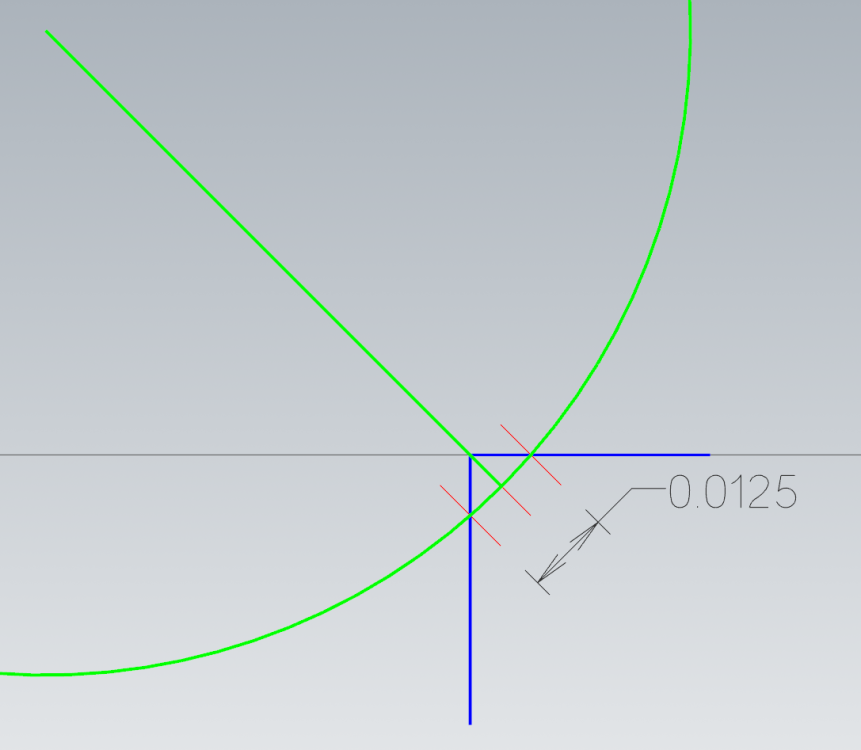
-
Controlling contact point in deburr toolpaths
Aaron Eberhard replied to JB7280's topic in Industrial Forum
Can you post a file? -
Memory Card Reader Fanuc 18I setup
Aaron Eberhard replied to Oppiz's topic in Machining, Tools, Cutting & Probing
Not that I can see. -
Memory Card Reader Fanuc 18I setup
Aaron Eberhard replied to Oppiz's topic in Machining, Tools, Cutting & Probing
No dice.. Same result, setting the input type to 4 gives me the "Card" option on the program bar, but when I view that, it says "insert memory card." -
more 5 axis bother
Aaron Eberhard replied to phill heward's topic in Machining, Tools, Cutting & Probing
Agreed, but generally the mindset that hasn't updated software in 12 years probably isn't the type to value the latest techniques and training -
more 5 axis bother
Aaron Eberhard replied to phill heward's topic in Machining, Tools, Cutting & Probing
Well, the offer is still on the table to do remote training if they'd like to pay for that like we talked about in Oct., just expect lots of cursing as I try to show you something that your software won't do for another 6 or 7 years But I'm guessing that the brass isn't exactly hip to spending money on training if the software is that far out of date. Sounds like people who don't understand that paying someone to struggle through something for 40 hours is not better than paying to have them trained so they can solve it quickly and save time every day... -
more 5 axis bother
Aaron Eberhard replied to phill heward's topic in Machining, Tools, Cutting & Probing
Yep, that's exactly what I was going for I can't even run X8.. The oldest I can run is 2019, because I'm on a software license. No, I meant In-House Solutions.. They're the Canadian reseller for Mastercam and the gracious host of emastercam.com. They still list X8 training materials on the website? https://www.emastercam.com/store/category/161-mastercam-x8/ -
more 5 axis bother
Aaron Eberhard replied to phill heward's topic in Machining, Tools, Cutting & Probing
Ah, yeah... There's going to be a lot of differences between X8 and now.. That's from 2012... A whole lotta differences. I'd imagine it's tough to find YouTube videos showing the older interfaces and such, too.. Maybe contact in-House and see if they still have a multiaxis training manual they can sell you from that version? -
more 5 axis bother
Aaron Eberhard replied to phill heward's topic in Machining, Tools, Cutting & Probing
Gotcha! To create a zip2go, go to File > Zip2Go. It'll create a mcam-content file that includes your post processor along with the file. Sounds like you want to either lock the toolpath to 4 axis, or at least Rotate Around Axis. Our generous hosts here have put their training materials out for free: You should still have my email address, right? Go ahead and email me the file. -
more 5 axis bother
Aaron Eberhard replied to phill heward's topic in Machining, Tools, Cutting & Probing
Were you hoping for continuous rotary action around the center of rotation? If I'm interpreting correctly, you're saying that it's moving the Y axis on the flats, and only rotating around the radiused corners? Can you post a Zip2Go? I'd be happy to take a look. -
You're welcome! Let me know if you need some training on the best practices when using the toolpath. There's a few of us here who do it, and it's a fairly involved toolpath.
-
Right off the hop, I'm guessing that's caused by a collision control strategy. Turn off your collision control and then see if it generates the complete pass.
-
Exception raised in Calculation 5axis Layering
Aaron Eberhard replied to FlintJer's topic in Industrial Forum
Welcome to the forum, any chance you can post a file? -
Memory Card Reader Fanuc 18I setup
Aaron Eberhard replied to Oppiz's topic in Machining, Tools, Cutting & Probing
Thanks Sir! I'll give 'em an order. -
Memory Card Reader Fanuc 18I setup
Aaron Eberhard replied to Oppiz's topic in Machining, Tools, Cutting & Probing
I thought I tried that, but it might have been a 256Mb.. It was the smallest I could find -
100% this! When I teach my multiaxis classes (just did one this morning), I always start with this: Why do you use Multiaxis toolpaths? #1 reason - it looks badass and it makes you look cooler when it comes time for the raise! You paid for the machine, use it all! #2 reason - to avoid hitting the part/machine/fixture. #3 reason - to use the shortest tool possible. I totally agree with Kyle that 90%+ is really just 3+2. And of the remaining 10%, 75% of THAT can be covered with the steps I show in the video above. It's that last 2.5% that can get REeeeeaaaalllll tricky, though Good luck on the interview!


