


Aaron Eberhard
-
Posts
1,415 -
Joined
-
Last visited
-
Days Won
103
Content Type
Profiles
Forums
Downloads
Store
eMastercam Wiki
Blogs
Gallery
Events
Everything posted by Aaron Eberhard
-
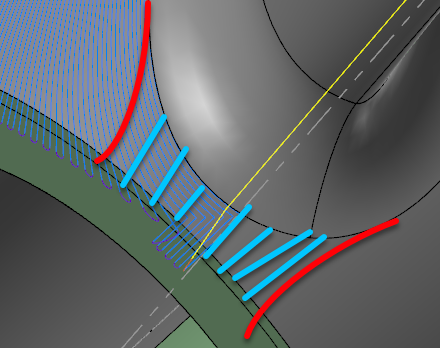
Take a look at this and see if it'll work better for you. I didn't have much time here between meetings with customers, but I slapped a Unified > Morph on it (Guides would give you approximately the same results). I turned on Smooth corners (so it doesn't do a 90° bend in the corners) and I also extended it. Also, I changed your linking to be a blend in small gaps, so it transitions nicely instead of "direct." The only other change is Op2 is the same as Op1, but I put on collision control for you so it won't gouge the blades.Sample - Unified.zip One other thing you can do is get fancy with trimming the "corners" to make the toolpath smoother, and then do a small toolpath in front of the impellers, something like this: I didn't have time to play that much and I didn't want to leave you hanging until this afternoon when I would have had a chance to do it.
- 9 replies
-
- 18
-

-

-
I'll try to take a look at this after some meetings this morning.
-
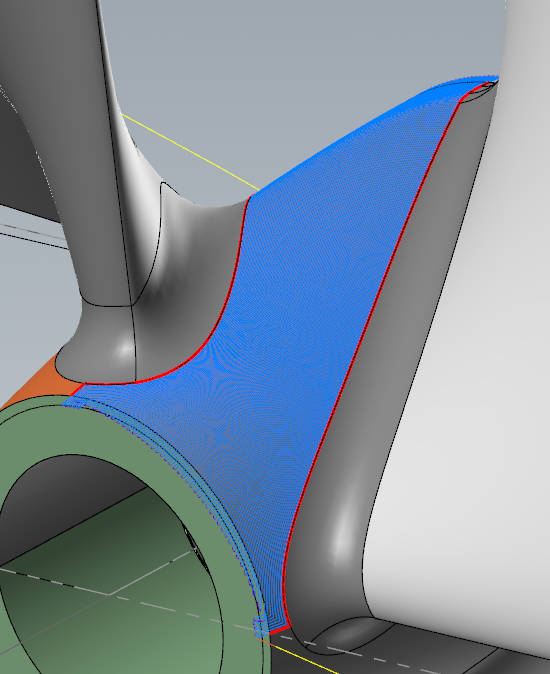
Also, what pattern are you really looking for? Do you want to do that entire hub area highlighted in the first pic? You'll have better luck doing each "side" of the blade as one toolpath, otherwise you're going to have a LOT of wasted time and a super-smooth polished look where you have to run over the area in front of the blade a bunch of times: In that case, I'd split the hub surface up into two.
-
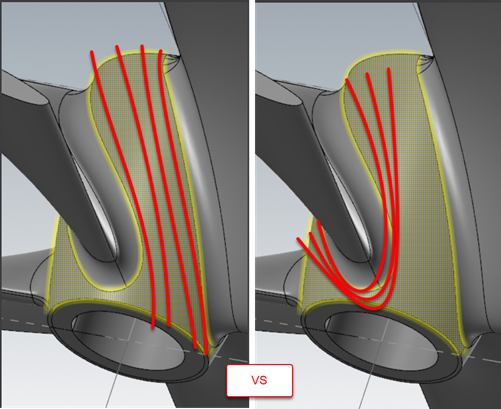
Just choose two curves in Unified and choose Morph as the pattern for it. Any chance you can post a file?
-
You're welcome, I'm happy to be a rubber duck https://en.wikipedia.org/wiki/Rubber_duck_debugging
-
With tool break detection, is it necessary to do it as a drill cycle? I mean, if you're okay with it happening as a standalone toolpath anyway, just do it as a manual entry. The big benefit to doing a custom drill cycle is it allows you transfer positional information to whatever you're trying to do (i.e., Probe at this XYZ), which seems unnecessary for a tool break cycle? Or am I missing something?
-
Dunno... It was just the most family appropriate thing that I'd expect them to be spamming. That whole crypo currency thing seems to be the midst of a collapse. It looks like you're not qualified to run a crypto company unless you have at least two felonies to your name nowadays
-
I dunno.. He seems legit. I'd buy bitcoin from him...
-

5 axis curve toolpath feed plane
Aaron Eberhard replied to Metals and materials's topic in Industrial Forum
Any chance you can post an example and we can help you directly? -
That's nifty. Someone had their thinking cap on that day.
-
The 3 axis engine is kinda equivalent to the old "quick" verify mode. It simplifies the calculation by not worrying about the sides/undercuts. I turn if off by default, as the quality isn't really high enough for me to do anything with, even on the rare occasion I do something that's only 3 axis.
-
mastercam x4 cant get passed startup tasks
Aaron Eberhard replied to gwstephens's topic in Industrial Forum
I remember that happening a few times during the X series when I was workin' the ol support hotline for Centroid. There was also the Intel series 22.xx of drivers that had problems with OpenGL. Could be that as well. Without knowing the video card, we'll never know -
mastercam x4 cant get passed startup tasks
Aaron Eberhard replied to gwstephens's topic in Industrial Forum
Also, the .config file Either way, I'm still betting on an nvidia driver issue. -
Awesome! You're gonna love it That's a great update I know that Titans of CNC has a really good sale on kennametal insert shell mills with inserts right now, you may want to look at grabbing some of those.
-
mastercam x4 cant get passed startup tasks
Aaron Eberhard replied to gwstephens's topic in Industrial Forum
Well, what's your computer specifications? -
To be fair, I haven't spent much time trying, but I don't believe you can cause the engraving toolpath to enter from the sides.. Can you share a file with what you're trying to accomplish?
-
mastercam x4 cant get passed startup tasks
Aaron Eberhard replied to gwstephens's topic in Industrial Forum
There was an series of Nvidia drivers that had a bad OpenGL implementation for some graphics cards a few years ago... Maybe windows helpfully installed one for you? What version driver and what video card are you using? -
Ah, crap, you're right. Thanks! I read too fast and didn't realize he was talking about a lathe.. I just saw the Z was .05" above the part
-
Is this just an incremental vs absolute (G90 vs. G91) thing?
-
How many machines do you program for?
Aaron Eberhard replied to Oakprogrammer's topic in Industrial Forum
Any that come through the door -
Oooh, good call. That's probably true! I guess I've always just made sure I was ordering BT40/30 vs. CAT40/30 pull studs, so I never quite paid attention to the thread pitch.
-
The only other differences I know of is a BT needs a longer pull stud than a CAT (it's something like 4mm shorter?), also, technically a CAT can have offset dogs (so that you can only input a tool one way, although I don't think anyone has been doing that for the last 20 years, though... But if so, you'll need another dog. Yeah, the tools themselves don't have to be stored in the machine. I just mean for programming & production purposes, that tool # is always in X assembly. Doesn't matter if it's being used in the Haas, a converted bridgeport, or the MAM. Eventually, when you get the point that you have a dedicated tool crib/assembly guy, you'll be able to order up a job worth of tools that are already mostly on the shelf.
-
Now's a good time to really plan out your common holders and order multiples so every machine in the shop gets to benefit from it. I.e., Tool #123 is always a ø.75 4FL .015R Endmill with .75 LOC and 1.25" stickout. Make that standard in the shop. Try to make it so every job can be programmed 75% from the standard library.
-
Excellent! Sounds like you'll be well prepared for success with this package! Glad to hear it's all specc'd out with all the goodies. I was just helping an Okuma customer that bought their machine a few years ago and "they only do 3+2." Until they didn't... Then we got to go through all the gyrations and learning curve teaching their guy how to do things old school without TCPC and such
-
I'll make the argument that you should check out shrink fit right now. It's the right time now that you're stepping up to a real machine. It solves so many problems that come from using collets, single points/weldons, etc such as runout, vibration, damping, rigidity, and on and on. Another good choice is the chuck system, like a RegoFix. I think Iscar calls theirs the CamFix? Any of these modern solutions are so much more rigid that an ER Collet system, you're really doing yourself a disservice by not having one. I don't know how they are for availability down in TX, but up here a lot of people use MST tool holders (https://www.mst-corp.co.jp/en/). I know they're decently cheaper than Haimer (as GCode said, that's not exactly hard to do...), but they're also really modular. You can mix and match holders, extensions, etc. They are all shrink, though, so you'll be in for the cost of a shrink setup. Speaking of, I know a lot of people I know have gotten good value from the Haas shrink setup, btw.. I think it's $7k all in or something? Agreed with Gcode that Big Daishowa (previously Big Kaiser) is always a correct choice. Also, don't forget that when you buy a new machine, the big tooling companies (Sandvik, Kennametal, Iscar, etc.) will throw you a massive discount based on a % of the cost of the machine. All of them offer great tool holders, at least for the "normal" stuff, so take advantage of that. Other considerations as you evaluate these, make sure you're getting the holders setup for thru-tool coolant, so you don't have to hunt around for that later. ---------- I love MAMs. They're great! One thing to make sure of right now is that you're getting it setup to do simultaneous multiaxis work (DWO/TCP/TCPC/WSEC, etc.). As soon as you realize how useful it really is you'll find yourself using it a lot more and you don't want to hamstring yourself right out of the gate by not getting those options unlocked. If you ever need a hand programming that sort of thing, don't hesitate to reach out!
