


Aaron Eberhard
-
Posts
1,406 -
Joined
-
Last visited
-
Days Won
103
Content Type
Profiles
Forums
Downloads
Store
eMastercam Wiki
Blogs
Gallery
Events
Everything posted by Aaron Eberhard
-
Instead of doing a single pass, make either concentric passes with the most amount of engagement you want (Knowing you'll cut air on one half), or do a spiral towards it.
-

Best Extended Reach Tools for Milling?
Aaron Eberhard replied to [email protected]'s topic in Industrial Forum
Hah, I tried that with two customers that were hemming and hawing about paying for training after you and I talked about it... Both of them decided that it seemed like a more profitable bet to just pay me for X days of training. I was disappointed. But like you and I talked about, it's hard to trust that they'd actually pay out anyway. -
Tool Manager - Sorting Column Options
Aaron Eberhard replied to SuperHoneyBadger's topic in Industrial Forum
If you can't swing Vericut, at least talk to your reseller about getting your posts hooked up to machsim in Mastercam. It's a fraction of the price for 98+% of the capability. What it won't do is help with custom M-codes, process optimizations, etc., but you'll at least be able to trust the motion you're seeing in there! Otherwise, it depends on your work. If you're doing mold/electrode making and you don't have a copy of MoldPlus, you're doing yourself a big disservice. Verisurf is a great product for CMMing & verification, but I really like them for reverse engineering. Their free add on tools (Thanks Ernie!) are great little time savers if you use those sort of functions often. Honestly, some of the best money spent, though, establishing processes and procedures that reduce duplication. That could be a custom solution to solve a repetitive project that only your (or very few) companies need a solution for. In that case, talking to someone like our very own Byte might make sense (TheeByte) to create a custom solution to your specific problem. Most often, it's the little things that make life better. Working through creating a tool and ops library will save you 10s-100s of thousands of dollars a year in redundancy. Every time you're creating a 1/4-20 hole, you should be importing/exporting operations and just assigning geometry, for example. If you're starting from scratch defining a tool, looking up previous feeds/speeds/etc., you're wasting 20+ minutes that should be handled in 20 seconds. Creating a process & procedure template file that already has all of your company's levels/colors/fixtures/etc. will save you 20 minutes every time you start a new job. Side effects are that it makes things go smoother on the floor and significantly easier to on-board a new person. If you don't know how to leverage all that and really get to focus on the fun programming, final plug goes to Ron (https://5thaxisprogramming.com/) or (even more shameless plug) myself (https://vector-mfg.com/) as a sherpa that help you on the way. -
Best Extended Reach Tools for Milling?
Aaron Eberhard replied to [email protected]'s topic in Industrial Forum
Gotcha. Yeah, that's certainly a problem. Like Leon, I'd recommend going for a small enough contact patch (flute/insert length), and a shallow enough stepover that the individual scallop characteristics aren't a problem for you. In a real bind, go for finishing switch to something like a full radius-slot cutter/lollipop so you're using a ball to side-mill and then at least you have even & round scallops to deal with which makes getting a consistent surface finish easier. Another thing to note for anyone else reading this, is if you use HSM advisor, it will tell you pretty accurately what deflection is for long tools: This is a .625" endmill sticking out 6.0" taking a .005" cut in 1018 steel for example. I've used this to pre-adjust when my tolerances were +-.0005" and hit it pretty well, but I wouldn't trust it down to the tenth due to physics and the nature of reality However, that doesn't help if you're using modular tooling because it's not a consistent deflection, and a lot of times it's not so much deflection as chatter that you're fighting, which is why the Sandvik silent tools are so amazing for their damping characteristics.
- 37 replies
-
- 2
-

-
- long reach
- extended reach
- (and 1 more)
-
Best Extended Reach Tools for Milling?
Aaron Eberhard replied to [email protected]'s topic in Industrial Forum
Yep. Sometimes there's no replacement for just figurrin' stuffs out... -
Best Extended Reach Tools for Milling?
Aaron Eberhard replied to [email protected]'s topic in Industrial Forum
Sorry JB, I missed this! The trick is, of course, that you have to compensate for deflection on your wear. The best way I've found to do that is to simulate the real world by actually cutting a part to a known dimension a few times, so you can figure out how much to take, then, do a semi-finish leaving exactly that amount to best of your abilities. It doesn't have to be a big part, generally, a bore in a 1" thk plate is often more than enough. What you need to figure out is that you need to leave, say, .005 for enough chip load to get a good finish, BUT, if you take a .005 deep cut, your tool will deflect .0003. That means that you need to offset your wear comp to add in that .0003 in one go. Now, if the deflection is going to change because of thin-wall characteristics of the part. Say you have a flange at the top (adding rigidity), and a solid floor, but a mostly unsupported middle section, then I recommend popping off to the bar to think about your life's choices that lead you to being in this situation... And figure out a way to brace the middle section with a temporary flange or something that keeps it stable.- 37 replies
-
- 4
-
-

-
- long reach
- extended reach
- (and 1 more)
-
You're gonna like it. I've done all sorts of crazy things with it. That and using Unfied > Wireframe > Project (used to be Project Curves in pre-2020).
-
Tool Manager - Sorting Column Options
Aaron Eberhard replied to SuperHoneyBadger's topic in Industrial Forum
Like Ron, I use VarcoReports. I considered that essential. As I told Jim (Varco), it was the 3rd thing I bought when I set up my company, after getting my Mastercam Partnership agreement in place. -
Yes, people like Ron and I are contract programmers who do stuff like this all the time. Training/programming/being onsite for first article/etc., is all part of the gig Heckuva first part to start with... Most people start with a CAM system by engraving their name on a square. I appreciate that you're jumping into 5 axis! That's how I started, although mine was with cylinder head porting.
-
It's even easier if you have the multiaxis package. You can do a lot with Convert to 5 Axis, even if you leave it locked to 3 axis!. Set up your dynamic/opti toolpath(s) on the bottom plane, then, on the top plane, create a Convert to 5 Axis. That'll take care of all of your linking and everything as well.
-
Generally I go for 25% of whatever stock I'm leaving, unless I have a specific reason not to. For example, if I'm leaving .020", I'll set the initial shape and path tolerance .005ish. The tool shape will affect the size & processing time the most, but I generally don't go too course with that, especially if you're using ball or bull nose tools, as you can get a lot of cusps and things hanging out that won't really be there. Again, initial roughing paths, probably .003ish? Then I tighten up as I get closer to finish paths.
-
The only time I ever run across that is when using Verify > Save STL with too low of a tolerance, but I haven't done that in many, many moons.
-
My guess is because your stock is hollow, so after the first pass it's free to move through it: If you go back to OP18 and right click > Mill Toolpaths > Convert Stock to Mesh, then, edit Op #19 and choose that mesh instead of the one you have chosen, you'll get this result: Edit > Looks like you figured it out by the time I got 2023 fired up
-
Force tool change not working correctly?
Aaron Eberhard replied to Radical1's topic in Industrial Forum
No idea. I can replicate it. If you put a Contour or something that uses the more modern interface, it works correctly. I'd send it into [email protected] or via your reseller. -
I often toss the dxf or solid on my other monitor and slap the drafting dimensions on it. it takes about the same amount of time as cleaning up the geometry, and then I can make a geometrically simple model instead of dealing with whatever fillets or weird shapes I sometimes find in MFG models. 6 of one, 1/2 dozen of another...
-
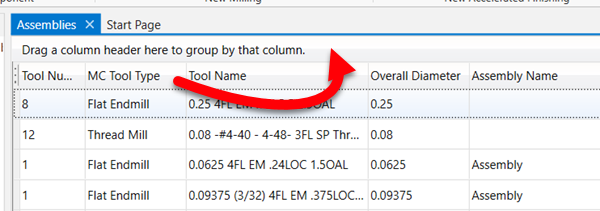
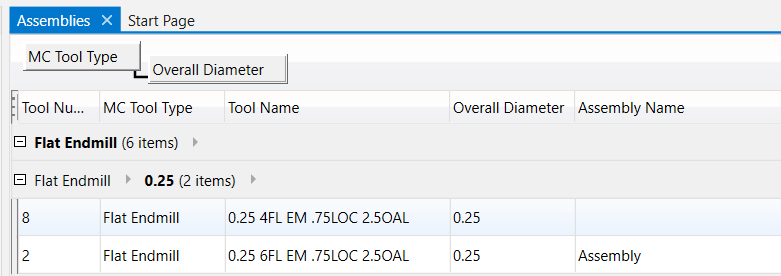
Drag and drop the column header to where it says "Drag a column header here to group by that column". You can do it multiple times:
-
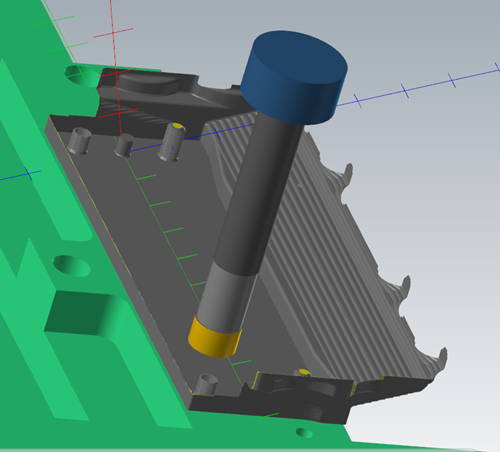
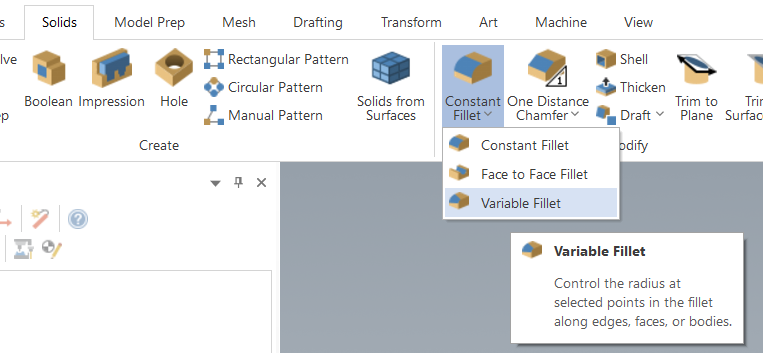
I'd do the larger "Corner" ones first, then the lower ones. Both might need to be Variable:
-
Using ribbon hotkeys makes MC sluggish
Aaron Eberhard replied to cbarton's topic in Industrial Forum
The best bet is to email [email protected] with a repeatable set of steps to reproduce the problem. -
Milling on Okuma LB3000 EXII using Mastercam code
Aaron Eberhard replied to Minus 40's topic in Industrial Forum
Seriously?! Who integrates anything onto a CNC and doesn't give you an M code to drive it? -
That's how I do it, except I have my "Vector Manufacturing" folder with my tools, and I make a tool library for all of my customers that contains the tools they have. Management is a bit of an issue, but I like knowing that I can trust they already have a tool I've used before with them. I also make a separate tool library for holders if that's prudent, for example, if I'm tooling up a big job that I know we're using SST or Haimer or whatever, I'll make a Haimer HSK-63A tool library that I can then always reference when programming with those holders. A lot of people don't know that you can open two tool libraries in the Manager and then drag and drop into assemblies directly from another library.
-
Milling on Okuma LB3000 EXII using Mastercam code
Aaron Eberhard replied to Minus 40's topic in Industrial Forum
Whenever you feel bad about buying Fanuc options, remember there's a poor Okuma guy somewhere who didn't get negative tool comp.... -
My favorite is when the alloy of this order isn't exactly the same, so all of that painstaking work you did optimizing the cut times on the first lot of material when you first ran the job no longer applies, and your tool life is like 50% of what it was previously!
-
Thanks! I was joking above, but I believe you're the first subscriber I just created this channel a week or two ago, as a friend was running into trouble figuring out an old Robodrill they bought. I figured I'd document my adventures in mine. Mastercam help seemed like it fit as well.
-
Sorry about the delay, I just now got a chance to play with it. Here's a video showing how I did it: I feel like I should put a Like and Subscribe and a Patreon plug in there
- 23 replies
-
- 11
-
-

-
Ah, that's unfortunate. Good on you for trying it, though!
