Patriot
-
Posts
55 -
Joined
-
Last visited
Content Type
Profiles
Forums
Downloads
Store
eMastercam Wiki
Blogs
Gallery
Events
Everything posted by Patriot
-
I see. Thanks for that run-down! That's actually very helpful as I've spent some time trying to search the internet to see exactly what they were for and only found little info until it started becoming a waste of time.
-
Yes, I tested a CIMCO post. I'd be all for building one from scratch, if I knew which default file to start with. I've done one for HAAS 3 and 4 axis, as well as a 3axis mori-seiki, and Okuma, and a 4axis toshiba. However; it's always been a bunch of small tweaks. I'm still relatively new with editing posts. I haven't quite figured out how to create Machine+Control def files, nor have I had the time to learn. It would just be more efficient for this company to purchase one this time. We also just don't want to be locked into a post that we can't even update with mcams update wizard...
-
Kidding , I know how much that ruffles feathers around here.. Anyway, We are looking to purchase a post for our new MORI-SEIKI NLX2500SY. We tried out a temp but i'm not a fan of it since that temp required a DLL, CP6, ACC, PST, and PSB file. I'm not too knowledgeable on why the CP6, ACC and DLL were required, but I know I couldn't update them with the mcam update wizard. I've been apart of a purchase a couple times before and the only files needed were the PST and PSB. Since mcam is releasing new versions more frequently, we need something that we can update and make small modifications ourself. Let me know your thoughts, or point me in the right direction. Thanks
-
I learned to solve the problem the same way you just did. I would run into your issues, and changed the way I did things a few years back.
-
If you use a circle geometry, the circle mill tool path will automatically use that size, just like contour automatically going to it's size. If you click points, you can decide what hole size you want without having to use stock leave to get a desired size, if you're testing and customizing hole sizes. The best part about circle mill now is it spiral opens up the hole, so you can "dynamic" style open a hole with a continuous full-depth cut. -not just plunging straight into the material to step to open to the next cut with multi-pass. Also being able to dictate the arc size for the helical entry comes in handy! I forgot to add, you can have the tool start in the center of a hole with one click, as if you are milling a counterbore for a hole. No ramping in, just straight to depth, then open the hole up with the side of the tool instead of the tip.
-
You're not alone here. I have these exact same issues. X7 and X8 were working great for me. I love some of the new features, just not finding new work-arounds.
-

Tool info display in Toolpath Parameters and Tool Manager
Patriot replied to Patriot's topic in Industrial Forum
What could be the problem is if your tools are already linked with a holder. If that's the case, it's now an assembly, so you'll need that checked or both. -
Tool info display in Toolpath Parameters and Tool Manager
Patriot replied to Patriot's topic in Industrial Forum
hah clever. lol Thanks for the info! -
Tool info display in Toolpath Parameters and Tool Manager
Patriot replied to Patriot's topic in Industrial Forum
Got it. I had dragged the columns to where I wanted and re-sized them. I think I was collapsing those two I didn't want to see. Will these stay? I see they have been, even through closing mastercam, but want to make sure they don't reset... -
Tool info display in Toolpath Parameters and Tool Manager
Patriot posted a topic in Industrial Forum
Is there a way I can organize how my tools are displayed in mastercam and have it saved? It seems it will hold the settings every once in a while and i have no idea what I did. Basically, I don't want to see the "Holder Name" or "Assembly Name" and want things sized differently so I can read all the info I desire on the tools. This is in X7 btw... -
X7 Cannot find Parasolid data in Solidworks file error
Patriot replied to Darin's topic in Industrial Forum
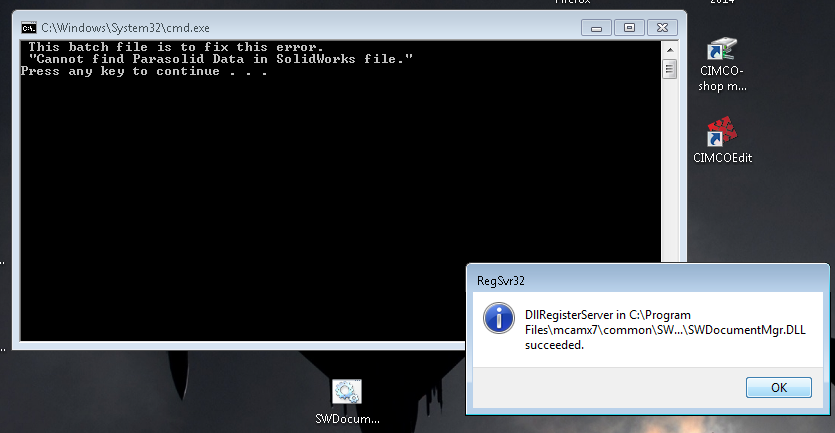
Maybe I'm not getting the full batch file? It says it's 1kb.. Is that correct? -
if you turn your lead in/out off it will get rid of that. it is caused by the lead in/out direction you have set. Or just use the vector direction so everytime the tool comes off the part, if goes in the same direction. You could also change your check stock and add the entire area around the part. That may help as well. There are a few other methods or surfacing toolpaths you could try before the last resort- Save toolpath as geometry in backplot, modify lines not wanted, run a contour toolpath on what's left
-
X7 Cannot find Parasolid data in Solidworks file error
Patriot replied to Darin's topic in Industrial Forum
Ok, so it's an IT issue? So what was happening was, as of yesterday and this morning, I only had X7. I was planning on updating to X8 today. I tried running that batch file and it didn't fix it yesterday, nor today. So I gave up for a few minutes today and updated to X8, partially wondering if it would be fixed on this computer. The update went perfect, except I still can't open SLDPRT files. Do I not have all the right administrative privilages? -
X7 Cannot find Parasolid data in Solidworks file error
Patriot replied to Darin's topic in Industrial Forum
SW2014 and yes X7. however, I'm having the same issues with X8 as well. -
X7 Cannot find Parasolid data in Solidworks file error
Patriot replied to Darin's topic in Industrial Forum
I run the SWDocumentMgr file as administrator as directed and get this popup. After clicking enter, I get another "Press any key to continue." Once I do that, the batch file closes. I try to open a Sldprt file once again, but get the same error "Cannot find Parasolid...." What gives? Any solutions?
-
Is X8 still available to download?? All i'm seeing is the updates or the Spanish version...
-
I'm working for a new company and having the OP's issues as well. Tried his solution to no avail. Any suggestions or solutions? FYI I've been using X7 since it came out and never had this issue at the previous place I worked. However; I am now on a 32bit system instead of 64, for the time being. Has me wondering if it's a machine def issue, or computer issue.. Also, it's a couple basic 3axis contour tool paths on straight lines.
-
I would 3 axis tool path it, then rotate 180 and hit the bottom wcs side. Try a surface blend. You can take two wires, driven off of the profile as viewed from your top WCS. (the large arc, and the small one, -that may come from a silhouette boundary from that surface) You just have to offset those wires half the distance of your tool, and your tool will blend from one(the first one chosen) to the other, with the given step-over distance you choose. Hope this helps!
-
Hey iceman, can you draw up some type of example for me?
-
Does anyone have this trunion modeled up, that wouldn't mind sending it along my way or to the FTP? I can't find any already in there, but in all fairness, it can be hard navigating through all the files there.. It would save me a bit of time. Thanks! X5 or earlier file if so
-
Thanks JParis. Looks like that's what I'll be going with
-
I am currently using shared working directories for machine definitions and tool libraries, but I want to use my own default tool path settings. I can't figure out which setting actually changes this and lets me use my own settings, since the default ones we are using always have things to be changed everytime and the one in charge made the default file a read only. I can't save my settings because of the read only, and he does not like others changing anything... :-/ So, can I keep the same machine definitions and everything as them, but pull my tool path defaults from my own file? And how? X5MU1
-
I am currently using shared working directories for machine definitions and tool libraries, but I want to use my own default tool path settings. I can't figure out which setting actually changes this and lets me use my own settings, since the default ones we are using always have things to be changed everytime the default file a read only... :-/ So, can I keep the same machine definitions and everything as them, but pull my tool path defaults from my own file? And how?
-
How do I assign a view that I've rotated to
Patriot replied to powerfulp's topic in Industrial Forum
Is the new view the same as one of the default views? If so, it would show your construction and tool planes clicked to that view in your WCS view manager after you clicked planes->Planes=gview -
How do I assign a view that I've rotated to
Patriot replied to powerfulp's topic in Industrial Forum
Planes (near bottom right of screen) Planes = Gview Enter desired view name.