All Activity
- Yesterday
-
 riotsNwrenches joined the community
 -
 grant1962 joined the community
 -
 same joined the community
 -
 Michael Preiss joined the community
 -
Dang Scott. Sorry to read this and hopefully everything works out for the better
-

Question regarding G43.4 behavior with fanuc controls.
crazy^millman replied to thatonegii's topic in Industrial Forum
That is because that builder doesn't work closely enough with Fanuc to use the control the best way. Going through this very dance with a customer now and a builder. Now people blame the Fanuc control for not being like XYZ when the builder is not implementing the control to do what it is meant to do. -

Question regarding G43.4 behavior with fanuc controls.
thatonegii replied to thatonegii's topic in Industrial Forum
I assume the parameter you are referring to controls whether G43.4 activation triggers movement or just a shift in coordinate system, if so, the machine is configured for shift and not move. With our post setup most rotation changes should be occurring at a safety plane above the part and all programs are ran through vericut before running on the machine. Thanks for the sanity check. -
 Kai Johnson joined the community
 -
Best of luck Scott and I second what Riverhunter said. I've been in that spot before and landed one of the best jobs I had shortly afterwards.
-

Question regarding G43.4 behavior with fanuc controls.
cncappsjames replied to thatonegii's topic in Industrial Forum
To the best of my knowledge there's no requirement for activating G43.4 when the rotary axes are home. You want to make sure the parameters for activation/deactivation are set for "shift" instead of "move". The only issues coming to mind with activation are depending on the positioning need it could present collision opportunities if you're not far enough away from the part on the reposition. -
Question regarding G43.4 behavior with fanuc controls.
thatonegii posted a topic in Industrial Forum
Hope I am in the right sub-section of this form to ask this question, my apologies if not. I am curious about the behavior of G43.4 on head-head 5-axis mills with Fanuc 31i controllers. According to the documentation from our machine builder as well as from what I recall reading in Fanuc's documentation the machine must be orientated at A0. C0. prior to activating G43.4 and the machine should be at A0. C0. before cancelling G43.4. This is not how I have approached utilizing TCPC in the past with our other machining centers. We typically use G43.4 to transition in and out of orientation for tilted working plane so we may be activating G43.4 while both tilt and rotary are not in home position. So far, this strategy has been successful on our first Fanuc equipped 5-axis machining center. We have experienced issues with G43.4 causing collisions when hand loading tools and manually manipulating the A-axis 90 degrees and back immediately prior to reading G43.4, but other than that have had no problems with this approach. The documentation for our newest Fanuc equipped 5-axis machine states pretty explicitly in the post building instructions that the tilt and rotary must be at home position prior to activation of G43.4. I questioned the Applications engineer on this while they were here during installation and they stated that we shouldn't have any issues activating G43.4 when not in home position and so far I haven't experienced any issues but would like to make sure I'm not missing anything that may cause expensive issues in the future. -
 ProfClaudio joined the community
 -
We're a DMGMORI TC office that is also a Mastercam reseller. No issues programming/posting using Mastercam. Dozens of those FD duoblocks in our area alone. Like with any 5-axis machine...I strongly recommend Vericut as it is well above anything that machsim can provide. To add, Hypermill is nice and all, but overcomplicates pretty much everything. Had a customer whack brand new relatively simple HMC machine because of a bad post. Another sample would be Heidenhain factory apps couldn't figure out the code posted by hypermill....just whacky....but you can do some nice parts with it if the support/training is there. jm2c
-
maybe same approach as turning a square block on a lathe? https://youtu.be/PqsOgGhIsPg?si=OADe17WhWMucKfbw
-
 Bryan S joined the community
 -
-
 Joop joined the community
 -
 gch joined the community
 -
Hello, I am trying to figure out how, given a sketch (planar wireframe), to obtain all its profiles - meaning all areas enclosed by curves. For those familiar with Fusion 360, this would just amount to calling the API method: sketch.profiles() Is there a way to achieve the equivalent via CHooks? To illustrate with an example, the profiles (areas enclosed by curves) would be the numbered regions in this image:
-
Buffers needs to become your friend. Maybe the new tool table process is robust enough to do it, but not familiar enough with it to give a method. Hopefully someone with the knowledge of the new tool table variables and process will answer with a method if it is possible, Issue I see if it that tool is used in 120 different operation 10 different times in the program what is the tool list going to look like? Where does the tool table sort out the needed information you are looking for? You list 2 times, but in post development the 10 times with 120 different operations has to also be considered in developing the logic to output what you are asking. Look at mill.set and mill2.set if you want to see the logic used in to support the newer tool table outputs. # CNC 01/30/20 - (23.82) Revised operation type logic to use tool_op$ # CNC 01/11/21 - (24.82) Initial post update for Mastercam 2022 # CNC 04/25/22 - (25.82) Initial post update for Mastercam 2023 # CNC 01/23/23 - (26.82) Initial post update for Mastercam 2024 # CNC 02/17/23 - (26.83) Updated tool_op$ values for process hole operation As you can see the logic has only been accessible to us common folk since 1/31/2020.
-
What about roto broach?
-
 I am using a generic Okuma OSP 4x post. Is there a way to have it output the operations into the tool table not just the tool list? Example, 2 tools get used twice. I would like it show in the list (in order), because I have it outputting N numbers in the tool table to show the operators the restart codes for each operation.
 -
 Hugo Mendez joined the community
 - Last week
-
right click the exe install file and chose "Run as Administrator" ??? that's all I've got.. your only other option is to get whoever has this machine locked that tight to unlock it. Even if you got Mastercam to install it will NEVER run properly with these restrictions in effect I believe there may be controlled folder access on the C:\Users\Public\Documents\ and C:\Users\**username**\documents folders which I CANT change unfortunately
-
To answer your questions, I am not configuring anything with the install and I do have full admin rights on my machine. I believe there may be controlled folder access on the C:\Users\Public\Documents\ and C:\Users\**username**\documents folders which I CANT change unfortunately. Any possible workarounds for this? Thanks
-
You should be seeing a " My Mastercam" folder here "C:\Users\Public\Documents\Shared Mastercam 2024" and here "C:\Users\*** your username here ***\Documents\My Mastercam 2024" If you are not, something really squirrely is going on with your install Are you trying to install in a non standard location?? Do you have full admin rights to the machine??
-
Yeah, I have uninstalled Mastercam 2024 and reinstalled it, only location I am seeing any Mastercam files are C:\program files\ under the name of "mcam"
-

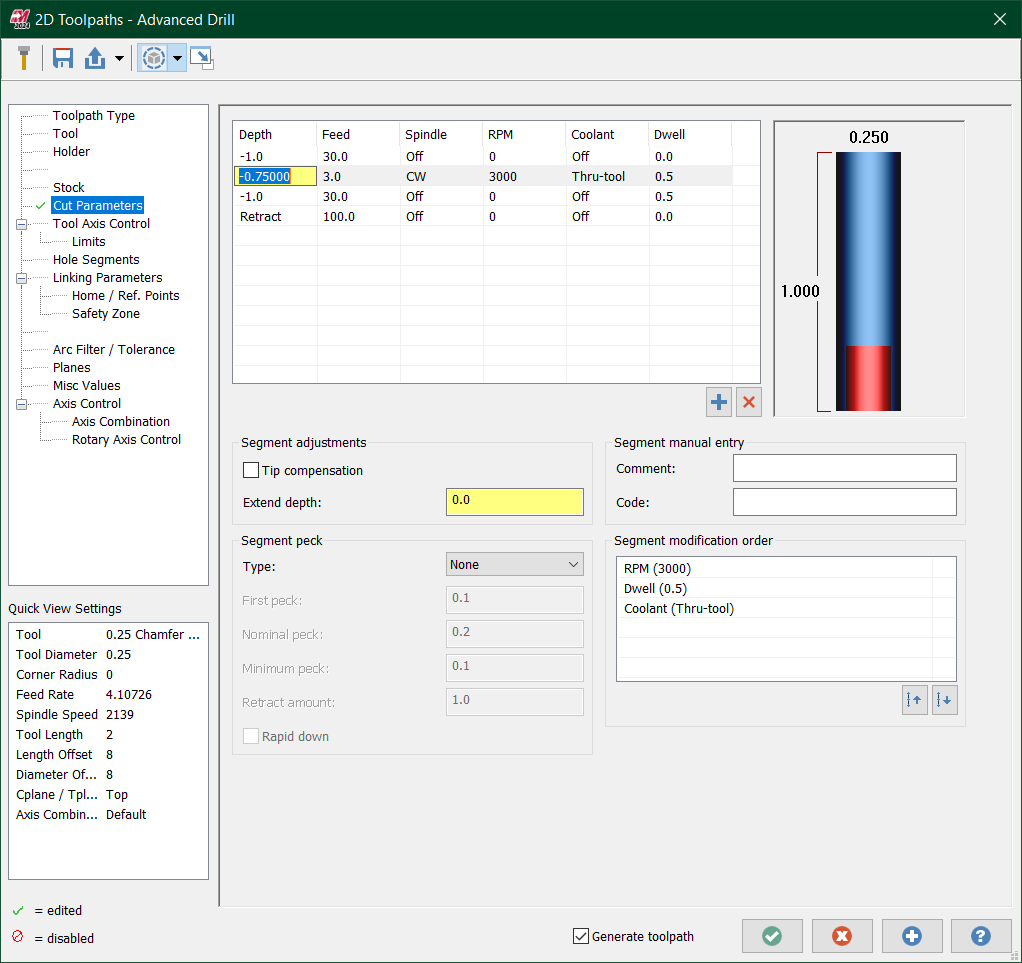
reverse counterbore drill cycle?
Aaron Eberhard replied to MetalSlinger5's topic in Industrial Forum
This is the easy way Obviously, you'd need to tweak the depths, dwells, etc. for your situation. That'll feed down to -1.0" below whatever point/arc you selected, then turn on the spindle, dwell for .5s, turn on the coolant and move up to -.75" below the point. Back down to -1.0", turn everything off, then retract.
-
Fiss!
-
That's a bummer. Hopefully new doors will open to a brighter future! Good luck!
-
Scott sorry to read this and wish you the best.
-
Hey guys, I know I haven't been around much lately, but I wanted to thank everyone who has helped me over the years with questions and trouble shooting. Sadly, my company is so tied to the automotive industry which has been hamstrung, as you probably know, by the unwanted Green Initiative. Not trying to be political on the Industrial Forum, but it is our reality. June 30th will be the last day, though each department will be shut down as the work is completed there. I wish each of you the best. It's too bad I never had the chance to meet any of you in person. Now that I'm being forced to uproot (though I hope to be offered a position in our machine shop division for the moment) I'm still hoping for the outside chance of using my ministry degree. Some of you may remember my wife had some pretty extreme mental health issues, and I was asked to write a book about how I walked with her thru all that using attachment theory concepts. Unfortunately, the book became a victim of the ugly culture wars and so the publisher canceled the agreement he had with me, but it was a good exercise anyway and people around the world have downloaded the free copy I have on the blog I used to run. Anyway...good luck! Scott Huguenin Galion, Ohio
-
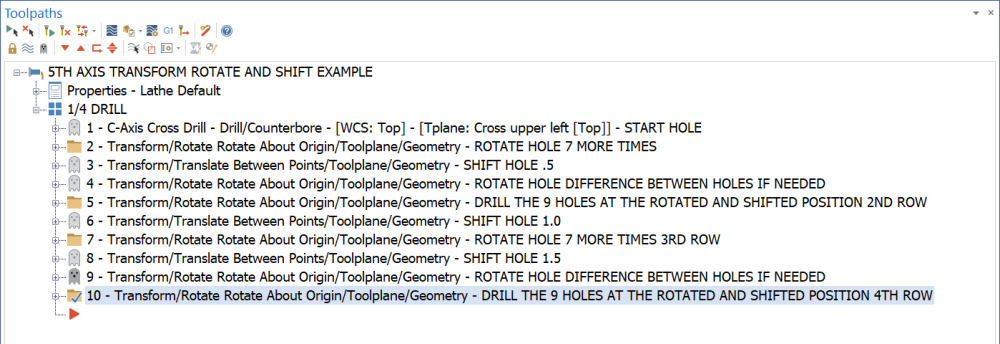
Program the one hole. Use Toolpath Transform/Rotate the hole the 7 more times using copy source disable posting. Use Transform to move the distance for the next row of holes. Then Transform Rotate the one hole the 40 degrees again using copy source and disable posting. I have attached a file that shows how powerful transform can be when used in certain ways. With one hole I can program as many different shifts and rotations as needed. Beauty of this method is one change to speeds and feeds or any settings and every hole is changed. Copy the different transforms as needed and the other thing is you can control rotation direction to not keep going in the same direction with the rotary. Use what you need from the example hope that helps you and others to get a better understanding of TRANSFORM. 5TH AXIS TRANSFORM ROTATE EXAMPLE
-
Sure here is an recent topic. Recent Topic