bd41612
-
Posts
229 -
Joined
-
Last visited
-
Days Won
3
Content Type
Profiles
Forums
Downloads
Store
eMastercam Wiki
Blogs
Gallery
Events
Everything posted by bd41612
-

Mastercam Code Expert: Change default file extension
bd41612 replied to SlaveCam's topic in Industrial Forum
Change it in your control definition under "files". Then in Code Expert, File - options - expand "All Languages" - expand "NC" - File Extensions, then fill in box for additional file extensions... NC; PST; MIN; etc. -
DOOSAN MYNX 7500 4th axis programming
bd41612 replied to JeremyV's topic in Machining, Tools, Cutting & Probing
Your welcome. Picking the bottom plane is fine for having a separate gripping and work coordinate, but screws up the vectors for 4th axis. Rotating the plane about the axis keeps the vectors as they should be so that the post can resolve the angle move. -
DOOSAN MYNX 7500 4th axis programming
bd41612 replied to JeremyV's topic in Machining, Tools, Cutting & Probing
It's not enough to rename planes. Put your view in isometric, click on "Planes", then click "Rotate planes" put 180 in for a value in the appropriate field based on which axis your setup is revolving around. Then you can give it a new name. Select this plane in your tool parameters for tool plane and construction plane, leave work coordinate system alone. Using this method you can use any angle. -
DOOSAN PUMA 3100 LY C-AXIS drilling
bd41612 replied to JeremyV's topic in Machining, Tools, Cutting & Probing
G112, substitute Y axis, set to no rotation for rotation type. We do it all the time. Works great in my opinion. -
Tap TIP TREATMENT parameter number, please help
bd41612 replied to PcRobotic's topic in Post Processor Development Forum
No problem -
Tap TIP TREATMENT parameter number, please help
bd41612 replied to PcRobotic's topic in Post Processor Development Forum
I'm not up to X9 still, but I would assume it's similar to X6. Do a parameter dump. Look for this: pparameter$ #Information from parameters #"pwrttparam", ~prmcode$, ~sparameter$, e$ Get rid of hashtag: pparameter$ #Information from parameters "pwrttparam", ~prmcode$, ~sparameter$, e$ Post it twice, 1 with bottoming, 1 with plug setting and then run a file compare, you should be able to find a parameter number there. -
Kennametal KYS30 might work well here. Used it on Inconel 718 went from 1 part per edge on a conventional cutter, to 6 parts per edge with the ceramic. Cycle went from 11 minutes per part to under 2.
-
Matsuura Broken tool sensor / measuring device
bd41612 replied to jaydenn's topic in Machining, Tools, Cutting & Probing
Thanks Foghorn, I was trying to remember that. G65P9303 for the measure if I remember correctly, right? It's been a few years since I last saw one of those. -
Matsuura Broken tool sensor / measuring device
bd41612 replied to jaydenn's topic in Machining, Tools, Cutting & Probing
If you're on the east side of the country, support may not be very good. IMO Anyways, if you post a sample of what you have, we may be able to help. -
We don't use a checking macro, but, we have a different file extension for each different machine type. When the program is loaded it is easy to find the correct program. It's not idiot proof, but if you use ".A51" for your horizontals and ".PS95" for your vertical it would be easy to see. Set up the NC file extension in the control definition, and then set your editor to recognize that extension for you can have the editor display in the format you want (colors etc.). Nothing wrong with the macro, it is a good idea. On horizontals for probing, I always put a tram hole in each fixture, with a unique diameter and location, only a few thousandths are necessary for deviation, the probe the hole when the pallet comes in. In the program would be an argument that would determine if the fixture was the correct one. I've also used the probe to check for the proper work piece, verify the load on critical hard to load parts etc. and even to determine which program to run for parts that share a fixture.
-
Matsuura Broken tool sensor / measuring device
bd41612 replied to jaydenn's topic in Machining, Tools, Cutting & Probing
MAM72-3VS? -
Live Tool Lathe - Planes & Cutter comp question,
bd41612 replied to Brian Pallas's topic in Industrial Forum
Look at this thread: http://www.emastercam.com/board/topic/82089-lathe-c-axis-is-on-the-wrong-side/ -
Other than the obvious, what was your company's reason for switching? We have 4 different CAM packages here, and we're looking for the one size fits all solution. Unfortunately, Mastercam is not the only one on the list. Edgecam is on the list, so I'm a little curious as to your rational. I know of no one using Edgecam, so it would be good to hear from a user, not a website or salesman. You're library: Not sure if this would help, but how about a .csv export. Then you could re-arrange data columns and concatenate the fields, copy and paste into an editor possibly import into Mastercam as a text file? I don't know if the newer versions will do that.
-
mplmaster from In House Solutions is an excellent starting point. It's not for the Mill-Turn package, but it will work for single path control. I think your configuration is a dual spindle, single turret, Y axis machine, correct? If it is this is the post for you, no encryption either, and it's free.
-
How about this: pzout #Z output if zabs < -10 & mi2$ = 1, wabs = zabs + 10, zabs = -10 if absinc$ = zero, zabs, [if wabs < 0, wabs], !zinc else, zinc, !zabs Using some logic like this your could get one block of code to look like X2. Y1.5 Z-10. W-2.3 The next trick could be to use the misc reals to put in a value that you want one axis to move and let the post decide on the remainder of the move for the other axis. HTH
-
I get it, one is for the column and one is for the quill, right? So what you are really after is using Z to a point and then using W to advance the quill fro m there. If this is true it would not be that hard.
-
Are you saying that you only want the Z axis to output in "incremental"?
-
First of all, with out seeing your post, you may need the following 2 lines: if mi1$ = 0, absinc$ = zero else, absinc$ = one Or it could be even easier, change the format address for zinc: fmt "X" 2 xabs #X position output fmt "Y" 2 yabs #Y position output fmt "Z" 2 zabs #Z position output fmt "X" 3 xinc #X position output fmt "Y" 3 yinc #Y position output fmt "W" 3 zinc #Z position output
-
See the following: http://www.emastercam.com/board/topic/81907-5-axis-post-help/?hl=matrix#entry995804 If you can't do it with your machine definition, look to the matrix...
-
To gain clearance for cross working tools, then put it back to keep the remnant rigid for the next part after the cut off, would be my guess. What say you John?
-
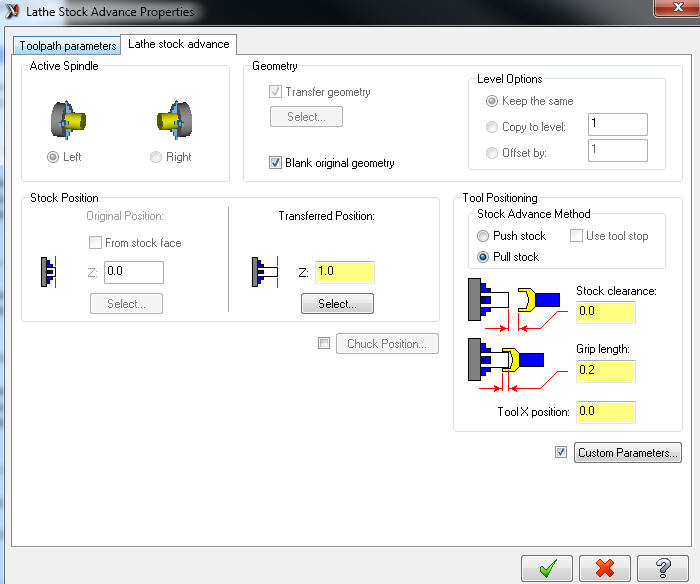
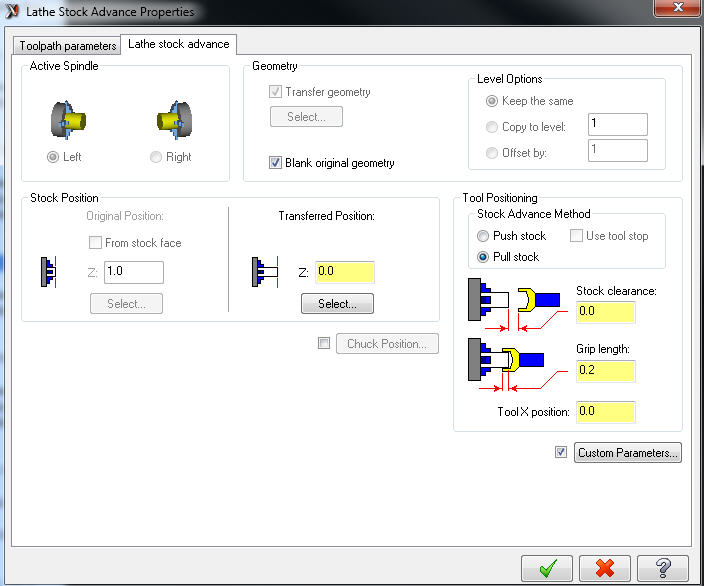
Yes it can be done. I just tried it with a bogus part in X6 lathe. Homemade post based on mplmaster. Using lathe stock advance with the "pull stock method" and the lathe stock transfer. I do not have the pickoff/cutoff transfer package. Would be nice to have... I have never tried this before. It looks like a little post logic on the second stock advance would do the trick. I am also not using the chuck jaws, usually its not necessary for me, and it complicates the program. I took a video, but the forum won't allow an .avi file. Posted code: % O0000(#A.NC) (09-03-15) (CNMG-432) N1(ROUGH TURN) M98P1 T0101 G97S1273M3 G18 G0X.6Y0.Z.12 G50S5000 G96S200 G99 G71U.1R.03 G71P1002Q1003U.01W.003F.01 N1002G0X.1502 G1Z-.2096 X.3192 Z-.4963 X.5Z-.5019 Z-1. N1003X.6 (FACE) G0Z.003 X.3602 G1X-.0825 G0Z.053 M98P3 M1 N99(BAR FEED) G97M3S100 G0G40G97G98 G28U0 G53Z#521 M108 M110 G0B0. M31 M131 M87 M169(UNCLAMP SUB CHUCK) M203(SYNCHRONIZING SUB SPINDLE AND MAIN SPINDLE) G1G98B-.2F100. M168(CLAMP SUB CHUCK) G4U1. M109 M69(UNCLAMP MAIN CHUCK) G4U1.5 G1G98B[.8+#522]F60.(PULL 1. INCHES) M68(CLAMP MAIN CHUCK) G4U1.5 X7. T0 G28U0 G53Z#521 M1 (---TURN BETWEEN SPINDLES---) (DNMG-432) N2(FINISH TURN) G10P0Z-[ABS[#505]+1.](UPDATE W/S) G0G40G97G98 G28U0 G53Z#521 T0202 G97S1091M203 G0X.7Y0.Z-.6821 G50S5000 G96S200 G99 G1G41X.5F.01 Z-.5 X.3192Z-.4944 Z-.2096 X.1502 Z0. X0. G40Z.1 X7. T0 G28U0 G53Z#521 M1 N99(BAR FEED) G97M3S100 M98P1 M31 M131 M87 M69(UNCLAMP MAIN CHUCK) G1G98B[-.2+#522]F60.(PULL -1. INCHES) M68(CLAMP MAIN CHUCK) (---RETRACT SUB---) M169(UNCLAMP SUB CHUCK) G4U1.5 B0.F60. G0G110G28 M205 M5 M105 M98P3 M1 (DNMG-432) N3(FINISH TURN) G10P0Z-[ABS[#505]+0.](UPDATE W/S) M98P1 T0202 G97S1091M3 G0X.7Y0.Z-.6821 G50S5000 G96S200 G99 G1G41X.5F.01 Z-.5 G40X.7 M98P3 M1 N12(CUT OFF TRANSFER) G50S4000 M98P1 S1000M3 T1212 M8 M108 X.65Z.1 Z-1.128 M110 G0B.5 M31 M131 M87 M169(UNCLAMP SUB CHUCK) M203(SPEED SYNC) G1G98B-.45F100. M168(CLAMP SUB CHUCK) G96S2865 G99 G1X-.03F.01 G110G28 G0X.65 M5 M105 G0G110G28 M205 M109 M9 M98P3 M1 (---SUB SPINDLE WORK---) (CCMT 32.51) N4(ROUGH TURN) G10P0Z-[ABS[#505]+0.](UPDATE W/S) M98P2 T0404 G97S3600M104 G0X.55Y0.Z-.1M8 G50S3600 G96S525 G99 G71U.05R.03 G71P1005Q1006U.01W-.003F.015 N1005G0X.2503 G1Z.3179 N1006X.55 M9 M98P4 M1 (---SUB SPINDLE WORK---) (VNGP-331K) N5(FINISH TURN) G10P0Z-[ABS[#505]+0.](UPDATE W/S) M98P2 T0505 G97S2865M104 G0X.7Y0.Z.3179M8 G50S3600 G96S525 G99 G1G42X.5F.015 X.2503 Z0. X0. G40Z-.1 G0X.574 M9 M98P4 M30 %
-
Or...you can do it in your post globally. I use a misc integer to turn it on / off. This works great to comp on corners OD / ID. A sample from my post: feed1 = feed if mi4$ = 1, [ if (gcode$ = 3 & (cc_computer$ = 41 | cc_pos$ = 1)) | (gcode$ = 2 & (cc_computer$ = 42 | cc_pos$ = 2)), [ if comp_typ = 1, [ feed = feed1 * (1 / (arcrad$ / (arcrad$ - tlrad$))) ] if comp_typ = 0 | comp_typ = 2, [ feed = feed1 * (1 / ((arcrad$ + tlrad$) / arcrad$)) ] ] if (gcode$ = 2 & (cc_computer$ = 41 | cc_pos$ = 1)) | (gcode$ = 3 & (cc_computer$ = 42 | cc_pos$ = 2)), [ if comp_typ = 1, [ feed = feed1 * (1 / (arcrad$ / (arcrad$ + tlrad$))) ] if comp_typ = 0 | comp_typ = 2, [ feed = feed1 * (1 / ((arcrad$ - tlrad$) / arcrad$)) ] ] ]
-
Thanks Ron. I also use brand x software and can pick a point on a sketched tool and drive that point on contact with the toolpath. I wonder if there is a c-hook out there to do this or maybe adding capability on the next version release that we apparently all would like to see. It is great when you can come up with your own way of doing it, but it is some extra leg work. There is the 3D chamfer option, but it never works with the tool types that I'm using.
-
I had the best result with Flow 5-axis. But, it only does less than half of the toolpath. I must be missing something. Lathe, face milling a slot into a conical surface, just trying to break the edge. I had to model a radius around the edge to make it kind of work. Any secrets here I don't know?
-
See my earlier post: http://www.emastercam.com/board/topic/81732-c-axis-is-double-posting-tool-numbers/ In there is a pdf showing how to do it.