bd41612
-
Posts
229 -
Joined
-
Last visited
-
Days Won
3
Content Type
Profiles
Forums
Downloads
Store
eMastercam Wiki
Blogs
Gallery
Events
Everything posted by bd41612
-
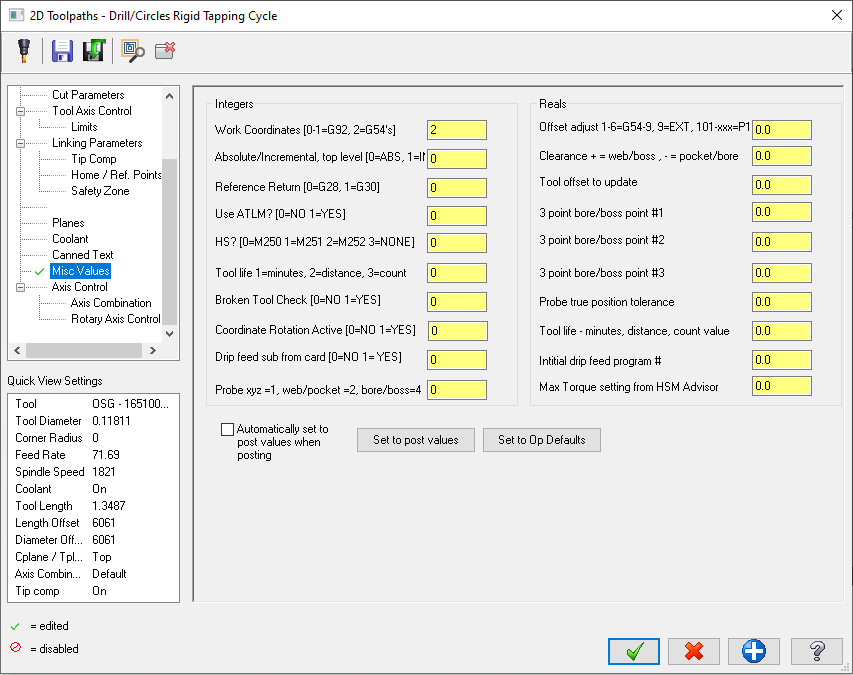
We have the Productivity+ add on, I don't use it. I don't need 1500 lines of additional code just to pick up a circle, not to mention all of the sub programs it spits out. I do it the old school way using regular tool paths, 2D contour and drill, and the misc values to generate the code, outputting the standard Renishaw format: G65 P9510 Z-.2275 F50. G65 P9511 X0. S1 The only problem is that you don't see the true probe motion, but that's ok. Here's how mine looks:
-

MCAM 2022 > Migration Wizard seems to work 100%!
bd41612 replied to Colin Gilchrist's topic in Industrial Forum
We recently updated to 2021. It was by far, the cleanest update I've ever done with a new version of Mastercam. The only things that changed were that it added some characters to some string definitions that were missing, but worked : "" and one of the buffers had 4 fields that changed to 5: fbuf 1 1 4 0 to fbuf 1 1 4 0 0 I can't leave Colin out of this, this was a big help: https://www.emastercam.com/forums/topic/82717-protip-how-to-set-control-definition-defaults/ -
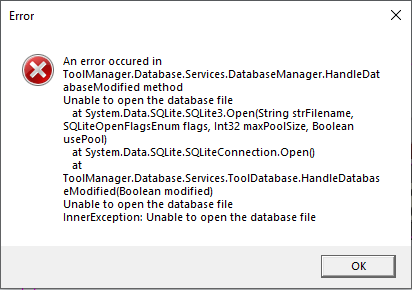
Has anyone else seen this before? This error will pop up when the Tool Manager is open. At the end of the day, there may be as many as a dozen or so instances.
-
Shiva, you made "the right choice", based on my experience with Esprit. Post support was terrible, and overall, the software did not live up to the expectations that they tried to sell us on. What do you expect when the salesman says "we have the FANUC kernel embedded in our software, so you will get perfect code every time"? Sounded great for 2 seconds, but how does the software know the difference between machine tools? How does it know how the parameters are configured? Their big selling point that they push is the saved process files. But that can also be done with Mastercam using operational defaults and exported ops. I had to suffer through it. I rectified the situation by getting a new job, using Mastercam.
-
If you have a multi-axis license, Morph (under Triangular Mesh) gives a lot of control. Not needed in this instance, but something to keep in mind.
-
Relief on the cutting edge cam be a problem. I have run into situations where the feedrate is so high that heel of the relief rubs. Tools with eccentric relief work the best for me. HSM Advisor is a tool, I don't always run at 100% with it. For some operations, I tune as "machinist discretion", such as spot drilling...
-
Slave, once you have all of those operations selected. Tap the letter "e" on your keyboard until you have them expanded the way you want.
-
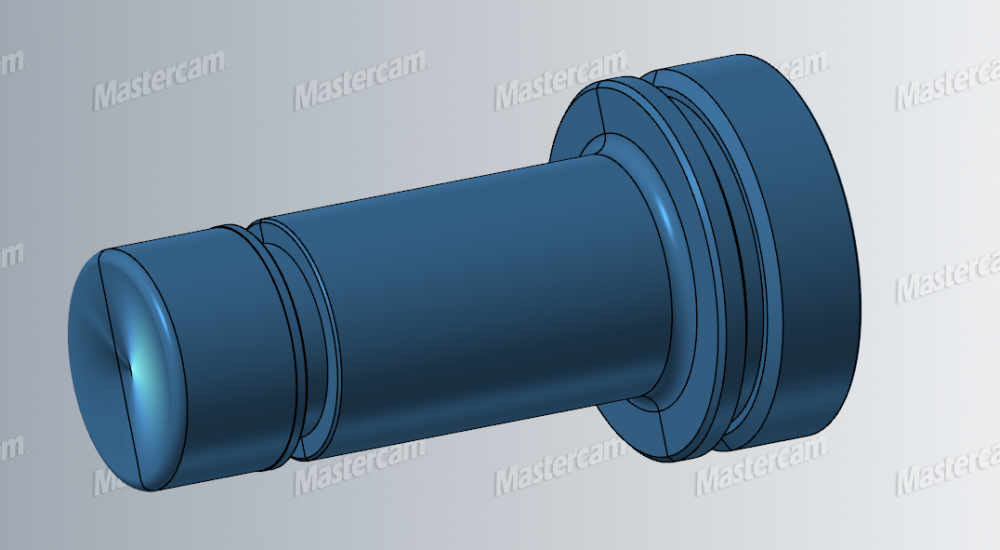
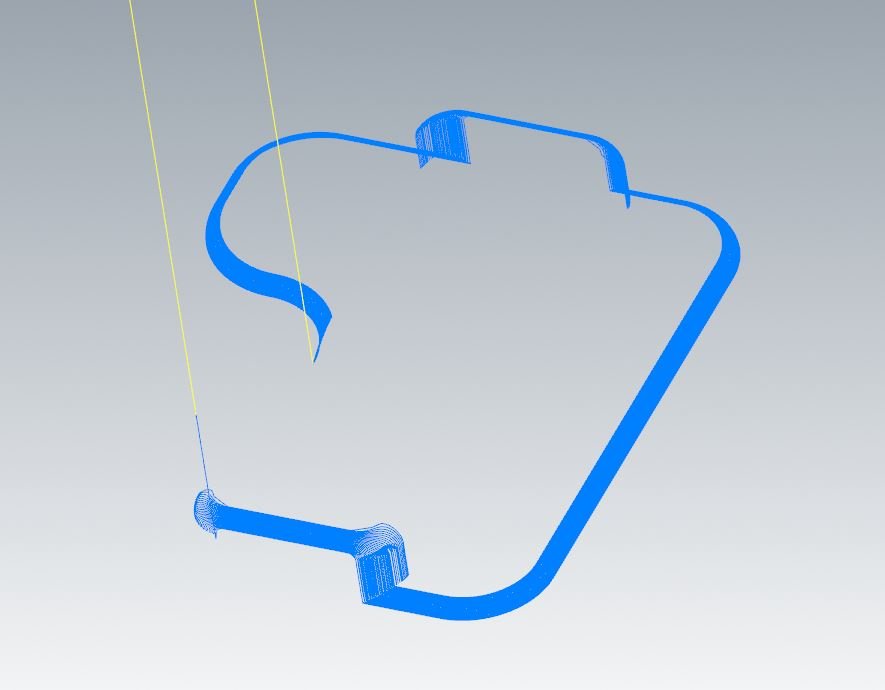
Has anyone else run into this? This is a .dxf file of a Nikken SK16C in HSK63. No matter what I do, I can't get rid of the concave face on the nut.
-
Good Experience with Mastercam Mill-Turn and New Integrex?
bd41612 replied to MechMonk's topic in Industrial Forum
I've had the same problem. I fixed it by getting a better job. -
Just Cheking In, Starting a new Program Today
bd41612 replied to CNC_Newbie's topic in Industrial Forum
I would make a male receiving fixture and use an adhesive. Many out there to choose from. I would think about an easy way, dimple the male fixture, use hot glue or wax. When you are done, hit the part with a heat gun to unload it. -
If all you are doing is the radius on the edges, you could do it with a "simple" 3 axis toolpath. Morph between 2 curves is effective at this, even with only 3 axis moves. Under "Cut Pattern", set "Pattern From" and "Pattern To" as edge curves on your model (on each side of the radius), select the radius as the drive. Under "Collision Control" #2, set check surfaces as your wall geometry. Under "Additional Collision Control Strategy", set #3 check surfaces as your floor geometry. Here is a MC2020 example of one that the radius goes all around and up & down the walls. The radii in the corners are mitered in this case, which is tougher than gliding down a radius through the corner. Morph between 2 curves.mcam-operations
-
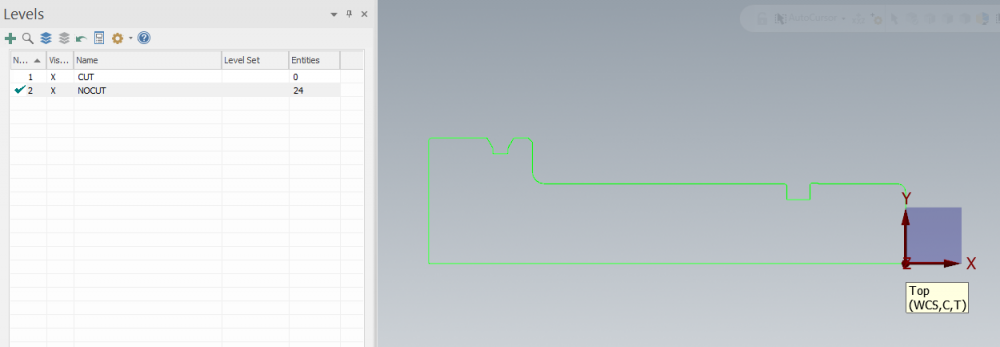
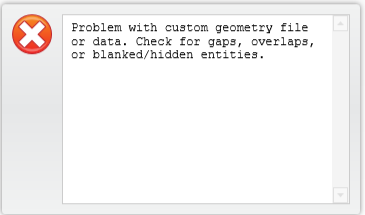
Taking out the centerline or assigning other attributes to it (solid, hidden, center, phantom) doesn't work either. If I take that line out I get the error message:
-
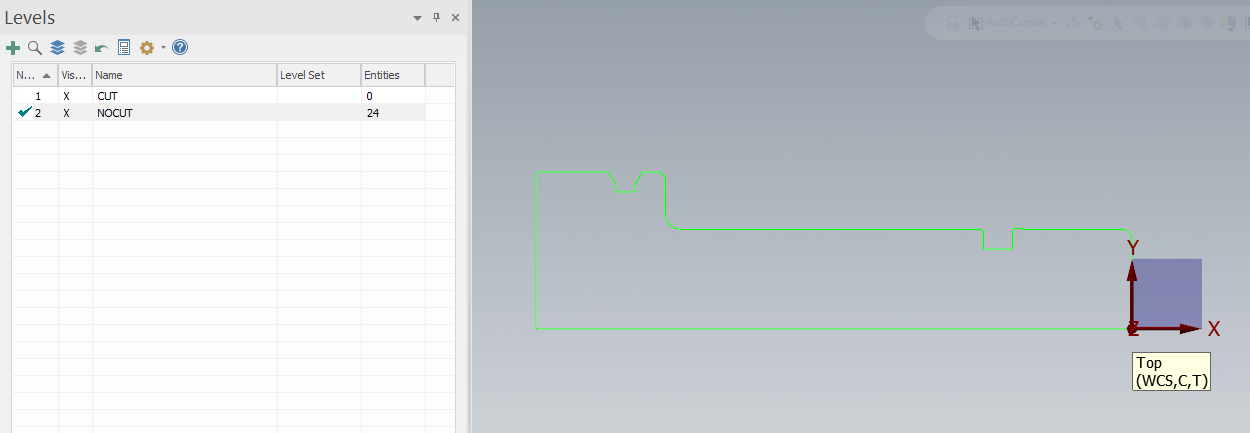
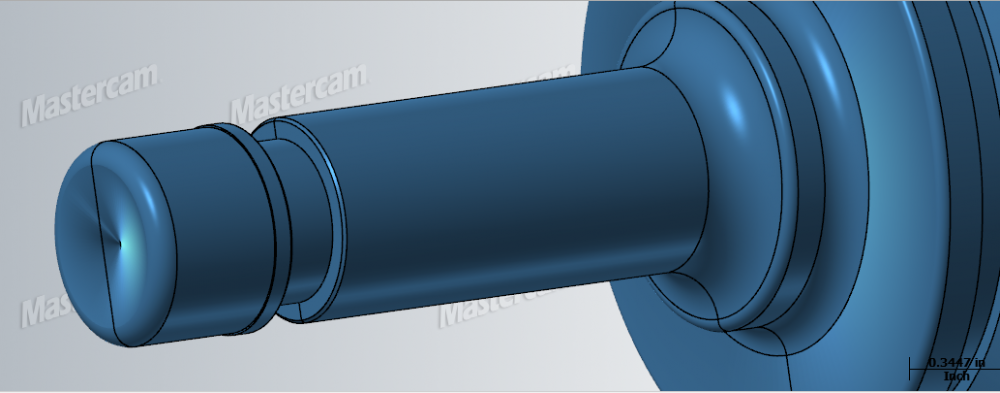
Hey guys, has anyone else come across this? No matter what I do, if there is a radius at the end of the holder, I get a concave cone on the end of the holder. This causes tools to not assemble in Tool Manager. Chamfers on the end of holders are not a problem. This is what my .dxf looks like. Level 1 is "CUT" with 0 entities, level 2 is "NOCUT" with all of the entities.
-
Pitch in your little gems that make mcam life easier
bd41612 replied to jlw™'s topic in Industrial Forum
This was addressed in Ticket #28735-214797 for enhancements, specifically R-22884 not sure if it will be in upcoming release. -
A long time ago, at a shop I worked, the RS232 ran behind the machine tools and sometimes on the floor. Add people stepping on it... We I had a cable that was cut, but worked until a breeze moved it. Then the connection would be broken. Sometimes only for a block or two of code. I got sick of dealing with it and started using Compact Flash with a PMCCIA adapter. Problem solved. Intermittent dropped or jumbled code, the cable is the prime suspect.
-
The dumbest thing I have ever seen in a mastercam post
bd41612 replied to pro grammer's topic in Industrial Forum
All of those killer smart phones we enjoy these days that are made in China... The physical buttons, fingerprint readers etc are all in different locations. If they are Android phones, every company uses their own ROM. Some are mono speaker some are stereo, different SOC's, different screens, batteries, colors, etc. You see where I'm going with this. If there was no variety, there would be limitations for us. Each machine tool or even CAM system has it's own niche where it excels. The differences give us choices, advantages etc. If we go the socialism route with all machine tools, cutting tools, CAM systems being equal we will have what socialism generates: shared misery, but at least they are all equal. -
I started with Virtual Gibbs, then Mastercam, Part Maker, Pro E, Creo, then Esprit, and now back to Mastercam. I learned on Gibbs first and I don't miss it. My pick for the best is Mastercam. Just my opinion.
-
I have not used these in anything as soft as 321, but with the PN coating I'd give it a shot. No drilled hole - just threadmill into solid material, deflection not much of an issue because the tool is cutting 100% at the nose. I have used these on hardened stainless and cobalt chrome, they work great. http://www.mmc-hitachitool.co.jp/en-US/products/thread-mill/et-edt/ A few months ago, I submitted an enhancement request along with formulas to CNC Software that may be in a future release to threadmill by volume. If you have ever used G76 single point threading on a lathe, you know what I'm talking about. The idea would be to enter in your toolpath parameters the desired amount of passes you would like to take and Mastercam would calculate each pass of the threadmill to take an equal volume of stock on each pass. When I do this now, I take an average depth of roughing passes and a final pass radial depth of cut. It's OK for 2 or 3 passes but if more are needed, then I build multiple operations and have each one take an equal volume.
-
I haven't used Esprit in over a year since my last job, and I don't miss it one bit. It was a 4 year disaster. I'm glad to be back with Mastercam 2020 now.
-
change 4th axis rotary output
bd41612 replied to ravidahiwala's topic in Post Processor Development Forum
Just stumbled on this. Colin shouldn't have to say this. Way back when I first got started doing CNC set up, my boss told me something that has stuck with me to this day, "Don't trust anyone's programs, especially mine". The same principle can be applied here, don't trust anyone's advice, test it, debug it, verify it. There is a lot of good advice on this forum, but, when we offer advice, we don't see the whole picture. Without seeing everything, there is always an important detail that can be missed. Also worth noting, that if someone such as Colin responds to help you, they are not required to spend hours on your problem. It can be very difficult to work on post development, but if you just blindly rely one help from the community to do it for you, you learn nothing. My two cents for anyone getting started in post development; save original post and incremental copies on a separate drive. I add the date onto the file name to keep multiple copies. Build a test file with several toolpaths in it, in which you know what the output should be. Go back and re-post previous projects with your new post and do a file compare to the original. Use the post debugger utility. If possible, have a peer use your post and give feedback, they may catch something you don't, or they do things differently and break your post. When I build new postblocks, I put them all in one place with a note that these are my postblocks. I do the same thing with variable initializing and formatting, all in one place under "my variables". Go to YouTube and check out Colin's channel, it's worth the visit. -
Actually, I'm trying to mimic the "INDEX / MATCH" that I would use if this was an Excel file. Essentially, I want to use the position of the tool number in the tooltable as the diameter offset, so that if the tool number is say T3407 and it is on the 13th row in the tooltable then T3407 would use D13. The data exists in my array, I just can't seem to access it. I have never used a "stack" in MP. This may seem like a crazy way to do it, but the mills are limited to 1-199 for offset registers.
-
Hi guys, We are using a 4 digit tool number in our tool library that works great for the Makino mills we have. We are trying to standardize this process over to some Hurcos. The Makinos use H1 D1 for offsets because we use the tool management. The limitation on the Hurcos is that they only have 199 registers for diameter offsets, and apparently the restisters cannot be re-numbered. So regardless of the tool number, the diameter offset needs to use 1-199. I have a buffer that extracts tool numbers from the pwrtt$ postblock. This is what the tool table looks like at the beginning of the program: ( T3293 ( GARR VRX - 27763 0.5 Bull-Nosed Endmill )) ( T3299 ( GARR VRX - 61374 0.5 Flat Endmill )) ( T5200 ( HARVEY - 68062-C3 0.0625 Roundover Tool )) ( T5415 ( INTERNAL TOOL - 64-2880-C 0.375 Chamfer Mill )) ( T5806 ( HARVEY - 43362-C3 0.375 Slotting Tool or Saw )) Here is a sample array: 0. 3293. 1. 0. 3299. 2. 0. 5200. 3. 0. 5415. 4. 0. 5806. 5. The second column represents the tool number, the third represents the initial order in which the tools run. The problem is that sometimes tools repeat after others have already run. How can I look up the second column and match it to the third so that any time T5200 comes up in the program, it will always use offset 3? Thanks in advance
-
I'm back. It's been a while, but I am a Mastercam user again, by my choice. Fanuc control? If so, you can read the status of system variable #4006 which will tell you whether G20 or G21 is modal. You can also track when it changes, if you do this, you can divert to a sub program that runs a mathematical conversion of your macro variables to the newly detected unit input. This way you will only run a conversion when your unit input method changes. Hope that helps.
-
Convert numeric string into a variable
bd41612 replied to bd41612's topic in Post Processor Development Forum
Thanks again Colin, I guess I was only thinking that the rpar function is only for reading from the NCI. I was not thinking that I could use the rpar on an internal variable that I created. Works as planned, now I can read from the data from the tool name to get extra parameters that I need to pass on. -
Hi guys, Its been a while. I am stumped right now trying to convert a numeric string variable into a variable so that I may use it in an argument. stoolusedes2 = brksps(16, stoolusedes1) # Break string *stoolusedes2, e$ This posts out the following string: .1875 This is correct. This value is from the end of the string. I would like to do this: emasbb = value (stoolusedes2) But how do I do this. I know about no2str, I'm just trying to do this in reverse and convert the string into something I can use. Thanx