Alex Dales
-
Posts
97 -
Joined
-
Last visited
-
Days Won
1
Content Type
Profiles
Forums
Downloads
Store
eMastercam Wiki
Blogs
Gallery
Events
Everything posted by Alex Dales
-

What's NCI variables with Drill Point...??
Alex Dales replied to Alan Chen's topic in Post Processor Development Forum
Use Parameter number 10519 in pparameter$ to read in the value to a variable -
About MPLMaster.pst only output C-Axis
Alex Dales replied to Alan Chen's topic in Post Processor Development Forum
This is am issue that has always bothered me. If you look at the backplot you will see that even though C-axis is selected, the tool is not always pointing to center, which indicates a Y-axis move. This means that processing this toolpath as a Y-axis move will result in machine motions different from the backplot. If you are using a ballend, the angle deviation is not important, but by default, we have set the logic to match the backplot. But don't worry, the Logic you are looking for is still in your post. It is just commented out. It is a quick change to make in the postblock pxyzcout2 as outlined below. You just need to uncomment the C-axis preference and comment out the Y-axis preference math. Original code: pxyzcout2 #Polar conversion, Cross cut, Right/Left Face cut #Drill polar is toolplane drilling toward center #if not a coincident axis (Face cut) if (y_axis | (opcode$ = three & abs(cuttype) <> two)), pxyzcout0 else, [ cfeed_x = sqrt(xa^2 + ya^2) cfeed_y = zero cfeed_z = za #if opcode$ = three & abs(cuttype) = three, csav = c$ #else, csav = atan2(ya, xa) + c$ if opcode$ = three & abs(cuttype) = three, csav = c$ else, [ if abs(cuttype) = 2, [ if fmtrnd(xa) = fmtrnd(prv_xa) & fmtrnd(ya) = fmtrnd(prv_ya), csav = prv_csav else, csav = atan2(ya, xa) + c$ #on the face you need to add c$ in case of twisted face plane ] else, [ csav = c$ #cross cutting with rotary turned on (NOT AXIS SUB!) cfeed_y = ya #C only indexes to plane and then Y motion cfeed_x = xa ] ] pax_shift ipr_type = one if not(millcc & abs(cuttype) = two), [ if fmtrnd(xa) = zero & fmtrnd(ya) = zero & opcode$ <> three, pnt_at_zero = one ] ] New Code pxyzcout2 #Polar conversion, Cross cut, Right/Left Face cut #Drill polar is toolplane drilling toward center #if not a coincident axis (Face cut) if (y_axis | (opcode$ = three & abs(cuttype) <> two)), pxyzcout0 else, [ cfeed_x = sqrt(xa^2 + ya^2) cfeed_y = zero cfeed_z = za if opcode$ = three & abs(cuttype) = three, csav = c$ else, csav = atan2(ya, xa) + c$ #if opcode$ = three & abs(cuttype) = three, csav = c$ #else, # [ # if abs(cuttype) = 2, # [ # if fmtrnd(xa) = fmtrnd(prv_xa) & fmtrnd(ya) = fmtrnd(prv_ya), csav = prv_csav # else, csav = atan2(ya, xa) + c$ #on the face you need to add c$ in case of twisted face plane # ] # else, # [ # csav = c$ #cross cutting with rotary turned on (NOT AXIS SUB!) # cfeed_y = ya #C only indexes to plane and then Y motion # cfeed_x = xa # ] # ] pax_shift ipr_type = one if not(millcc & abs(cuttype) = two), [ if fmtrnd(xa) = zero & fmtrnd(ya) = zero & opcode$ <> three, pnt_at_zero = one ] ] -
You might be able to accomplish this with one_rev and manually adjust the limits in pcoutrev. one_rev : 0 #Limit rotary indexing between 0 and 360? (0 = No, 1 = Yes) ... pcoutrev #Rotary axis revolution calculation (Modify for wind-up) ... if index <> 1 & (rot_type > 0 | (one_rev & gcode$ = zero & (cuttype <> one | opcode$ = 3 | opcode$ = 16))), [ while fmtrnd(cabs) >= 360, #Change 360 to 180 [ cabs = cabs - 360 if cuttype <> 1, rev = rev - 1 ] while fmtrnd(cabs) < 0, #Change 0 to -180 [ cabs = cabs + 360 if cuttype <> 1, rev = rev + 1 ]
-
M00 in canned text posting twice
Alex Dales replied to Darin's topic in Post Processor Development Forum
Thank you for drawing attention to this dmaier, I have corrected the issue in our internal master post and uploaded a new version to the website! -
Duplicated value in tool table
Alex Dales replied to Luke.Hicks430's topic in Post Processor Development Forum
Colin, I really like your explanation. It is well organized and easy to follow. Regarding gcode$ = 1003, I would make one small change in your wording to avoid confusion. gcode$ = 1003 indicates the end of the file. It is what happens after the last operation. It is not the last tool change because it is not a tool change at all. -
Programming canned cycle in lathe, n$ issue
Alex Dales replied to jlw™'s topic in Post Processor Development Forum
Sequence numbers with canned cycles is incredible annoying to setup. I agree with Orvie's suggestion to offset one of the values. I have found that the easiest way to tackle this is to set the control definition to the format you would prefer for the canned cycles, then just create a new integer variable for the toolchange sequence numbers and add in custom logic to increment it to the desired value. This means you are only using n$ in one place instead of two, and saves a while bunch of headaches. -
Force Feed Rate After An Index change
Alex Dales replied to dmaier's topic in Post Processor Development Forum
you can also use the force function to output the variables without changing the previous value (as you can never be too sure that the prv_ value isn't used somewhere else in the post) For the spindle m-code we force out the selector variable because a string select table is used when outputting spindle. result = force(speed,speed) result = force(spdir2,spdir2) result = force(feed,feed) Alternatively you can also call pfspindleout instead of pspindleout to force the speed and spindle output. but you will still need to force out the feed rate. -
It sounds like the issue is occurring when your Secondary axis is at (or close to) zero degrees (instability), at which point your primary axis is rotating 180 degrees, and your secondary axis goes back the save direction it came from instead of taking the alternate solution. Without adding custom logic, your post will always want to rotate the primary axis when your programmed toolpath crosses vertical. This allows it to maintain the same tilt solution (secondary axis) since most post processors resolve for the Rotary based on bias toward one tilt direction. There are ways around this, but they can be difficult to implement and will most likely require access to the encrypted section of your post. Your best bet to getting around this limitation would be to define a new axis combination that only contains your secondary axis. This will ignore your primary axis and eliminate the possibility of a second solution. In this way the Primary axis will not move, and secondary axis will be free to cross past zero degrees without triggering an instability. This will work best if your Primary axis is fixed at zero. If it need to be fixed at another angle, we might need to get more creative with the solution.
-
have you tried regenerating all your operations? That is one of the first things your should do when importing parts programmed in an older version in a new one.
-
I just tested with your files and changing dia_mult to 1 changed all the X values from Diameter to Radius. modified post attached. Code below. ORIGNAL % O0010 (BUSHING) (DATE=DD-MM-YY - 29-11-17 TIME=HH:MM - 15:59) (MCX FILE - C:\USERS\ALEX.DALES\DESKTOP\OPEN POST MODS\EMC\TEST PART.MCAM) (NC FILE - C:\USERS\ALEX.DALES\DOCUMENTS\MY MCAM2018\LATHE\NC\BUSHING.NC) (MATERIAL - ALUMINUM MM - 2024) G21 (TOOL - 1 OFFSET - 1) (OD GROOVE CENTER - NARROW INSERT - N151.2-185-20-5G) (2MM BOTTON TOOL) G28 U0. V0. W0. G50 X250. Y0. Z250. G00 T0101 G18 G97 S750 M3 G00 X18.268 Z-1.381 G99 G01 X16.268 F.5 G18 G2 X13.506 Z0. R1.381 X11.42 Z-.419 R1.508 X9.55 Z-2.608 R3.032 G1 X7.55 Z-2.609 G28 U0. V0. W0. M5 T0100 M30 % Changed % O0010 (BUSHING) (DATE=DD-MM-YY - 29-11-17 TIME=HH:MM - 15:59) (MCX FILE - C:\USERS\ALEX.DALES\DESKTOP\OPEN POST MODS\EMC\TEST PART.MCAM) (NC FILE - C:\USERS\ALEX.DALES\DOCUMENTS\MY MCAM2018\LATHE\NC\BUSHING.NC) (MATERIAL - ALUMINUM MM - 2024) G21 (TOOL - 1 OFFSET - 1) (OD GROOVE CENTER - NARROW INSERT - N151.2-185-20-5G) (2MM BOTTON TOOL) G28 U0. V0. W0. G50 X125. Y0. Z250. G00 T0101 G18 G97 S750 M3 G00 X9.134 Z-1.381 G99 G01 X8.134 F.5 G18 G2 X6.753 Z0. R1.381 X5.71 Z-.419 R1.508 X4.775 Z-2.608 R3.032 G1 X3.775 Z-2.609 G28 U0. V0. W0. M5 T0100 M30 % Generic Haas SL 4X MT_Lathe.zip
-
dia_mult : 2 #Multiplier for output on X axis (Neg. switches sign of X) change to 1
-
Call positions after offset change?
Alex Dales replied to deezums's topic in Post Processor Development Forum
Glad to help! mpfan is CNC Software's default fanuc post. mpmaster is the generic fanuc post we have here at In-House Solutions. If your post came with the software it was most likely written by CNC Software and would be based off of mpfan. -
Call positions after offset change?
Alex Dales replied to deezums's topic in Post Processor Development Forum
Colin, I was going to suggest that switch as an alternative, however I removed it before submitting for two reasons: 1. It applies to drilling canned cycles only. In this case it would work, but that does not cover a longhand cycle or any other operation types. 2. In the sample code the toolpath is moving to a reference height of Z0.1 before calling the drill cycle. Forcing the XY with the cycle will move the machine to the correct position, however, it will do so at the Z0.1 reference height. My solution will result in a safe approach, moving to the correct XY position before moving down to the Z reference height. When I do post mods, I always error on the side of caution, and I try my best to advise others in the same direction. While force_dpts will work for this problem, I would not recommend it as the safest or most robust option. -
Call positions after offset change?
Alex Dales replied to deezums's topic in Post Processor Development Forum
The easiest way will be to force XYZ for every new operation and just not worry about the changing WCS. This will cover all WCS changes, it might add a few redundant position calls, but they will not do any harm. in mpmaster, you can do it with the following steps, any other posts should be fairly similar: 1. go to "ptlchg0$" 2. find a condition for "if op_id$ <> last_op_id," 3. add "result = force(xabs,zabs)" EXAMPLE ptlchg0$ #Call from NCI null tool change (tool number repeats) toolchng0 = one if op_id$ <> last_op_id, [ rd_params$ # Read parameters - pparameter pmisccheck result = force(xabs,zabs) ] -
Call positions after offset change?
Alex Dales replied to deezums's topic in Post Processor Development Forum
you can set up a condition to check if the workoffset number (workofs$) has changed during a null toolchange, then force out the absolute coordinates of X Y and Z on their next call using result = force(xabs,zabs) -
Metric, Have you e-mailed us a version of your post yet? I have not come across it. Once you send it in, I will add that logic in for you. Alex
-
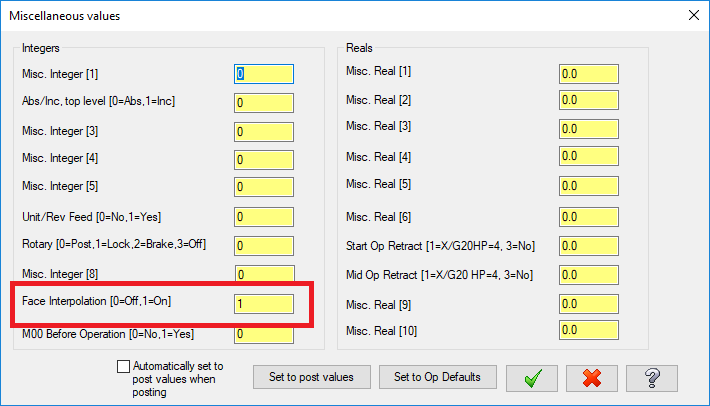
A full Z retract will not fix this. the error is occurring when the machine crosses over the zero degree position while cutting. Using interpolation like below should get the part running. Misc Int #9 is set for face interpolation this will convert it to X and Y. thsi will avoid the issue and get this part running.
-
Looks like the post logic isn't tracking when it crosses zero correctly. Even though it is outputting C.133 the post should be adding a revolution and tracking an absolute angle of 360.133. this will keep the direction the same and the incremental move at 2 degrees instead of 358. I just ran this operation through one of our posts and you can see the direction does not change when crossing zero. (This post is set up to use the Sign on the Angle instead of a modal M code to indicate the direction, so instead of M16 we have negative C values, and Positive C values for M15) X96.462 C-310.936 F55.6 X92.603 C311.383 F627.4 X88.828 C311.858 F681.3 ... X97.368 C356.708 X97.265 C357.988 X97.107 C.133 X96.964 C2.283 X96.838 C4.436 X96.727 C6.592 X96.632 C8.751 We didn't provide this post, so I can't change the encrypted logic for you. Contact your post provider and they should be able to get this sorted out for you.
-
What is the Rotary axis type on the machine? The Machine def has the C set to Signed Direction and is using M15 and M16 to indicate the direction. What happens if you MDI 5 degrees? 355 degrees? Does the M15 and M16 influence the direction it rotates to find that position? If the M15 and M16 are working correctly in the machine, then Colin was right, your machine is going the long way around. X92.603 C311.383 M15 F633.28 X88.828 C311.858 F687.47 .... X97.368 C356.708 F4510.42 X97.265 C357.988 F4502.71 X97.107 C.133 M16 F4519.87 <<<<<The c-axis direction is changing instead of crossing zero with a M15 and is taking the long way around. X96.964 C2.283 M15 X96.838 C4.436 F4528.18 X96.727 C6.592 F4534.86 X96.632 C8.751 F4539.83
-
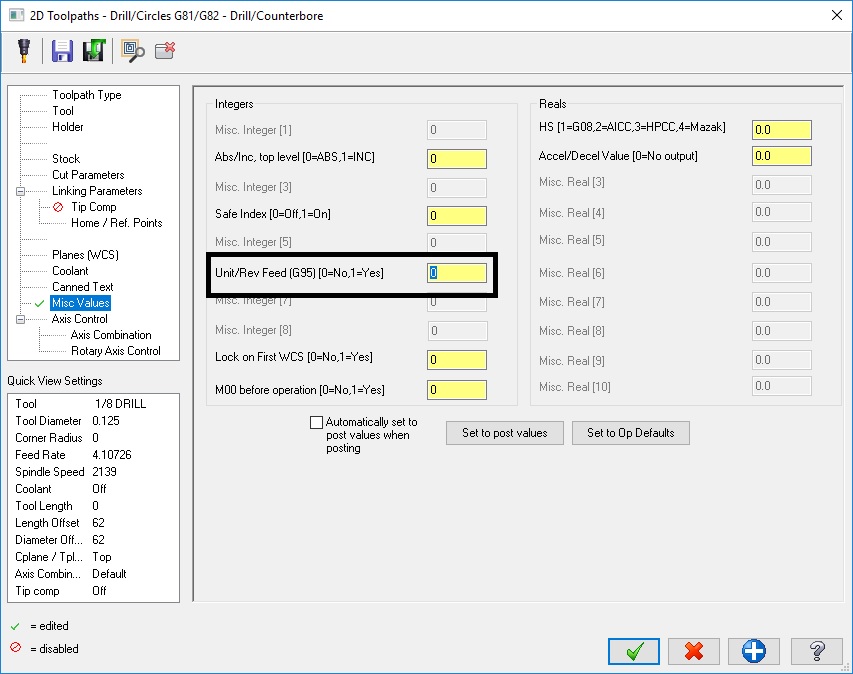
What is the post/machine? If you are using an MPMASTER you can set the feedrate to Unit per Rev with Misc Integer #6 in the toolpath parameters.