Leaderboard


Popular Content
Showing content with the highest reputation on 02/28/2019 in all areas
-
I absolutely HATE this change. It totally breaks up my workflow.1 point
-
I sent Colin a message this morning. About the only thing I have not tried is removing all existence of Public BETA 2020 from my computer. Its is bizarre that it is doing the same thing. I have know idea if it was the culprit of the problem. I will be removing all existence of Mastercam including the BETA from the computer and trying again soon. I am a 20+ year user of Mastercam and have used every version since six, before X cam out. I typically do not have issues like this. It is a strange one for sure. Thanks, Sam1 point
-
maybe they like the power trip... seen it many times with IT1 point
-
To export: Select the toolpath you want to export, right-click & select Export, check the box for "Export operation's geometry", select where you want to save it, name it what you want. To import: Right-click in the Toolpath manager & select Import, check the box for "Import operation's geometry", navigate to where the operation you want is located (If you use a standard location for your saved operations, you should check the box for "Remember this file").1 point
-
here is an example of how i would accomplish modeling this part, keep in mind there are other ways to get this modeled too. https://fastechincorporated-my.sharepoint.com/:v:/g/personal/joshc_fastechinc_net/Ef5O26yonCBHn2Ky8DoD_CUB--KHEi5yVtN3eveRItWyew?e=nYl33X1 point
-
Here is something I put together to see if it helps. The only thing is someone will have to download the Public Beta of 2020 to open the file. 5th Axis Helix OD Cut Mastercam 2020 file Female Helix. Male Helix:1 point
-
Here is the M Series being used on an impeller project Tk-32 and I did years ago.1 point
-
Boolean Add Or Boolean Remove _____________________________________________________________________________________________________________________________________________________ 1. Project your fonts on to the sphere ( solid ) 2. Create solid sheets from trimming surfaces with your font's wire frames 3. Thicken sheets in what ever direction you want ( Emboss or Engrave ) and however much you want . 4. Boolean add or Boolean remove will depend on what result you wish. ___________________________________________________________________________________________________________________________________________________ These images are a 10" sphere with lettering embossed .500 high and engraved .500 deep.

 1 point
 -
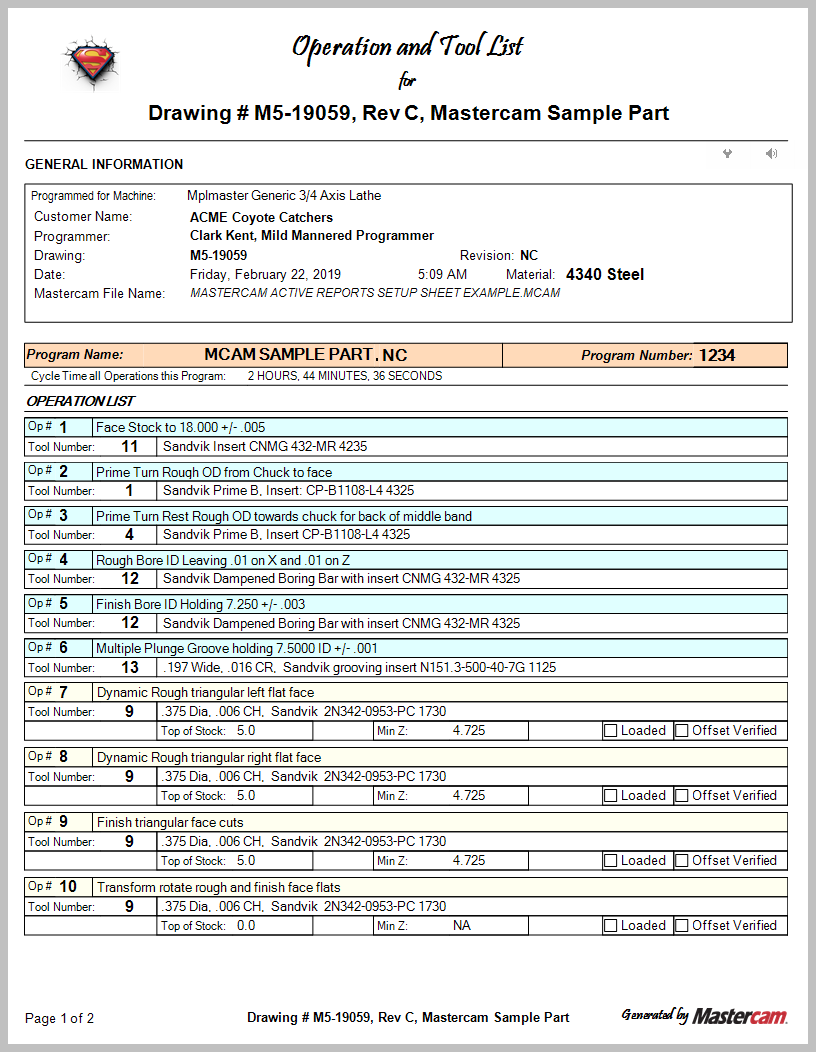
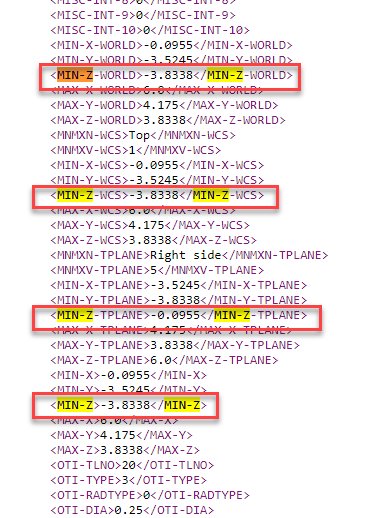
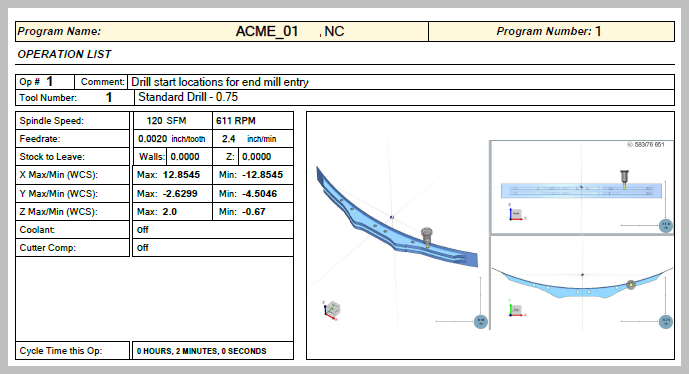
I just took your setup sheets and tried to modify them to output the MIN-Z that you were looking for. (and failed) It took a while for me to get back to this thread. I have been juggling too many chainsaws this week. I have attached an Operation and Tool List report that will work with Mill, Lathe, and Mill/Turn. Also included in the zip file is an installation and configuration doc, a sample Mastercam part file, and a sample report. The hierarchy is very important. For this report, I used the following hierarchy OP and Tool List (MT) short.rpx - OP and Tool List (FILE) Short.rpx - OP and Tool List (OPERATION) Short.rpx - OP and Tool List (OPERATION-L) Short.rpx - OP and Tool List (OPERATION-M) Short.rpx - OP and Tool List (OPERATION-T) Short.rpx - OP and Tool List (MAN-ENT-INFO) Short.rpx and I am outputting sub-reports that don't produce any output, but are critical to gathering the correct data. I added the MIN-Z that you were looking for and I also added the "Top of Stock" data. In some cases the MIN-Z is not below Z zero. A little quick math subtracting the MIN-Z from the top of stock will give the tool stickout that is your ultimate goal. AR is supposed to be able to do calculated fields, but I have not been successful in getting that to work. The sample report below is from a Lathe part with milling. Active_Reports_OP_Tool_List_short.zip
 1 point
 -
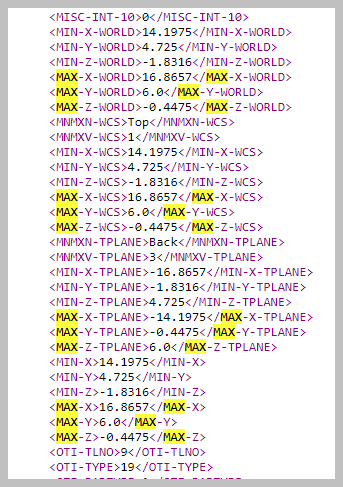
The secret handshake only needs to be used when you are in designer and trying to find a specific XML tag. You don't need to change the XML reference every time. I only update it when I want to run the preview. They include sample XMLs in the SST\Samples directory. They even have the "Full" XML file that was created with the secret handshake. It is interesting that your Z depths show up as positives. Is your part set above Z zero and are you using an adjusted WCS? If you have time, try this: Change the depth of one of your operations so that it has a unique number. Like: -1.2345 Run your setup sheet tool list and create a full XML file with the secret handshake. Drop it in Chrome, and then search for that unique depth. Note the XML tag, and then change the MIN-Z tag in your rpx file to match. As you can see, there is more than one MIN-Z. By looking for that unique number, you can quickly find the tag that you are looking for. Without doing the secret handshake you might not see all of the different tags for MIN-Z I like how you are sticking with this and trying to figure this out. Most people get a little ways in and drop it, either because of the complexity or they just don't have the time to spend on this when spindles aren't turning.
 1 point
 -
Not exactly. When you tell Mastercam to create a setup sheet, it looks at the RPX templates that you have specified and the operations that you selected and ONLY gathers that information from your Mastercam file and dumps that into an XML file. This is why it is so important to be able to force Mastercam to do a complete dump of the data in a Mastercam file via "the secret handshake" I feel your frustration. There are days when AR really aggravates my tourette syndrome. You can get AR to output some of the data that you want without doing a complete set of reports. But if you have a very large file with hundreds of operations, the setup sheet generation time can take a very long time. If you are doing simple every day stuff with 20 operations and 10 tools, it doesn't really matter if it takes several minutes to generate a tool list. I have attached your sample setup sheets that generate the min Z value that you were looking for. Place both of the rpx files in the SSD directory, not the misc directory, and then select setup sheet from the operation manager, (not Tool List) then press F2 to select your test report tool list. See if you get the results that you are looking for. Note that I did not delete all of your old fields, I just turned off the visibility. As far as the truncated boxes that you are seeing, they are only labels showing what data fields you have selected. You can rename them to anything that want. They are only visible in designer. test report.rpx -test subreport.rpx
 1 point
 -
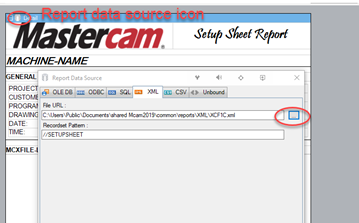
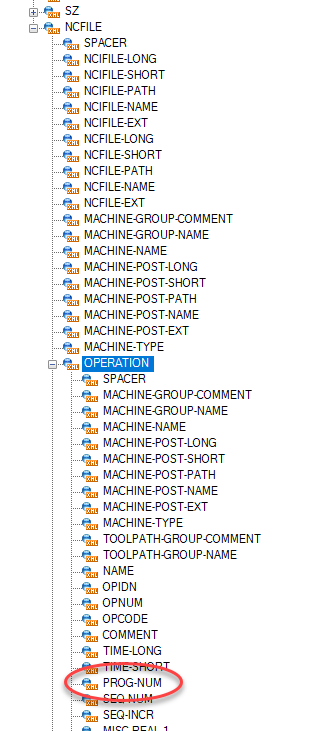
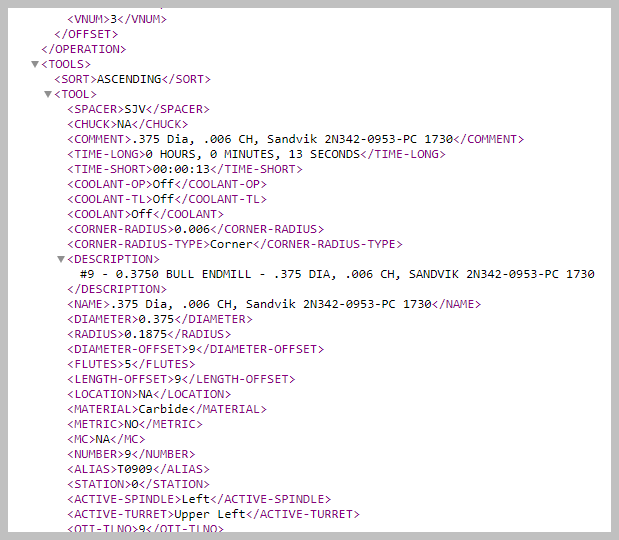
The answer to this is: Yes for the best results. One of the reasons that you are seeing inconsistent results from the preview output is that the data that is being used to generate the preview report is an old sample xml file in the samples file directory. It doesn't have your data and the tags could be different or not in that sample xml file. Every time that you run a setup sheet, Mastercam makes a new xml file with the data that you requested via the rpx report. This is not the full data set. It only contains the data that AR (Active Reports) finds xml tags for in your report template (rpx files) To generate a full data set xml file we need to invoke "The Secret Handshake". Right mouse click in the Operations manager and select setup sheet. Select the setup sheet that you want to run. Hold down the control key and click on the Green Check box You will be asked three questions: Deactivate RPX Parser? Answer: No Display messages? Answer: No Write ALL data to XML file? Answer: Yes At this point all of the data from the Mastercam file will be written to the XML file. This may take a while if there are many operations. Normally Mastercam will only write the data needed from the RPX report and leave the rest out. Navigate to c:\Users\Public\Public documents\shared Mcam2019\common\reports\XML Sort by date and locate the XML file that you just created. Open Chrome browser and drag and drop the XML file into Chrome. It may take a few minutes depending on the size, but you should see the XML in a “document tree” format. From here you can search for 1277 (the number that we entered above for the program number) You should see: <PROG-NUM>1277</PROG-NUM> You can also see the hierarchy of where the data is located. In this case the PROG-NUM is located in OPERATION, which is located in NCFILE If you have tried entering just PROG-NUM into the ActiveReports Designer and it doesn’t print out the Program number we will have to go to the next step. In ActiveReports Designer, open the report that you want to modify. Select the report data source icon and then navigate to the XML directory and select the XML file that we created earlier. Click Okay Now go to the Fields branch of the tree and start expanding, Bound, Document, SETUPSHEET, NCFILE, OPERATION You should see the PROG-NUM field listed there. If you want to find the NC file Name without the .NCI, Search in the Chrome XML file for the program name that you entered and you will see several occurrences of it. The one that you want without the .NCI is: NCIFILE-NAME Drag and drop it onto the report. You will see that the path is maintained and shows up as NCFILE/OPERATION/PROG-NUM Sometimes you can get the data that you want to display by putting in extra path statements like: ../ or ../../ or like the sample in the line above. BUT: this can cause AR to start at the beginning and take a screen capture for every operation, every tool, etc. if you have a very large file with lots of operations, it might take half an hour to generate the report. Report hierarchy: One of the things that I have done to help me understand the relationships between the different reports and subreports is to document the outline structure of the reports. I do this by opening up the main setup sheet and then looking at the sub reports and copying down the name of subs (indented), then I open the subs and do the same thing, and keep doing that until I have the complete outline of the report structure. Here is an example of the default MT setup sheet: Setup sheet (MT) Sandvik.rpx -Setup Sheet (SZ) Sandvik.rpx -setup sheet (SZ-M) Sandvik.rpx -setup sheet (SZ-L) Sandvik.rpx -Setup Sheet (FILE) Sandvik.rpx -Setup Sheet (OPERATION) Sandvik.rpx -Setup Sheet (OPERATION-L) Sandvik.rpx -Setup Sheet (TOOL) Sandvik.rpx -Setup Sheet (OPERATION-M) Sandvik.rpx -Setup Sheet (TOOL) Sandvik.rpx -Setup Sheet (OPERATION-T) Sandvik.rpx -Setup Sheet (MAN-ENT-INFO) Sandvik.rpx -Setup Sheet (MAN-ENT-DATA) Sandvik.rpx -Setup Sheet (TOOLS) Sandvik.rpx -setup sheet (Tool) Sandvik.rpx -Setup Sheet (TOOL-M) Sandvik.rpx -Setup Sheet (TOOL-L) Sandvik.rpx -Setup Sheet (LATHE-TOOL-HOLDER) Sandvik.rpx -Setup Sheet (LATHE-TOOL-CUSTOM) Sandvik.rpx -Setup Sheet (LATHE-TOOL-INSERT) Sandvik.rpx -Setup Sheet (LATHE-TOOL-DRILL) Sandvik.rpx -Setup Sheet (OP).rpx When I create a new setup sheet, I typically start by copying all of the existing sheets to a safe location so that after I have buggered up one of the report templates and it no longer works correctly, I can go back and get the original rpx file and see what I did that caused it to stop working. Another strategy that I use is to have several AR designers open with the templates that I am working on. I will make a change but not close designer and try running a report. If it is too messed up, I just click the undo button in designer (as many times as is necessary), save the file and run the report again.
 1 point
 -
Mr. Fish, There is a Word doc available on Mastercam.com in their 'Mastercam Knowledge Base' called Active Reports Setup Sheets Tips and Tricks It has a lot of very valuable information in it. You are correct in some of your assumptions. Mastercam looks at the .rpx template and only gathers the information that you have requested for the xml file. There is a way of having Mastercam output a complete list of all of the fields to the xml file using "The Secret Handshake". The Word doc has those instructions in it. If you output a complete xml file, you can see fields that you otherwise would not know were there. For example, there are more min/max values than those you have listed in your post. From the tips and tricks doc: Node Hierarchy This is probably the most important rule to follow. Even if you do not use any data from a node, create a subreport that uses the node and calls the subreport of the next node level. Typical problems when nodes are not followed: · Data is repeated. · Data is limited. · Data is missing. · Image captures happen when none are used. For example, if you use no data from the NCFILE, OPERATION, and TOOLS nodes, use subreports with those nodes specified in the Recordset Pattern. Correct: Incorrect: //SETUPSHEET //SETUPSHEET //NCFILE //TOOL //OPERATION //TOOL //TOOLS //TOOL Mastercam also looks at the name of the rpx file and gathers and parses information for a specific product like Mill, or Lathe. You will see the different products in the tree list. for example: Operation-L, or Operation-T (for Text, Manual Entry). I have been successful in outputting min/max values. So much to learn... and I am such a novice.
 1 point
 -
Very nice! Thanks1 point
-
sure but I may have a limited number of clicks left in me , don't want to run out of clicks!!!0 points
-
James has moved on and IowaJim passed away.0 points