Leaderboard


Popular Content
Showing content with the highest reputation on 10/18/2023 in all areas
-
A side note, for those who weren't around back then...Alex's avatar was Winnie the Poo. Thus all the "bear" references throughout his posting history and replies to him.6 points
-
Iskander. Teh original teh.5 points
-
Alex's post now seems more relevant than ever with the glutenous b4stards around the big table squeezing us all ever tighter and tighter. And yes, this place was awesome, and we're all just passing through....3 points
-
Are you referring to the glow highlighting? In 2024 goto file - configuration - Selection - Right side of window
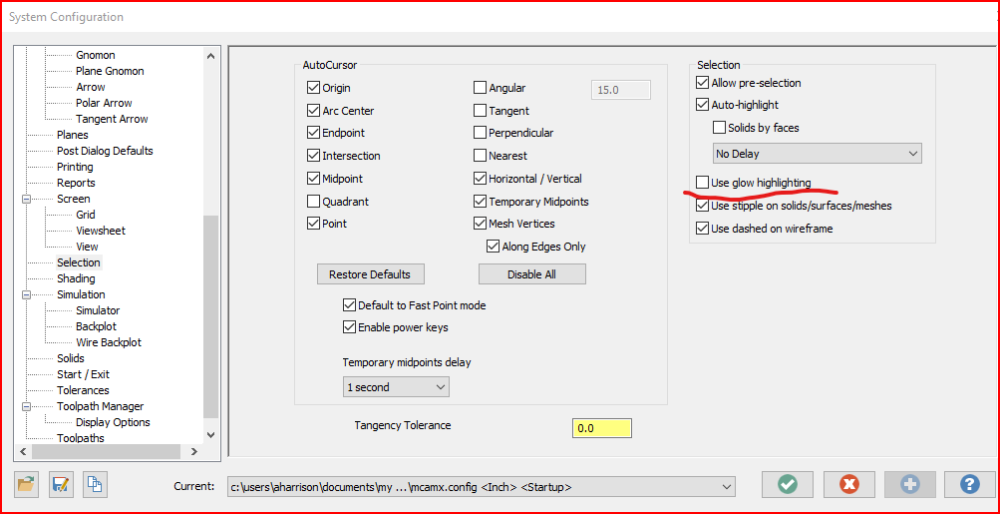 2 points
 -
The tooling manufacturers numbers are always the best starting point of what a tool is capable of doing....2 points
-
On a normal Fanuc a g98 is return to initial plane after drilling the hole. G99 is return to the R value. In your g98, you've only got one hole, and it has to return to the clearance position afterwards due to your settings, so it's going to choose to output the drill cycle that returns to your initial plane. In your g99, after starting at your clearance position, it's returning to a different height (R (retract) plane), so it'll have to output g99. That's my guess, anyway2 points
-
Delrin, PEEK and similar brittle materials do chip on breakout and even when stepping over to the center. UHMW not so much, more like the opposite. But agreed, slower spindle with higher chip loads are effective on most plastics.1 point
-
What he said, r.e. end mill type, chip evacuation and flushing are key. Also, with UHMW (aka delrin), you cannot rough cut slowly. Don't baby it. It builds up too much heat even with good coolant flow. Chip loads in the .004 to .008 range work well for me using 3/16" 2 or 3 flute cutters just long enough to do the job at hand. You should mind your approach/exit strategies as well, delrin chips easily when you break out of a corner.1 point
-
That has nothing to do with what you're trying to accomplish. It will be in the toolchange logic for the lathe tools is only a lathe post. If it is a mill and lathe post combined then it will be in both sections like I showed in what I posted up. I suggest watching Colin's youtube videos on Post editing. You have many things to learn and understand about MP post and how the process works and what it does.1 point
-
The straight 2 flute 4" long is the problem. No where for the chips to go. I always used Aluminum uncoated endmills for machining UHMW and never had the problems they are running into. Coolant or high pressure air all the way to prevent sticking and/or melting of the material back into the cut.1 point
-
I machine a decent amount of UHMW parts. A .1875 endmill shouldn't really be breaking off. I would back down on the RPM a decent amount as you may be generating too much heat in the cut. Also make sure to be hitting the tool with plenty of coolant or air blast to remove the packing of chips. If i wanted to be really conservative and make sure my tool didn't break I would use a contour ramp toolpath going about 5000 rpm and maybe 40 inches per minute. I don't know your tool stickout or setup so these numbers may be slower than necessary.1 point
-
I am no one special just have 35+ years doing this is all and willing to share and try to help others as best I can. Pass it on is all I ask of anyone I train and help.1 point
-
Something has to define the pfn logic. In MPLMASTER there is this switch: tseqno : 2 #Output sequence number at toolchanges when omitseq = yes #0=off, 1=seq numbers match toolchange number, 2=seq numbers match tool number We then search the post to find where and how it was used: ltlchg$ #Toolchange, lathe . section not shown . section not shown . section not shown . section not shown if not(synch_flg & tool_op$ = 67), #Suppress tool output if cutoff during part xfer [ if omitseq$ = 1 & tseqno > 0, [ if tseqno = 2, n$ = t$ pbld, *n$, [if home_type = -1, *sgcode], *toolno, e$ ] else, pbld, n$, [if home_type = -1, *sgcode], *toolno, e$ ] mtlchg$ #Toolchange, mill . section not shown . section not shown . section not shown . section not shown if omitseq$ = 1 & tseqno > 0, [ if tseqno = 2, n$ = t$ pbld, *n$, [if home_type = -1, *sgcode], *toolno, e$ ] pheader$ #Start of file pheader_custom if tseqno = 1 & omitseq$ = 1, [ seqno$ = 1 seqinc$ = 1 n$ = seqno$ ] Then from there we can see what variables where defined and how we want to adapt it to the post we are using.1 point
-
I sincerely Apologize for interrupting your question. You were going to get help from the best, I'm sorry. I read here that you have to have Stepup Check. if you do not want to do the stepup , Stepup and stepdown should match. I see your part has an angle stepup Should be better for the finish tool.1 point
-
try this1 point
-
Look at the old MPLMASTER post it has the process already defined in it.1 point
-
1 point
-
try tool_no = opinfo(20004, 0)1 point
-
How many serious crashes cost less than $4,500.00 to get going again? Saving even one major crash would likely pay for itself. Another post mentioned MachSim is 98% as capable as Vericut. Not sure how different that is from Camplete but seems MachSim would be an excellent investment.1 point
-
This needs a bump for the pure history of it, the long gone names, what this forum used to be. Thanks Terry for digging this one out... Alex passed back in 2020 but he is still talked about fondly in some circles1 point
-
Looks like that's the one, it's Update 31 point
-
1,418 downloads
These files are intended for those who have purchased the Mastercam X7 Handbook Volume 3, available here. Files included: 5X_TEST_PIVOT LOCATION.MCX-7 AEROSPACE.MCX-7 AIRFOIL FLOW 5 AXIS.MCX-7 ANGLE RANGE.MCX-7 AREA TYPE.MCX-7 CAMSHAFT.MCX-7 COLLISION CONTROL SET TO TILTING TOOL AWAY WITH MAX ANGLE.MCX-7 CONVERT TO 5 AXIS.MCX-7 CURVE 5 AXIS CURVE TYPE 3D CURVES.MCX-7 CURVE 5 AXIS TOOL AXIS CONTROL CHAINS.MCX-7 CURVE 5 AXIS TOOL AXIS CONTROL FROM POINT.MCX-7 CURVE 5 AXIS TOOL AXIS CONTROL LINES.MCX-7 CURVE 5 AXIS TOOL AXIS CONTROL PLANE.MCX-7 CURVE 5 AXIS TOOL AXIS CONTROL TO POINT.MCX-7 CURVE 5AX SURFACE EDGE ONE MULTIPLE SURFACES2.MCX-7 CURVE PROJECT NORMAL_PLANE.MCX-7 CURVE PROJECT NORMAL_SURFACE.MCX-7 CURVE TYPE SURFACE EDGE ALL.MCX-7 CURVE TYPE SURFACE EDGE ALL-WITH SEAM.MCX-7 CURVE TYPE SURFACE EDGE ONE.MCX-7 CURVE5AX TOOL AXIS CONTROL SURFACE.MCX-7 CURVE5AX_SPLIT TRIMMED SURFACE.MCX-7 CUT PATTERN BOX.MCX-7 CUT PATTERN CYLNDER.MCX-7 CUT PATTERN SPHERE.MCX-7 CUT PATTERN SURFACE.MCX-7 CUT TOLERANCE.MCX-7 CUTS ALONG CURVE.MCX-7 DRILL 5 AXIS EXAMPLE.MCX-7 DRILL ENTITY TYPE POINTS_LINES.MCX-7 DRILL OUTPUT FORMA.MCX-7 DRILL OUTPUT FORMAT.MCX-7 DRILL TIP CONTROL ORIGINAL POINT.MCX-7 DRILL TIP CONTROL PROJECTED POINT.MCX-7 DRILL TOOL AXIS CONTROL PLANE.MCX-7 ENTRY EXIT.MCX-7 FILTER.MCX-7 FLOW TOOL AXIS CONTROL BOUNDARY.MCX-7 FLOW TOOL AXIS CONTROL CHAIN.MCX-7 FLOW TOOL AXIS CONTROL LINES.MCX-7 FLOW TOOL AXIS CONTROL SURFACE.MCX-7 FLOW TOOL AXIS CONTROL TO AND FROM POINTS.MCX-7 FROM START TO END.MCX-7 GAP SETTINGS.MCX-7 GRADUAL ANGLE CHANGE.MCX-7 IMPELLER.MCX-7 IMPELLER.STL IMPELLER_2.MCX-7 LASER TRIM CUT.MCX-7 LIMITS.MCX-7 MACHINE BY LANES_REGIONS.MCX-7 MAXIMUM ANGLE STEP.MCX-7 MESH TOOLPATHS.MCX-7 MOPH BETWEEN 2 CURVE PATTERN.MCX-7 MORPH BETWEEN 2 SURFACE GEOMETRY SELECTION.MCX-7 MORPH BETWEEN 2 SURFACE PENCIL.MCX-7 MORPH BETWEEN TWO SURFACES.MCX-7 MOVE TOOL AWAY.MCX-7 MSURF CUT PATTERN SURFACE.MCX-7 OUTPUT FORMAT.MCX-7 PARALLE CUTS.MCX-7 PARALLEL TO SURFACE.MCX-7 PORT ADD EXIT BLEND.MCX-7 PORT MACHINING.MCX-7 PORT TOOL AXIS CONTROL_CHAIN GEOMETRY.MCX-7 PORT WITH CURVE.MCX-7 PORT.MCX-7 PROJECT CURVES.MCX-7 PROJECT CURVES_TOOLPATH.MCX-7 RIB CUT.MCX-7 RIB CUT.X_T ROTARY 4 AXIS AXIAL CUT.MCX-7 ROTARY 4 AXIS AXIAL DAMPENING LENGTH.MCX-7 ROTARY 4 AXIS NORMAL TO SURFACE.MCX-7 ROTARY 4 AXS THROUGH A POINT.MCX-7 RUN TOOL.MCX-7 SIDE TILT DEFINITIONS.MCX-7 SWARF 4-AXIS.MCX-7 SWARF 5 AXIS WALLS CHAINS.MCX-7 SWARF 5-AXIS_RAILS-AEROSPACE PART.MCX-7 SWARF OUTPUT FORMAT 4 AXIS HORIZONTAL.MCX-7 SWARF OUTPUT FORMAT 5AXIS.MCX-7 SWARF TIP CONTROL LOWER RAIL.MCX-7 TILTED FROM CURVE.MCX-7 TILTED THROUGH CURVE.MCX-7 TILTED THROUGH LINES.MCX-7 TILTING STRATEGIES POINT.MCX-7 TILTING STRATEGIES.MCX-7 TOOL AXIS CONTROL -RELITIVE TO DIRECTION-1 LINE.MCX-7 TOOL AXIS CONTROL SURFACE.MCX-7 TOOL BOX BLADE ROOT MACHINING.MCX-7 TOOL BOX CAVITY TILT CURVE.MCX-7 TOOL BOX ELECTRODE.MCX-7 TOOL BOX IMPELLER BLADE.MCX-7 TOOL BOX IMPELLER FLOOR.MCX-7 TOOL BOX PORT EXPERT.MCX-7 TOOL BOX PROJECTION.MCX-7 TOOL BOX SWARF MILLING.MCX-7 TRIM_EXTEND OPTIONS.MCX-7 TURBINE BLADE.MCX-7 TURBO_IMPELLER.MCX-7 TUTORIAL 5 COLLISION CONTROL STRATEGIES.MCX-7 Z AXIS LIMITS.MCX-7Free1 point -
Hmm, I'm on X7 right now and not X6. I don't seem to have that particular post with my installation of Mastercam. In Mastercam if you go to Settings-->Machine Definition Manager... Once you are in the Machine Definition Manager click on the icon near the middle top of the screen that looks like an etch a sketch for Edit the Control Definition. Once in the Control Definition Manager expand NC Output and make sure that Output sequence numbers has a check next to it. You can also control the sequence number increment and at what number the sequence will start over. I would recommend posting your question in the Post Development forum here on eMastercam instead of in the Industrial forum. You will get the fastest answer to your question over there.1 point
-
I just got asked to speed one of our high quantity jobs. I was figuring ROI on a couple options and started a discussion with my boss about our shop rate. He said "If you cut 10 minutes off the runtime you save $x on this lot, 20 minutes $x * 2." My response, "can I get 5% of that in my paycheck?" He laughed and told me if that's how it worked he would've retired a long time ago.0 points
-
0 points
-
#Quoteworthy0 points