Leaderboard


Popular Content
Showing content with the highest reputation on 10/30/2023 in all areas
-
This is great to know. The company I work for has yet to bid on any titanium jobs, but they love to imagine themselves more capable than they are, and make promises that are often of dubious deliverability. And so, it's not a matter of if, but rather of when, thus I'd rather be armed with as much information as possible.3 points
-
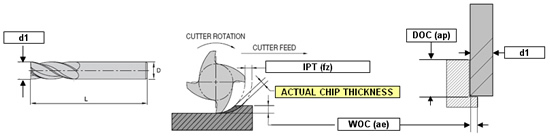
Use Dynamic Milling. Make your stepover 2-4% of the tool diameter, maximum 5%. You want to minimize the heat getting into the tool and stock, and maximize the heat getting into the chip. Taking a small stepover minimizes the cutting edge contact time as the tooth is shearing off a chip. To maximize material removal, you'll want to use a flute at least 2:1, depth to diameter. Unless you have very massive amounts of material to remove, I like using 1/2" diameter endmills because of the value. https://www.helicaltool.com/products/tool-details-84511 I use FSWizard, and love this app/software. If you don't have a copy, it is worth getting the "pro" version, with the lifetime license. Money very well spent. I plugged in the following parameters for the tool I recommended above: Grade 5 Titanium, 6al-4v (310-350HB) Solid Endmill Carbide ALTiN coating IN units 0.5 Tip Dia 6 flutes 1.35" stickout 0.03 Corner Radius Flute Length 1.25" 38 degree helix angle (I guessed, this wasn't listed) 90 degree lead angle 0.5 shank diameter Engagement: Depth of cut 1" Width of cut 0.02" Width of cut percentage 4% No to slotting Yes to Chip Thinning No to HSM Overrides set to 100% for speed and feed. This gives a recommendation of 1337 RPM, a Feedrate of 68.86 IPM (68 IPM). This requires 2.14 horsepower, and results in 1.38 cubic inches per minute of metal removal.3 points
-
I see the same behavior on our haas's all the time. I could say some not nice things about the machines but I wont. Hopefully you can use the G187 setting as mentioned above, Our machines just alarm out when I tried so I have to assume its a paid add on that we opted out of. If that doesn't work you are gonna need to play with your tolerance .0004 os pretty tight for a haas, creates alot of code and the control will chock on it.2 points
-
This explains it well Titanium is also a challenge. “In addition to its high tensile strength and low ductility, titanium has very low thermal conductivity, meaning that it doesn’t absorb heat very well,” Gennuso said. During a tapping operation, heat enters the workpiece, tap and chips, he explained. Because forming doesn’t create chips, the heat must go into the tap or the material. When form tapping titanium, a lot of that heat penetrates the tool and causes premature failure.2 points
-
I did a project using a Kennametal RSM cutter for roughing. It was a .75" I believe with 13(?) Flutes? It was insane. And it lasted forever. I'll grab the model number, speeds and feeds next time I'm near a computer for you. It was awesome.2 points
-
For threads in Ti, I find form taps work well, where applicable.2 points
-
I forget where I saw it (Boeing? aerospace? IMCO?) but there were tests to see if the number of flutes could be maximized for roughing TI. It came down to runout and the limits of the physical universe. To get each tooth to engage well and give long life 13 is about the max for an endmill. Material removal rates boils down to number of teeth.
 1 point
 -
You should have the contour control functions active when machining period. The machine will perform better. Part quality will be better (provided the settings from the factory are good). And contrary to popular belief myth, use them during canned cycles (maybe with one exception until testing your specific machine - rigid tapping). Here's some DATA to back up my claim; 3:24 - W/ NO HIGH SPEED MODES 3:11 - W/ G05.1Q1, G05.1Q3, AND G131 D1 3:07 - W/ ONLY G05.1Q1 3:06 - W/ G05.1Q1 AND G131 D1 3:06 - W/ ONLY G131 D1 G131D1 is a Matsuura specific code that sets certain Acc/Dec parameters to favor positioning type moves (as opposed to profile type moves). If your machine has R levels (on the G05P10000 line), G131D1 would be a rough equivalent to G05P10000R1 or G05P10000R0. Hope that helps.1 point
-
Figured I would come back to this with an update in case it helps anyone in the future. Finishing up running the last 2 parts tonight out of my order of 60. Successfully made all of them to the flatness spec, but ended up not needing a grind op at all. The process we settled on was to bake the stock, rough both sides, cryo treat it, and then finish both sides. I was able to machine to better than .0002" flat over 98% of the part and the other 2% crept close to .0003"-.0004" but fortunately it was in a spot that customer was ok with that. The cryo treatment takes the parts to -200F for 3 hours and then throws them in an oil bath at 200F for 3 hours. This seems to have solved our warping issue as previously my parts were coming back at .0005"-.0007" flat from plating and now with the cryo, we are maintaining .0002" flat over 98% of the surface. I never got the chance to try and grind the anodize since we were able to use a manual process to straighten the more warped ones back into spec. The finishing fixture supported the part on 3 pads and clamped on 2 pads on the longest dimension of it. I used 2 pitbull clamps torqued to 5 in/lb to force the part to sit on 2 of the pads. Attached is file with the fixture I used and mock part. Flatness Fixture.mcam1 point
-
G05P10000 is AI Contour Control (High Precision Contour Control compatible) P is not a function of accuracy. If machining condition is present, R would be. G05.1 is AI Contour Control/NANO Smoothing/Smooth Interpolation Different options.1 point
-
Is it because the material is quite springy and does not like to deform permanently in such an operation, or is it due to how titanium likes to adhere to other materials under such conditions?1 point
-
Thats a big NO, threadmill is the safest. Dynamic toolpaths with max 8% step over, make sure you are always taking a a cut, i.e. don't run air passes1 point
-
What about form tapping?1 point
-
I have 2 HP laptops. One is an i7 and one is an i9. The i7 is used on my main work station laptop and is set up with max RAM and the most expensive Quadro card I could afford (5000). It smokes the i9 machine with an Quadro 2000 card. The i7 CPU allowed me to distribute my RAM evenly over my DIMs, really helps with temp. control.1 point
-
^^^^^^ I've had fair success with Emuge reverse spiral cut taps. Form taps do work but you need good tapping fluid. Drill to the max allowable size per the drawing or drill charts1 point
-
Holes are nothing but misery generally, and Titanium is no exception here. MolyD mixed with Copperease is one of the best tapping fluids I have used for Ti. In the hard metal shops I have worked in, generally anything more than 3/8" diameter and I am looking at a threadmill option. Also true for the nasty stainless steels.1 point
-
Something else, be very careful making threads in this material. You can tap it, but it requires tapping fluid, and peck tapping most of the time. It's generally a lot safer to threadmill, if you only have a couple parts to make, I would suggest it over trying to figure out tapping. (unless you have a sacrificial piece to figure out how the tapping works.)1 point
-
Titanium (6Al4V) is pretty straight forward if you use good machining practices. It is both hard AND tough. It is (like Aluminum) a heat resistant material. That is, it does not conduct heat well. As rigid a set up as you can manage. Both with your tools (short as possible) and fixturing / tooling. I leave a fair amount of stock (obviously it depends on the cutter you are using), with a .5 -.75 inch solid carbide, and pretty much any insert cutter I can think of, I am leaving 0.02" stock to finish. If you are only leaving 0.01 with inserts, you are probably in trouble already. Keep you chip load as high as you can to get the heat into the chip, more stock helps here. Smaller parts are fine in a 40T machine, but once you get up much above 12" you will certainly wish you had a 50T.1 point
-
Use material specific cutters, use HSMAdvisor for starting parameters, and avoid full width slotting if you can. Dynamic paths work well. Make sure your part is well fixtured and supported, since the material is more flexible and elastic than steel.1 point
-
Ingersoll has an online calculator here1 point
-
Something of note when working with S class materials. Be very careful about your first passes against raw stock. If the stock is oversized you can over engage your tool. Which will break the tool instantaneously. I generally always drew my stock .02"-.05" larger then what I measured to help with this issue. The material wants to soak heat, even blipping the coolant off for a second while it's touching material can end the tools life. If you have TSC use it!1 point
-
Good work holding, proper tools (coatings, number of flutes), proper coolant concentrations. Good article here Milling Ti1 point
-
Try checking Coordinate instead of Tool Plane, that will get you 4 positions1 point
-
I used HSM Advisor yesterday on a project I am working on. I have a 25mm 4 flute Sandvik indexable screwed onto a heavy metal shank that I am using to side mill the cheeks on a crankshaft with. Normally I would run it at .004 a tooth and 475ish sfm. That is where I started at. It worked out to be 40 IPM and 1900 RPM. This particular crank is a 6 cylinder so I had 6 pins to play on. HSM Advisor suggested 76 IPM and 2100 RPM. I took the advice offered here and started at my normal speed and feed and adjusted up each pin. I ended up at 72 IPM and 2100 RPM. The only reason I didn't get to 76 like HSM Advisor suggested was that I ran out of pins. I will try it on the next crank. Of course surface finish suffered as I increased feed rate, as expected, but for what I am doing, it doesn't matter on this op. I was able to take a solid 4 mins of cycle time out, which will work out to over 24 mins a crank from my baseline. Time is money as we all know. 24 mins times 30 cranks and HSM is priceless. This is just one op. It has paid for itself already and stuck money back into the companies pocket. This has really got me thinking about my approach to, well, everything. There are other projects that I want to go back and re-apply this on now. I have a dynamic milling project I am probably going to do today or tomorrow in a horizontal cat 45 mill so I will get the chance to play more on HSM Advisor then. Thank you guys for the info, feed back and help. This place is awesome and I read here everyday. I always seem to pick up something new and it makes me think daily.1 point
-
Well there you go then, my learning for the day. I would have never have even attempted to form tap Titanium with my understanding of the material properties and difficulties it can produce. Out of interest what tap were you using ? From my experience this is very much machine and setup specific. You'll need both a rigid machine and setup for that.Try running a 13 tooth endmill in Ti6al4V on a HAAS !!!0 points