SuperHoneyBadger
-
Posts
146 -
Joined
-
Last visited
-
Days Won
4
Content Type
Profiles
Forums
Downloads
Store
eMastercam Wiki
Blogs
Gallery
Events
Everything posted by SuperHoneyBadger
-
 Dang, ask and ye shall receive. I owe you one, thanks again!
 -
Thanks for your help, my guy. I'll look into using a newer post.
-
Ron, thanks for your feedback! This tool in particular is 1st up in the program. I would think that it should get an A0 output, does the machine know it starts at A0? I'm not sure. Also, subsequent rotary moves do not post. This particular test program should output and cut at A0, A90, A180 and A270. I added a z2g here, cause I'm not sure what I'm missing, and I hope it can help. Thanks again
-
Hey folks, Having a problem with our post for a Mats VX660 with A Axis rotary. My feeling is something small is stopping the rotary output. MC2022. MPMASTER with some tweaks to run how we like. It posts out the M22 and M21 codes just fine, so I know the post knows where the A0 should go ( or A90 depending on the C/T plane, I have uncommented sav_rot_on_x = rot_on_x to always output rotary moves on the Top plane etc.). Posting with the generic MPMASTER or Fanuc 4ax Generic works, and I have run a test program on the machine. So I know my tool planes are correct as well: WCS Top, G54 for all ops, created planes for bottom and back, with X+ in the right orientation, been going through anything I can find to try and figure it out. Below is a sample of code for a t/c which should include 'A0' between the unlock and lock: Also there are A0's, 90's, 180's and 270's in the NCI file. And only a few numbers differ in the nci between the generic posts that work, and the one in question. I have a feeling there is something small I am missing to enable this output. Have tried for a few days looking here, and trying to scour the .pst files for differences and all mentions of "index", "rotary" and "rot" etc. I want to be able to fix these types of issues for the shop moving forward. I'm keen to learn as much as I can and make a bold and mighty attempt before calling in the reseller for edits or going nuclear and moving to IKE. Any help would be much appreciated, thanks in advance for your eyeball time.
-
Stick Lettering Modeling Trick
SuperHoneyBadger replied to crazy^millman's topic in Industrial Forum
With only levels 4 and 6 visible, and the camera a few degrees off axis, makes a pretty cool looking lettering style. Dubbing it "80s Retrofuture Chunky Jurassic Extra Bold"
-
Moving/Rotating Solid Faces - Gnomon Issue
SuperHoneyBadger replied to SuperHoneyBadger's topic in Industrial Forum
Another icon or button that my lizard brain always sees, but has never activated. I always thought that initial activation of a Dynamic Transform was my only chance to move the origin of translation, and felt it was clunky in that regard. This will be a daily driver for me now. Thanks as always! -
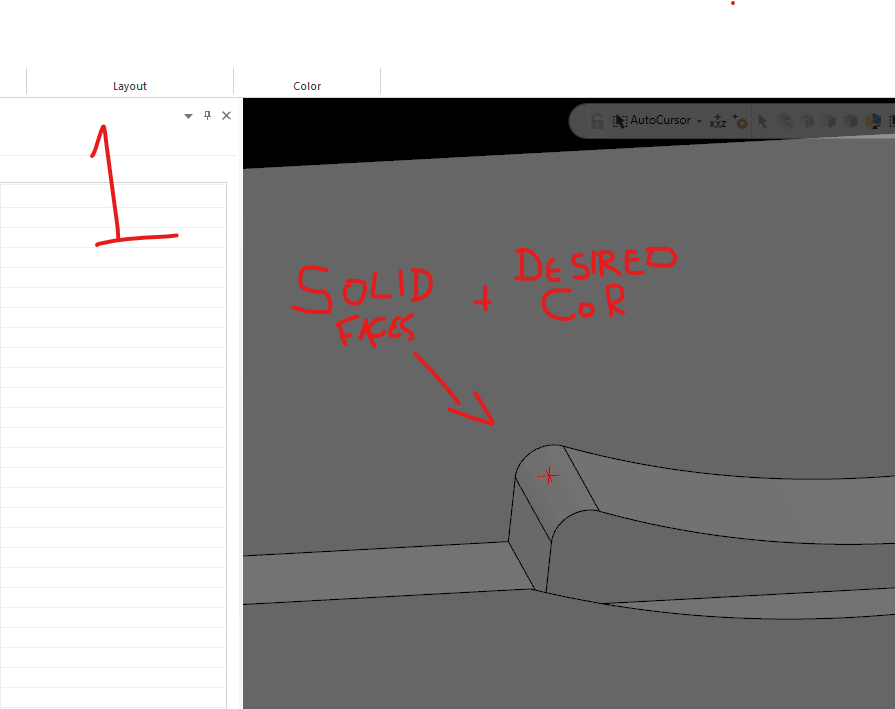
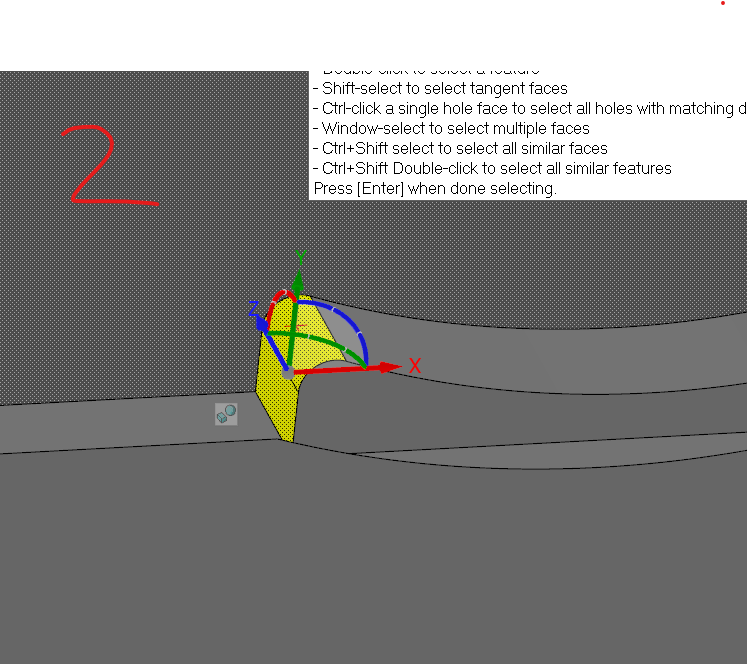
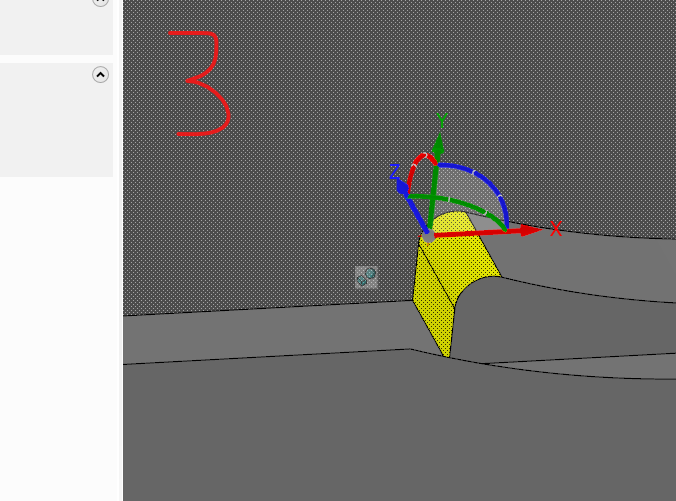
Disclaimer/Info: MC 2022, with a native solid made by extruding wireframes. Using the Move command to select the faces. Trying to use Move to rotate the outer vertical faces of the pocket shown in (fig. 1) to make a little room for the part in the jaw. The corner rads and back face will locate it enough, so I don't want contact on the sides. When I select the faces I want to rotate (fig. 2), I get a gnomon to specify the origin of the transform. Unlike other transforms, the first movement of the grey dot where the axes meet applies a transform op to the faces (fig.3) - I would expect this action to only move the gnomon to my desired center of rotation/transform, and then be able to rotate the selection. Is there a way to move the gnomon to a point without moving my geo? Or are my CAD expectations showing through for this tool?
-
That's a big 10-4. I have MasterCam 2021 and 2022, that's the full kit I can bring to bear on my parts. I hear you guys throw around CAMplete, Verisurf and all those other fancy, book-learnin' programs all the time. I have been operating under the assumption that I am not skilled enough to know that I need them. Without de-railing the thread totally, what is its purpose?
-
Our post outputs this line: G131 (HI-SPEED) We have a misc. value called "Hi-Speed Style", and when it gets set to 1, the post adds the above code on it's own line after the toolchange, and carries on until it's cancelled (every op). Is this naked G131 line the same as G131P1? I'm hoping it is, so I don't have to delve into the post, or even worse - add manual entries for the calls.
-
Are you referring to a page in the machine control here? I'm mostly at the MC seat, so I don't get to poke the buttons on our VX660 too often, and I can't see where these settings would be in MasterCam
-
Hidden/Non-Existant Levels When Opening Old .mcam
SuperHoneyBadger replied to SuperHoneyBadger's topic in Industrial Forum
Fie on you, Lazy Guy! Thanks for the tip, I'll be on the lookout for self-destructive solid bodies. -
Hidden/Non-Existant Levels When Opening Old .mcam
SuperHoneyBadger replied to SuperHoneyBadger's topic in Industrial Forum
"Used or Named" radio button did the trick! Was set to "Named", didn't notice or use those buttons before, thanks a million! Seriously, thanks so much, I have been struggling with this issue constantly as a minor annoyance. Never had a super complex file that I NEEDED the wires from until today. -
At our shop we have 1000's of programs made in earlier versions. Most register as "MastercamX6 Part Files" in explorer. I have only been around for a year, so most of them I have never seen. I can open them in 2021 or 2022 for re-posting or grabbing a setup sheet, no problem. The issues start when I am getting wrist deep and starting modifications/uprev's or trying to make some hi-speed versions. Many, if not all, of the files have the part solid, part wireframes, surfaces, and toolpath driving wireframes completely invisible in the Levels manager. As in the levels don't exist - but I KNOW the geometry exists. Why do I know? Toolpaths are usually fine, and the Chain Manager will show the wireframes as "Chain 1, 2, 3... etc" or whatever it may be when its open. That's the only time I can see these particular wireframes/edges. Is this a common issue when opening older files? My initial thought is that the issue is similar to when you don't name a level, and you can lose the level in the manager, but the geo still exists. Maybe the X6 level naming/numbering system doesn't import well (or I am doing it wrong, by just opening it)? I must confess that 2021 was the first CAM system I have used, so I am totally stabbing in the dark as to how the older versions worked. Any help would be appreciated! And may I say that this forum and its denizens have been an incredible companion as I started, and now continue, learning MC - and develop bitchin' CAM habits in general.
-
See above thread ^^ A veritable wealth of G131 Mats knowledge, helped me figure it out. Happens to be about your very machine. Hope you get it running quick and smooth, my guy!
-
Yes. I don't think MC is set up for GPU compute on toolpath calculations. I could be wrong, but I'd be surprised if true,
-
R-25913 has been a pain, the memory error prompt freezes up my pc sometimes, glad it is fixed. Never put 2 and 2 together that it was related to verify though. Thanks for the post, my guy
-
After installing 2022 on my machine, trying to open .mcam files from Windows explorer results in the 2022 installer launching. I looked at the default program options by extension in Windows, and the .mcam extension is using 'McamVersionSelector Executable'. I'm sure this should open Mastercam 2020 for files last saved using that version, and 2021 or 2022 if that was last used. I don't want to just default all .mcam's to use 2022, as I don't want the older files constantly being updated to 2022 (we changed the posts and m. def locations etc.) when I want to make a small change or repost for a different machine. Anyone else had a similar issue?
-
HS Waterline surface finish tool path gauging in mc 2022 ?
SuperHoneyBadger replied to mig's topic in Industrial Forum
in 2022 the Linking Parameters for waterline and a few other 3D toolpaths is totally different. I am by no means an expert, but it has the power to do a few more tricks than it used to. I'm thinking this might be getting in the way of how we approached this path in the old version, and I have gouged with it too. This video has a quick explanation at the end about the new features of the Linking Parameters. HTH, b'y Below MasterCam offical video is waaay better than what I found.. -
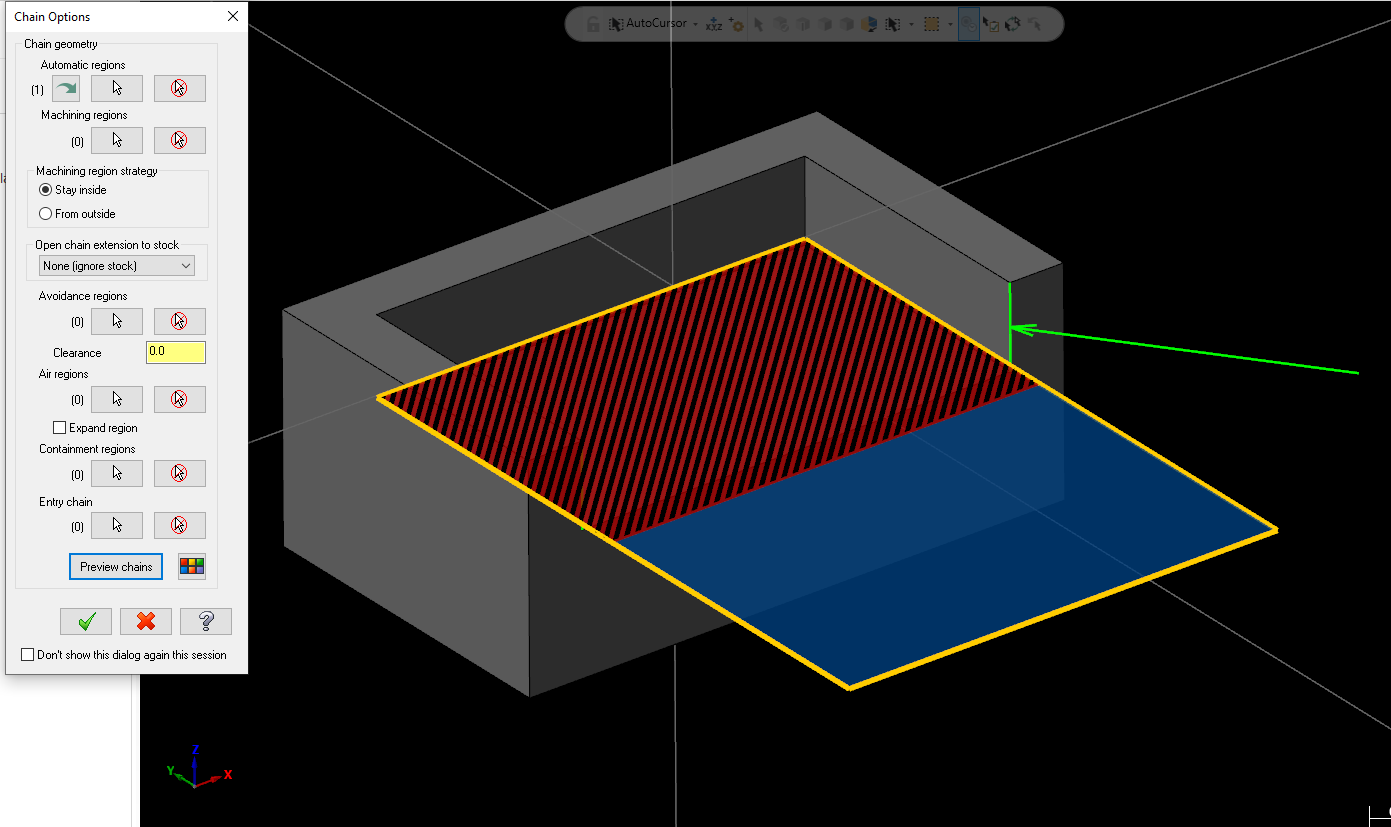
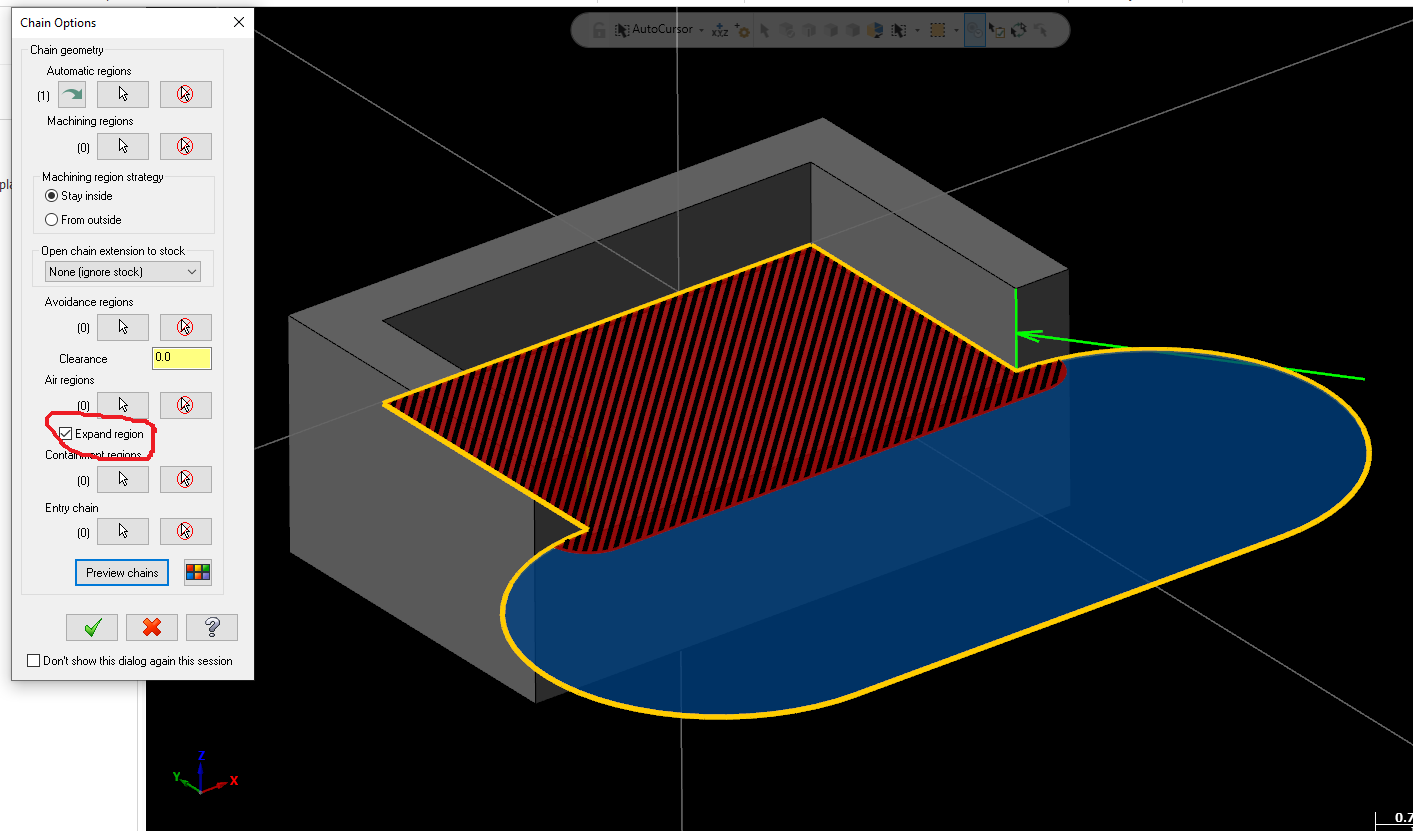
Metallic. I should have looked over here before I posted a longwinded reply over the Auto Region thread! Try an Area Mill op as a finisher with Auto Regions, and use the Expand Regions checkbox in the Air Regions section of the dialog. Might do the trick, b'y
-
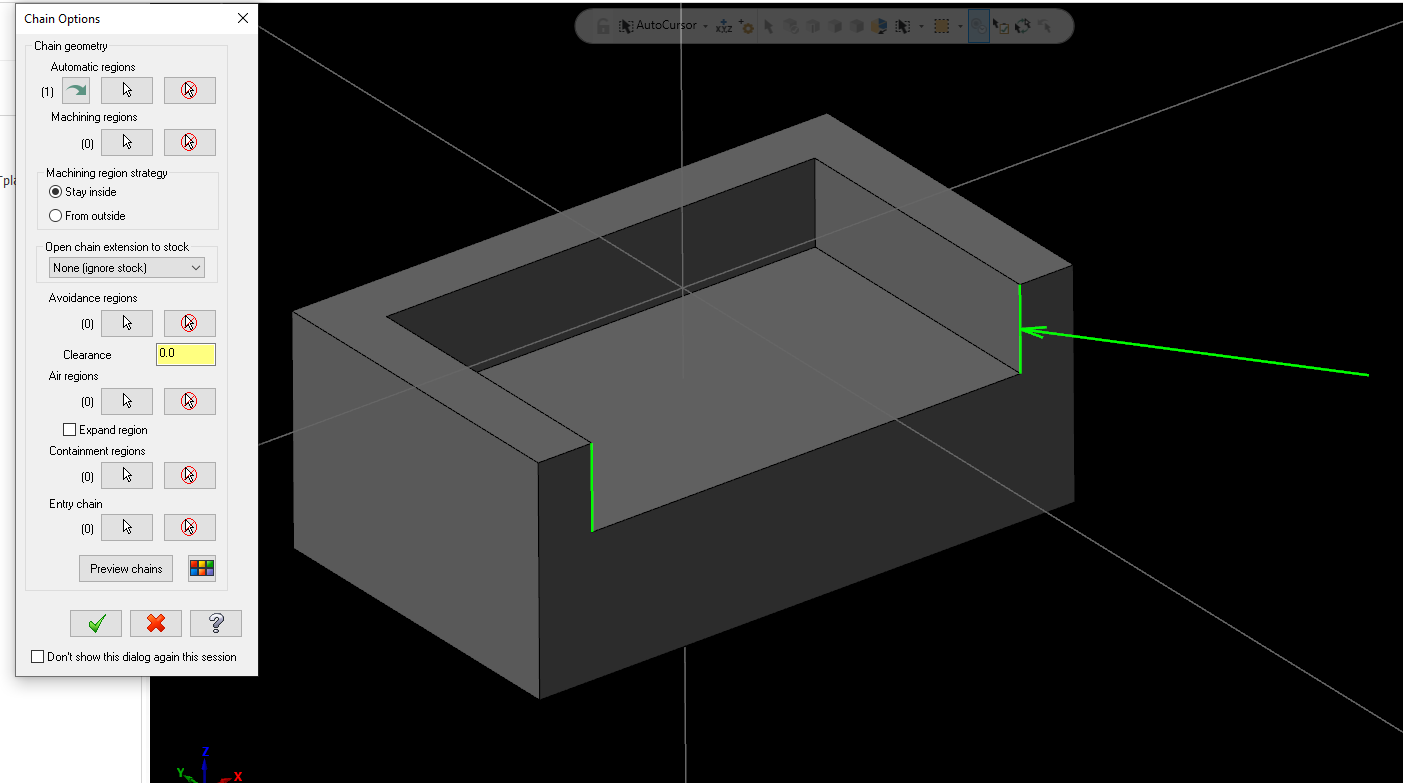
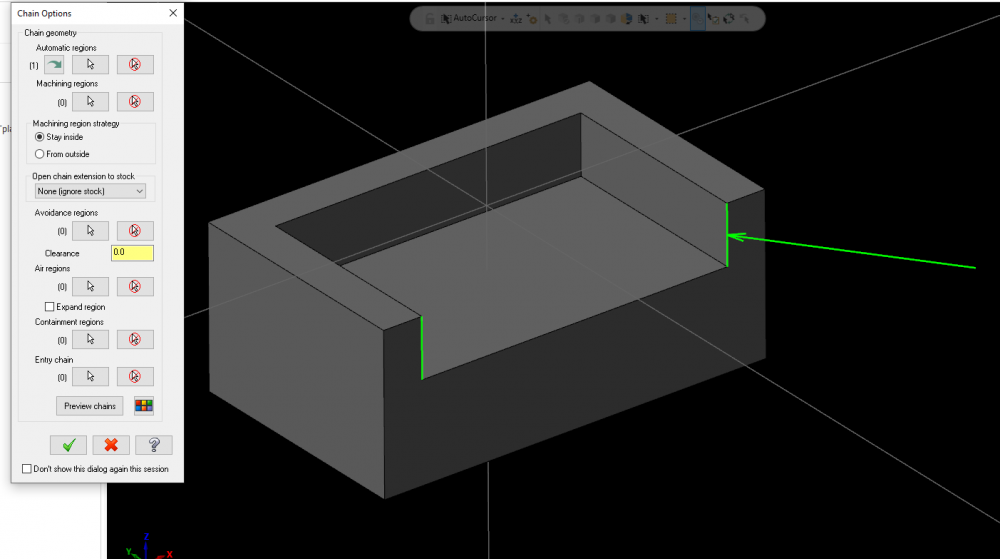
For sure, it's the Expand Region option that I love. Forgive me though, as I may have misrepresented my position - I considered the edges shown below 'outside corners' as far as an open pocket is concerned. We get them a lot here. Below I have a super simple example of the Expand Regions checkbox on the Auto Chain dialog, just adds a little to the material to be cut and follows your avoidance selection, part geo, etc. It's a quick way of keeping the vertical highlighted from getting sharp, saves some deburring time, and dodges a few finger slices. The time saver for me is not having to set up a separate contour path after the pocket routine (finishing not withstanding). It's a small thing here, but a more complex part will benefit. As will parts with many pockets, or nested pockets. I'm making a genuine effort to use solid geo for my selections, and this tool is helping me reduce or eliminate laying down wireframes on my parts.


-
Had a training/2022 upgrade session 2 weeks ago, and have not gone a single project without using auto regions. Becoming just another step for setups in my book. It improves the selection process with such speed it feels like cheating sometimes, and the expand region (don't know if it was there before or not in the old dialog) is doing wonders for sharp outside corners on vertical walls. Especially if you're someone who is still laying down wires, don't overlook this tool!