Kyle F
-
Posts
173 -
Joined
-
Last visited
-
Days Won
2
Content Type
Profiles
Forums
Downloads
Store
eMastercam Wiki
Blogs
Gallery
Events
Everything posted by Kyle F
-
These helped immensely!!! Youtube has been the best resource for me. I'll toss in some accounts I have subscribed, https://www.youtube.com/@mastercam https://www.youtube.com/@CamInstructor ^^top two probably the best resources https://www.youtube.com/@themcamnw https://www.youtube.com/@MLCCADSystems https://www.youtube.com/@CADCAMSOLUTION ^^ they have great videos not showing programming, but showing process of 5axis workflow, that can be super useful. https://www.youtube.com/@TITANSofCNC ^^ can of course be corny as hell but if you dig deep there is a little good mastercam info. like the one titled "MasterClass CNC Programming Techniques Revealed" a couple specific videos I really enjoyed
-
I am quite lucky in the sense that I have full autonomy in my process/tooling/etc so no more!!! In our program directory I went ahead and made a new folder titled "multiaxis 2024" which is all one file per part, and I just have to hope no one in the future will judge me on the old programs! We've got some 2d wireframe programs from late 90's that are still in rotation so no way I'm going back and editing old old old ones.
-
I've been at my first and only shop for about 12-13 years I think now. This is how it always was,... until recently figuring out the right way from these forums LOL. It makes sooo much more sense to have everything in one file, now when I'm messing with a 5axis toolpath and "oh look, I need a little bit more clearance on my fixture" Now I just hop into the fixture machine group and push/pull the solid, and change those milling depths, same file, easy peezy. I feel the same, for now at least, I enjoy the multiple machine groups. Downside to these large files with lots of solids is though now my xxxxty PC specs are really starting to show. It's sad the percentage of my day I am just chilling waiting for something to regenerate... but I guess it gives me time to do research and write replies like this one haha. agghh I am so excited for my new machine(s)
-
What size holes are you drilling? Easiest solution IMO would be carbide drills, especially for the glass filled 2300. If you're dead set on using HSS you'll probably burn through them quickly, I would go lower on the SFM side and lighter chip load maybe .0025 instead of .005 but that depends on drill size of course. short pecks. If you need to reduce cycle time go carbide. I have machined ultem 1000 but I don't believe I've ever milled 2300 so take everything I say with a grain of salt LOL. Just where I would start. https://aipprecision.com/machining-ultem-plastics-guide/
-
Yes! dynamic remachine is definitely where it's at. I'll use opti-rough + rest only if the part has a lot of 3D features, cycle-time on the 2D dynamic is usually always faster vs an opti-rough (again unless you want those step-ups for 3D stuff) Even with all the opti-rough setting tips n tricks EDIT: I just now am seeing OP's second screen shot... I'll have to mess with it, seems as though I am wrong about pretreatment only for O.D. corners
-
I have always thought of "corner pretreatment" as a way to address the 4 sharp corners on a rectangular piece of stock... I think what you're looking for is to further rough out that red colored stock? maybe before that 1/4 endmill dynamic finish pass you're showing in the screenshot, add a remachining contour to semi-finish those tight areas? embarrassingly enough I just recently figured this out, in all my old programs I would go in and manually break wireframe geometry to remachine radii lol... sometimes I surprise myself
-
Quick question about 3+2 and probing on a Haas
Kyle F replied to Kyle F's topic in Post Processor Development Forum
I honestly think it may be as easy as just deactivating with G255 before the first G65 probing cycle. After the probing cycles it's just homing the machine via G53 so I can't see that posing any problems. Between my next setups maybe I'll give it a try and report back. -
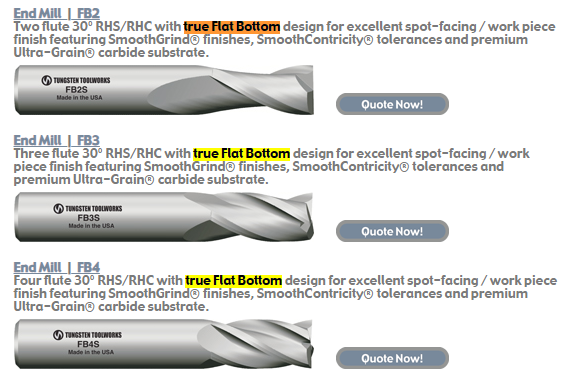
I personally would go with TTW to guarantee the true flat bottom. After thinking about it,.. and trying to wrap my own head around it,.. I found this on sandvik's turn milling link. an insert cutter would be great for something like turn milling on a 4th axis though assuming they're the right geometry inserts.
-
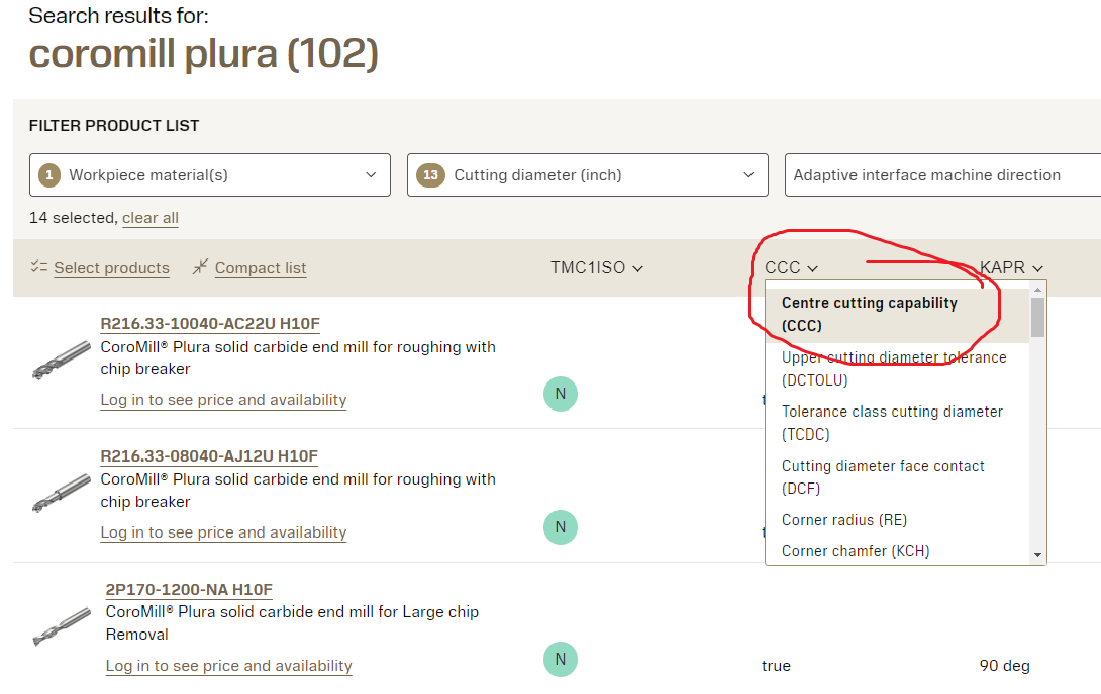
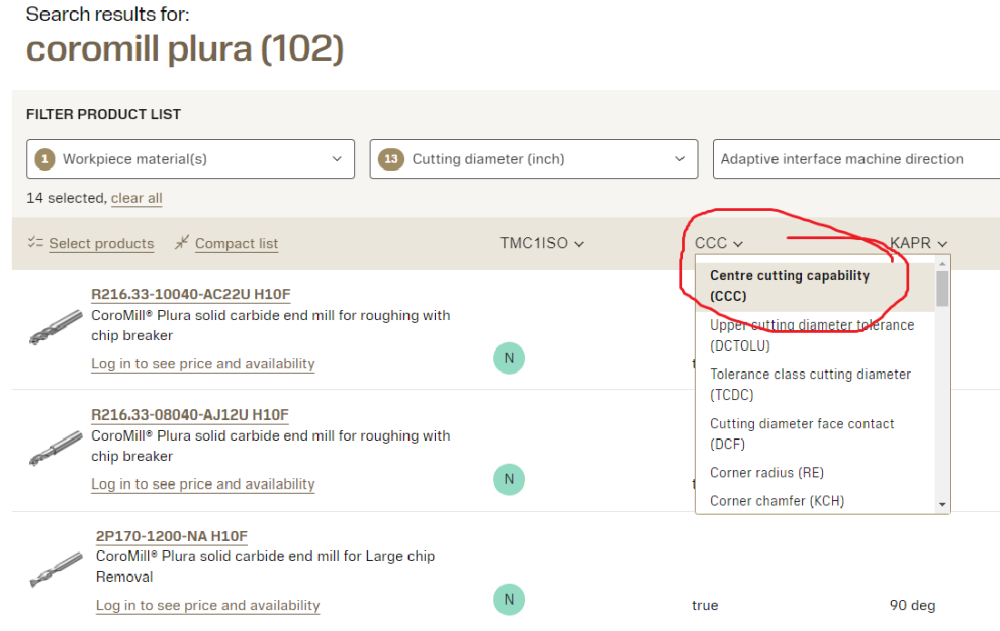
sandvik coromill plura, when you're filtering endmills on their website you can specify by "centre cutting capability" https://www.sandvik.coromant.com/en-us/knowledge/milling/turn-milling I would maybe shoot them an email and double check but I believe true flat bottom is CCC.... If true flat bottom is too hard to find I suppose you could do a .375 inserted cutter https://www.tungstentoolworks.com/products/end-mill.asp# Or you could order custom from TTW
-
They make true flat bottom endmills, that would work perfectly for this. without that negative rake towards the center of the tool. Funnily enough, I learned about this during CamInstructor's RON WEEK videos haha! how fitting
-
Hey everyone, one of the machines I program for is a Haas UMC-500 and I regularly use our renishaw tool probe to pick up work offsets. From there I'll use a typical g254 dynamic work offset to access various other planes for 3+2 milling. I recently got CIMCO probing and it's been incredible, but I had to get a few post modifications. First issue was that my post was outputting a "S0 M05" line so I got the S0 removed, no problem. Second issue was an alarm of "TCPC OR DWO IMCOMPATIBLE CODE" caused by G254 being active when it tries to start the probing cycle. To get it to work all I had to do was hand delete the G254/G255 and all was well. I relayed this info to my reseller and they modified my post. Now I can post the program fresh out of mastercam with no hand edits ( exactly how I prefer lol ) So my code looks like this: N1 (OPERATION - 1) (PROBE 1.84 BORE FOR X0. Y0.) (STANDARD OMP40_A-5000-3709) G0 G17 G40 G80 G90 G94 G49 M11 (UNCLAMP B) M13 (UNCLAMP C) G0 G90 G53 Z0. T47 M6 T1 M05 G0 G54 G90 C0. B0. X0. Y0. G43 H47 Z2.73 M10 (CLAMP B) M12 (CLAMP C) G65 P9832 G65 P9810 X0. Y0. Z2.73 F50. G65 P9810 Z.8819 G65 P9814 D1.84 S1. G65 P9810 Z2.73 G65 P9833 G49 G0 G53 Z0. M01 BUT it got me thinking, what if in the future I want to use G254 to reference locate a datum or feature and probe at something other than B0. C0. ? so this morning I added a quick probing cycle to check a feature at a plane and the code outputs like this: N2 (OPERATION - 2) (STANDARD OMP40_A-5000-3709) G0 G17 G40 G80 G90 G94 G49 M11 (UNCLAMP B) M13 (UNCLAMP C) G0 G90 G53 Z0. T47 M6 M05 G0 G54 G90 C-90. B30. M10 (CLAMP B) M12 (CLAMP C) G254 X2.38 Y-2.6447 G43 H47 Z3.8201 G65 P9832 G65 P9810 X.0896 Y-.8728 Z1.5 F50. G65 P9810 Z-.1181 G65 P9823 A105. B180. C-105. D.7561 G65 P9810 Z1.5 G65 P9833 G255 G49 G0 G53 Z0. M01 Which leads me to believe I still need some tweaking, cause I imagine I'll get an alarm from that G254 being active. Long story short, I am unsure exactly how I should ask my reseller to modify the post for when I'm probing at an odd plane. I've never had the need to do it honestly but I'd rather have it sorted *before* I need it so I don't get hung up waiting. Is it as simple as adding a G255 before the probing cycle, and then re-activate G254 after probing is done? or even maybe not re-activate it at all and just make sure I do forced tool changes between probing cycles if there is ever more than one in a row on a certain plane? I posed this question to my reseller when they were modifying the post previously but they just kind of ignored me LOL so I feel odd asking them to "fix" it when I don't understand the mechanism of how. I'd appreciate any input or advice! Thanks y'all
-
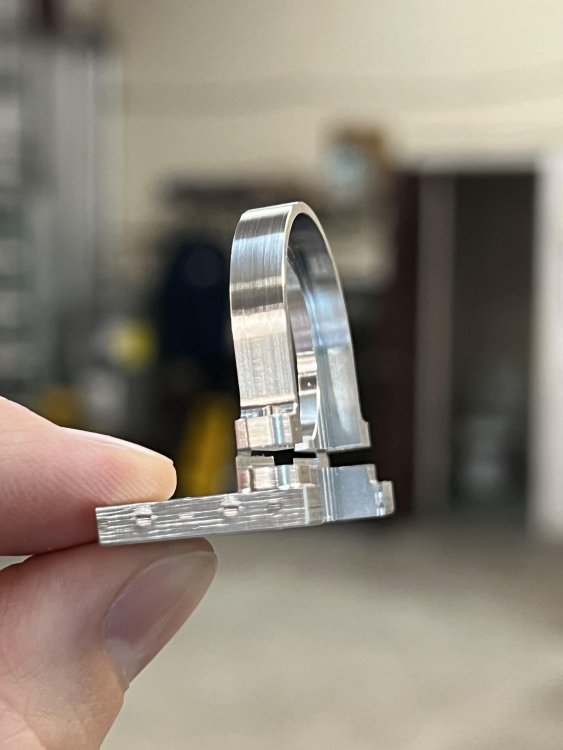
It really does open your mind to the possibilities... It can sometimes add a decent amount of cycle time depending on rigidity of the workpiece, but as long as you can justify it by the lack of extra ops I say it's worth it I'm a little late to the party and have only started implementing it over the last year or so. here's a lil simple part I did recently with a .002" tab I had some downtime on my 5axis and my manager asked if I'd set up this simple 3 axis job... I looked at the print and said "only if I can reprogram it real quick"
-
Setup Sheet Won't Output Thread Mill to Tool LIst
Kyle F replied to cncgotoguy's topic in Post Processor Development Forum
I always have a "notes" layer to go with each op. way too handy for the auto-output to setup sheets.
-
That sounds about right! Thank you aaron (and bob of course) That makes perfect sense. I may have to show my boss some of these posts lol and I'll be reading through that thread as well @Jake L I also saw your bump on the old g54.4 thread and there is a ton of great info in there
-
@Bob W. Great post, thank you. At my job shop we are about to embark on our "lights out" journey. As with most stuff, everyone around me is saying "now that we bought the machines, we can run lights out" without *really* understanding all the variables. 100% of our multiaxis mill parts have been set up and ran by me, and now I'll probably be programming full time trying to keep these two pallet mills fed with parts. (but I'm sure if a tricky 5axis part is in the pipeline I will want to personally set it up) I have operators at my shop who load drills into dirty er collets with rust on the taper, and don't even bother doing a quick S200 runout EYEBALL check haha. These are the guys going to be setting up my stuff?! oh lawd I also have setup sheets with specific holders and specific stickouts and it baffles me that sometimes they just straight up ignore it. Yeah, go ahead and put that 1/32 endmill stuck .500" out in a side lock holder, sure. Wonder why the finish sucks? My *manager* was running my machine while I was programming and I gave him a torque wrench and told him the spec I was using,... I walked out 30 min later to see him using a regular wrench on the vise. makes me want to pull my hair out. Yeah, it's an OP10 and the part would be fine, but it's the principle... Sooner than later he's going to do that and it won't be fine, or the parts will vary in flatness/thickness/whatever. I could go on for hours lol. Needless to say it's got me excited, and equally nervous. So I'm watching this thread like a hawk looking for tips and tricks
-
Whoops looks like I found another bad habit of mine
-
Anyone know how cutting tools are manufactured?
Kyle F replied to Metals and materials's topic in Educational Forum
-
I like this idea,.. nothing irks me more than opening up one of my programs and seeing that things weren't how I left them haha. If I'm currently working on a project or optimizing a program I'm running on a machine, I'll save the file while I'm on a random wireframe level, or zoomed into a feature, whatever's clever. Then once I feel like I have the program "polished", I'll go to op10 setup viewsheet and save it from there so the thumbnail will be just how I like it (while my mild OCD can be annoying I think it lends itself to helping me be a good machinist/programmer)
-
Anyone know how cutting tools are manufactured?
Kyle F replied to Metals and materials's topic in Educational Forum
I can technically sharped a drill assuming the diameter is large enough LOL but it's been yeeeears since I've done that. HSS drills are too cheap and parts too expensive and that's not even taking my personal laziness into account. -
I really only prefer to run first ops on the UMC in my shop. for 2nd ops it's annoying with Z floating around throughout the day. for +/= .005 it's obviously no big deal, but annoying nonetheless. My UMC-500 has taught me many ways to program around it's flaws haha. I can personally get what I think is decent results considering the machine's inherent flaws. I just milled a part today where I finish the O.D. profile from the top plane with 3 axis motion. Then I use DWO to opti-rest rough some more in tight corners and then use full simultaneous 5axis for semi-finish and finish with a .100 dia ballmill. The blending from the O.D. to the 5ax toolpaths were all within .001. @crazy^millman was actually kind enough to help me with my first unified multiaxis toolpath on this part. I think it was completed with something like 10-12 different unified multiaxis toolpaths. Didn't use "auto" on a single thing with all this being said,... I can't wait for my two Matsuuras coming early next month LOL
-
That would happen to me too sometimes, but once I started doing it in another method it works every time. right click tool you want to change > edit tool, then under finalize properties, I'll change and verify the tool number, length + diameter offset. At my job shop we don't use a library of tools (yet) so usually I'll just wait until I'm finished with a program, then select all operations, right click > edit selected operations > renumber tools. definitely found that to be the easiest
-
I would first check your posted G code on the program, and verify the peck via a G83 There is a setting somewhere in mastercam simulation, like a check box, to simulate drill pecking. It could be possible yours is turned off. I have mine on but I know sometimes it can get annoying lol. The settings below not changing is fine also, those ghosted out areas I mean. For my post I can put whatever I want in the value, but it just takes the first "peck" value and uses that anyways. For more control I have to use an advanced drill cycle.
-
8 Finish on Oring Grooves?
Kyle F replied to crazy^millman's topic in Machining, Tools, Cutting & Probing
@Powertrain604 Hmm I've milled a decent amount of Vespel but have never had to deal with any tough surface finish requirements so I may not be able to be of much help,.. but easiest option would be to get a tool that you can run something like a reaming drill cycle on. https://www.thinbit.com/products/mill-a-groove/index.php check these out. you can get custom ones as well here is a screen shot from a recent quote of mine: theoretically you could get 2 or even 3 of the same tools, but maybe have the first tool a thou smaller and it cuts .001 off of finish depth, then tool #2 can come in and take the last .001" off the wall and floor, and then tool 3 could spring pass tool #2 and remove any deflection (which would be super overkill on something like vespel haha I would probably go this route on inconel though)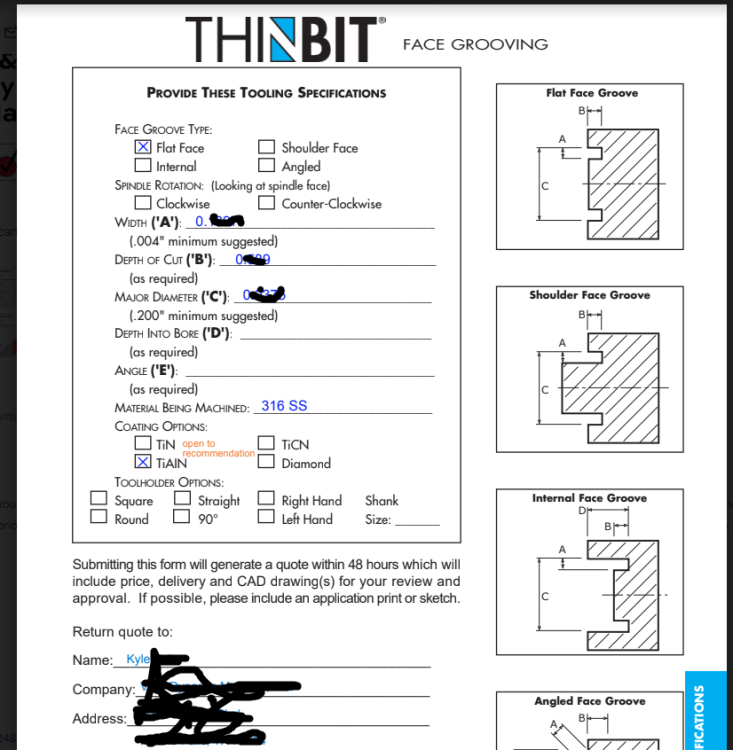
-
Any suggestions? My first time HEM with MAsterCam!
Kyle F replied to Metals and materials's topic in Industrial Forum
Maybe it's because I mainly program for Haas mills, but I usually run 10% or less even on stainless haha. Now we are talking about a .236 dia endmill running at over 5x diameter stickout?? in titanium?! I'd be running probably 2-4 different roughing bull mills of varying diameters and stickouts to maximize rigidity. I have also had INCREDIBLE results with helical high-feed mills. They have some with TPlus coating for harder materials. https://www.helicaltool.com/products/high-feed-end-mills-steels-up-to-45-rc-metric-variable-pitch-coolant-through-reduced-neck These are great and in their 6mm variety they have varying reaches of 12/24/36mm. It's hard to know without seeing a model or dimensions but if you're dead set on 6mm tool I'd be running one of each length, and as the tool stickouts increase your speeds and feeds should reduce to reflect that. The beauty of the high feed mills is that they love to run high stepover and low depth of cut, which is great for situations like this IMO. They have their speed and feed chart on that page, use that. When using the shorter mill, I'd run close to the top of the recommendations. ( 4% diameter depth of cut, as high of stepover that pleases you ) then as you move to tools that are further out start getting closer to that 2.5% diameter depth of cut. They are bell shaped tools, so work really well on hard materials taking those light stepdowns. I personally would probably use typical 2D dynamic chains to get the majority of that roughed out, and then polish it off with a stock model + opti-rest to finish that curvature at the bottom of the I.D. For finishing those fins, I would think of trying 2 ideas: 1) rough out the whole part and leave like .05 per side on each fin, and then finish ramp with a necked back low length of cut endmill (I'd personally run real low SFM and chip load here) I'm not sure how thick those fins are but sometimes the rigidity of that extra .100" below where you're cutting gives it enough strength. 2) if that doesn't work I would rough and finish them in steps like what was previously mentioned. best of luck!!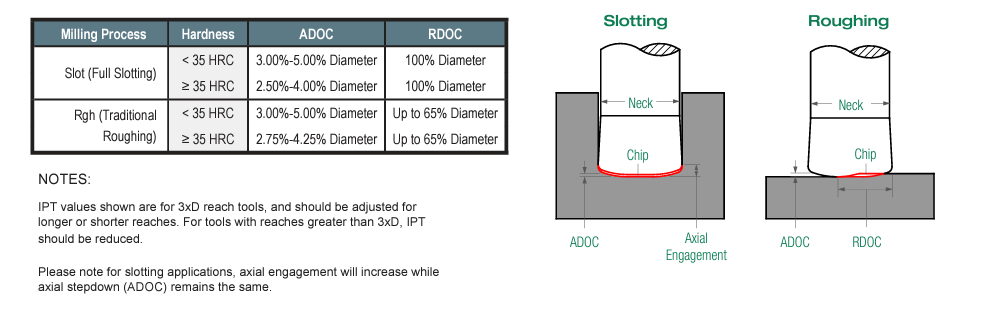
-
jesus I love these forums LOL!! I never knew about the hide properties either, that's amazing, I always wanted planes + levels smaller but I hate how jumbled up it all got. and THEN I watched the video, and seeing @Aaron Eberhardright click drag and drop geometry from chain to chain,... amazing how many little hidden gems there are. Almost sad I've been programming in mastercam for over 10 years and I still somehow know so little