Kyle F
-
Posts
173 -
Joined
-
Last visited
-
Days Won
2
Content Type
Profiles
Forums
Downloads
Store
eMastercam Wiki
Blogs
Gallery
Events
Everything posted by Kyle F
-
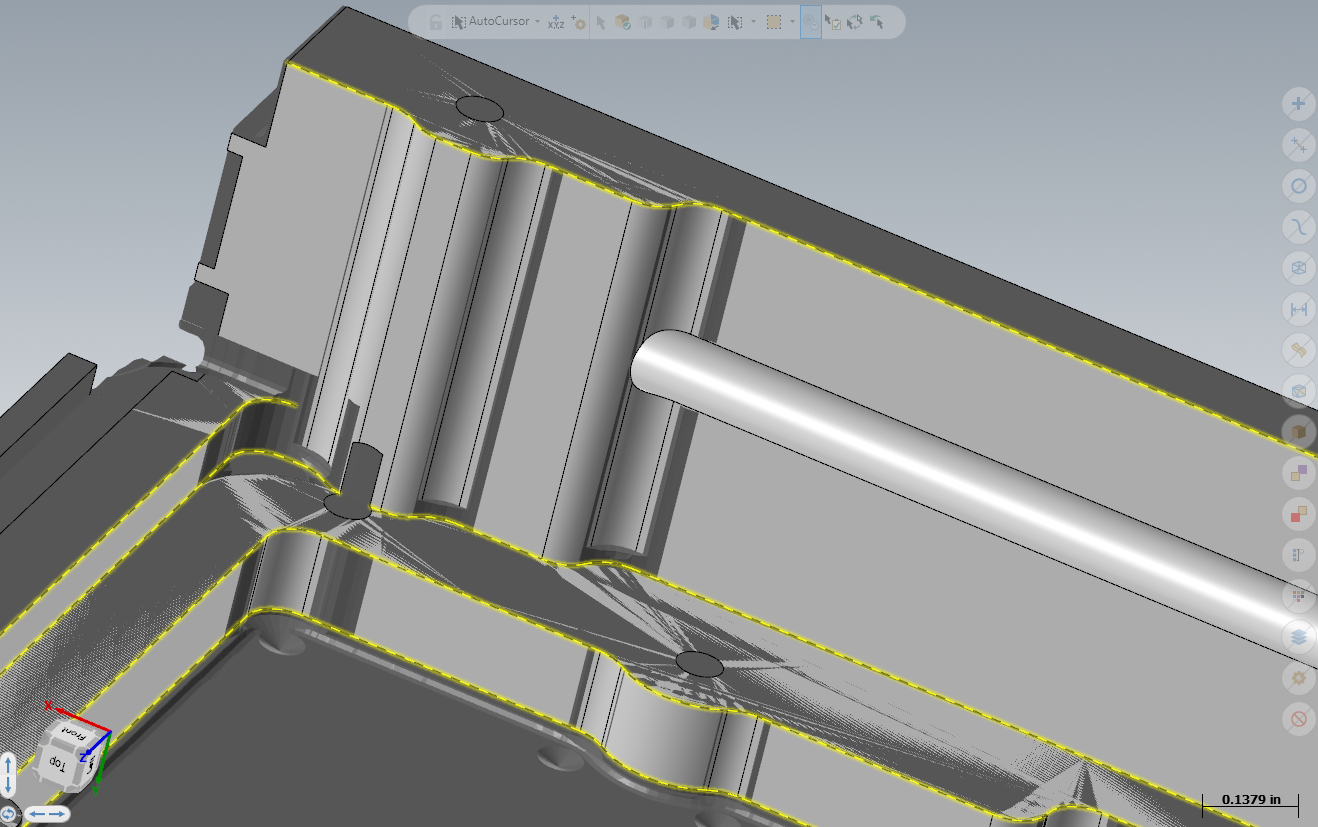
It's rare I get a part that truly calls for 5axis motion. 99% of the time I get through with 3+2 but this part seems to call for it. 2024 zip2go file can be found here: https://uploadnow.io/f/6mLh3kf I have model prepped out any non-necessary features So essentially I have a semi-finished aluminum part that will be coming to me from the lathe. I have then already 3+2 roughed out majority of everything, and have it stock model on toolpath #1 toolpath #2 is a simultaneous semi-finish for the .05 radius around the base of the feature. and then toolpath 3-4 is me just messing around trying a few different things. stepovers are spaced at like .05-.1 to speed up regeneration. unified automatic and unified morph with oval form endmills. So I guess I have a few questions: Does mastercam support 3d high speed toolpaths with oval form or barrel form finishers? I can't seem to get it to work but was curious if maybe I had the tool defined improperly. Would an oval form finisher be an appropriate tool to finish this part? Or I wonder If I should just stick to what is easiest and finish in 3axis, and then come in 3+2 and ballmill finish what's left on that angled port boss thing lol I really appreciate and value the opinion of you all and would love to hear any advice or input you have. Unfortunately I am the only 5axis guy at my shop so i can't really go to many people for help on these kind of things.
-
UHMW is always a pain.. it's the stuff the turtle-suffocating 6pack holders are made of IIRC lol. so soft you can deburr with your fingernail. everyone gave great advice in this thread
-
odd. at least with my posts, both of those would spit out G99 with "use clearance only at start and end of operation" checkbox selected while using clearance + retract
-
oh that's wild for some reason I thought it had to be a closed contour. whoops! thank you. I'll definitely try the ramp. and generally if I ever use drills to help rough I also will keep them a few thou off of the walls. This is an odd situation where the added cycle time wasn't worth the slightly improved finish in the corners due to the quantity of the job and the tolerance on the finish. that is another old bad habit of mine I need to get rid of! I never use re-machining option on the contour setting and this is a great time to put it to use. I have a handful of different 2d contours set to single radii each with varying lead-ins/lead-outs and it's a whole lot of added toolpaths for nothing lol. I appreciate the input. Excited to put this to use in my program today and demo out tomorrow!
-
So essentially just draw some closed geometry in each corner and have the tool spiral down? I do love myself a helical ramp, I'm open to giving that a try! then once speeds/feeds are sorted out I can change angle of helix to speed it up and find a sweet spot.
-
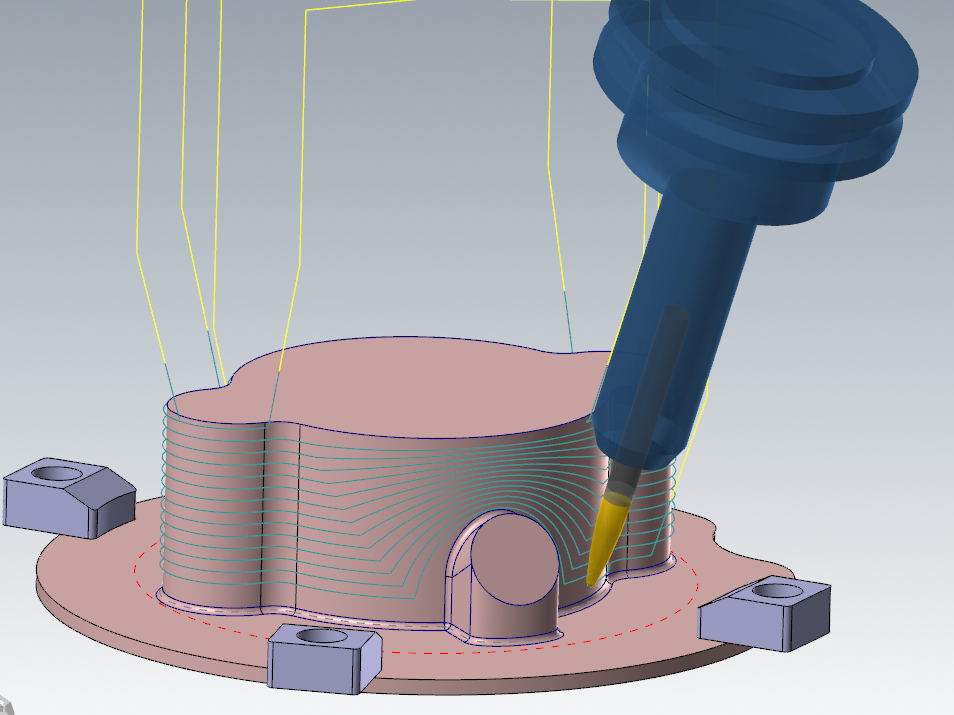
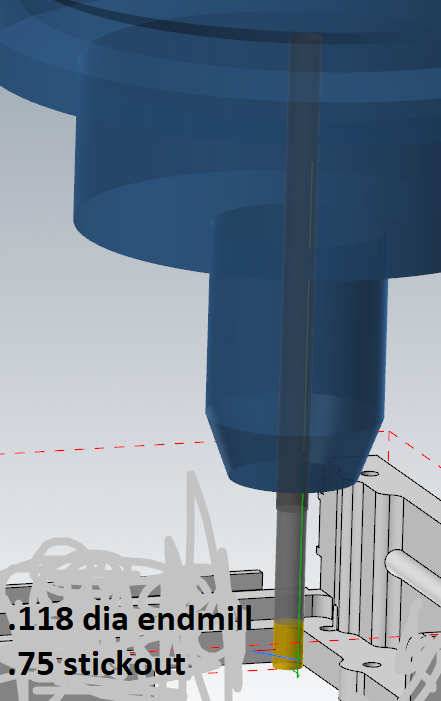
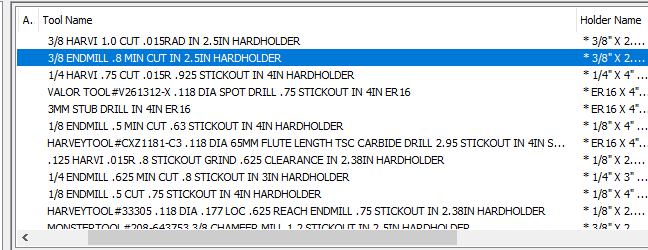
I am working on a fun little 5axis project. It has a handful of .06 radii corners on it, and I pre-drill where I can with a .12 dia drill. I then rough the part with 3/8 -- 1/4 -- 1/8 endmills and after most of my finish passes I am left with what is pictured here. So I really just have a few cusps and tight corners that need finishing. so I have a necked back .118 dia 3flute endmill with .177 length of cut for this. My problem is that widdling these little sections and getting a decent finish isn't necessarily hard, it's just taking too long haha! At most there is probably .008 stock left in tiny sections. Right now I'm going about it running S6000 F10. and in some of the real tight sections going as low as s4000 f5. taking .175 depth cuts and 1 spring pass. It's got a teeny bit of chatter in sections but overall it's certainly acceptable. It's taking quite a while though and I've always read that tiny tools need a decent bite or else they vibrate but I've had pretty poor luck in the past when trying to finish small endmills with longer stickouts without slow SFM and multiple finish passes. the machine has 10k max spindle. I'd love to hear how y'all would handle this little problem of mine! thanks for taking the time and reading this, appreciate any input I work in a small job shop and my quantities typically usually max out at around 25 parts and most my jobs are new, but this one is actually a pretty high quantity (for me) and I'm running 4 parts on a tombstone so any cycle time I can cut off really helps!

-
This as a first part in mastercam is wiiiiiild. Now, over 10 years in, I'd love to get an impeller part,.. just so long as the tolerances weren't too crazy or material too hard lol
-
this doesn't make sense to me,.. what is all this extra room beneath your tapped section of the hole??? most the parts that come my way have a .200 hole depth with .200 thread depth
-
Just for fun, technically you could find the circumference (or whatever the correct word is lol) of whatever feature you're cutting, and set that to your contour lead-in/out overlap box in the top right. this would give you the motion you're looking for, but it is with multi-pass. this will spit out: clearance/retract/go to depth/finish pass, stay down and spring pass/retract back up edit: I'm sorry after re-reading OP, this will have the same cutter comp for both finish and spring pass. not sure if that's what you're looking for

-
It's just kind of standard. even mcam defaults the plane that way. who cares if your parts coordinates are in +/- ? you're using cam software haha it'll do all the hard work
-
Milling on Okuma LB3000 EXII using Mastercam code
Kyle F replied to Minus 40's topic in Industrial Forum
what a stupid non-standard option that is haha Imagine not wanting that. -
Milling on Okuma LB3000 EXII using Mastercam code
Kyle F replied to Minus 40's topic in Industrial Forum
Do you by chance have any lead-in/lead-out on your contour? this .025 straight point to point line in the NC code defines the adjustability. if there is no G1 I won't have adjustable comp. I have pretty limited G-code knowledge so I can't go in much more depth haha but that's usually the easy answer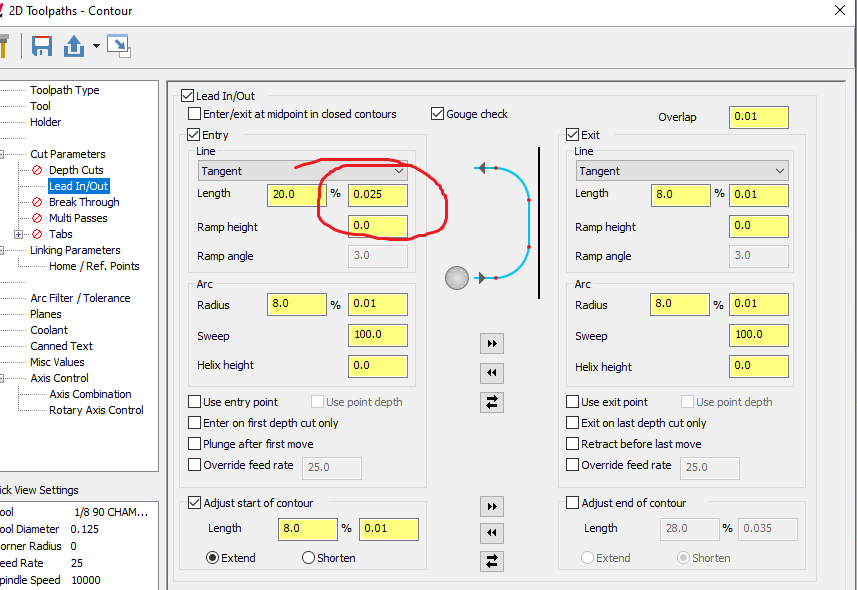
-
100% same for me. way too many variables to have super dead set #'s set, unless it's a super standard roughing practice in my shop. way too many variables like depth/stepover/tool stick-out/etc I'm pretty specific when it comes to my tool set-ups lol
-
another quick easy way to tell if the licenses are all tied up: when I open a mill file it'll say "mastercam mill 2024" at the top header or whatever you want to call it. If all the licenses are tied up it will still say "Mastercam Design 2024" and you can't open up any of the toolpath settings etc
-
I had no idea contact point could be plotted out as aaron just kindly demonstrated, that is so exciting it will be added to ATD in '25. I feel like a kid in a candy store lol
-
Pitch in your little gems that make mcam life easier
Kyle F replied to jlw™'s topic in Industrial Forum
This one is very handy. Only time it's not fun is when you're in real deep in the program and you decide to change a stepover or something on one of your first toolpaths, then it dirtys up the whole job. it's like opti-rough/rest stock model inception after 4-5 different planes with varying stock models lol -
this was me reading his response LFG
-
3/5 Axis cutting Toolpath suggestion
Kyle F replied to Metals and materials's topic in Educational Forum
honestly it would be easier if you could just upload a .mcam file and I'll try to take a peek at it. if the floor is a big curved lens, but the fins are straight up and down, then I can't imagine how a 5axis toolpath would be easier/more efficient than something like a generic surface finish scallop for the floor. (except maybe 5axis for better toolholder + tool shank clearance) and if you have something like a bull nosed endmill on the opti-rough, but you set 0.0 stock to leave on floor/wall, it still won't be able to finish that center section due to the geometry of your tool. also, the size of the part would drastically change how I would try to go about attacking this. there are just too many variables to be able to guess off the top of my head -
I did a quick rough guesstimate and I came out under 3,500 hours.. I have so so so so much to learn, looking forward to it!
-
I've been doing a lot of multiaxis parts on small dovetail fixtures lately, and 2d ramp has been one of my best friends. with typical dynamic milling (high axial, low radial contact) I've had issues with chatter + screaming during roughing. ( I assume from high helix flutes with too much contact trying to pull the part upwards) but quick change to 2d ramp around the o.d. relieved all the tool pressure and it's been a go-to move ever since.
-
3/5 Axis cutting Toolpath suggestion
Kyle F replied to Metals and materials's topic in Educational Forum
I may be missing something, but judging by your photos this part doesn't even seem to need a 5axis toolpath, it looks as though it could all be done in 2d and 3d toolpaths + surface finishing. do you really send it out for heat treat looking like the second photo? or do you rough out the rest of the center first? -
Right after you selected the two smaller slots, did you click the outside diameter of the part? I saw the O.D. go highlighted at 0:08 with the slots righhttt before you went into the toothpath settings. you may need to upload the mcam file so we can open it up and check it out, there are just so many variables and any one thing could throw it off. Honestly I've never used slot mill, I tend to just use a pocket cycle or dynamic mill so I may not be the best person to help either.
-
You think that's bad, wait until you start to get in the weeds on tool axis control geometry on the 5axis simultaneous moves lol
-
The dynamic toolpath,... is it geared towards high speed machining? maybe, yes, but you know you can do a dynamic toolpath with a 90% stepover and 500% depth of cut so I mean, it's all kind of available to tweak at your disposal. 2d dynamic mill is probably my favorite toolpath
-
Switching between DWO and TCPC w/ Generic Haas 5X post
Kyle F replied to apeters's topic in Post Processor Development Forum
On our UMC-500, both DWO and TCPC get triggered automatically in the post. but we have the UMC-500 specific post,.. I'm not sure how expensive it is but I imagine it's worth it to just pull the trigger on the post specific for your machine. Even with my UMC-500 specific post I still get issues here and there (hehe I should really get those issues figured out too but sometimes there just isn't enough hours in the day)