Aaron Eberhard
-
Posts
1,419 -
Joined
-
Last visited
-
Days Won
104
Content Type
Profiles
Forums
Downloads
Store
eMastercam Wiki
Blogs
Gallery
Events
Everything posted by Aaron Eberhard
-
 The other thing with stock models I've found is that a lot of them with a few toolpaths work better than a few with a lot of toolpaths. I.e., You're better off having 5 stock models that process 2 or 3 heavy toolpaths than having one that processes 15. It will take more than 5 times as long to process the second scenario. I never use STLs due to the file issues Ron mentions, but I often will create a set of levels with a mesh of my stock model for Machine Simulation purposes. If you didn't know, you can right click on a stock model > Mill toolpaths > Stock Model Convert to Mesh. If you have a lot of 'em and the regen stack is getting unruly, then you can always start a "fresh" stock model by pointing at one of those meshes you exported.
- 29 replies
-
- 5
-

-

-
- .stl
- stock model
- (and 4 more)
-
I use both pretty interchangeably. If I'm doing features that can be driven directly off the solid, I'll do that. If I need to manipulate something to get a different shape or containment, I'll create those wireframes as needed. I often even use model prep to remove features like holes/fillets/pockets or extend/modify surfaces for other types of machining.
-
2022 Convert to 5 Axis - Plane questions..
Aaron Eberhard replied to TheLordsToe's topic in Industrial Forum
Glad you were able to get a file to someone for help -
Best and fastest way to learn Unified?
Aaron Eberhard replied to [email protected]'s topic in Industrial Forum
That's awesome, I didn't realize they released that. That's great -
2022 Convert to 5 Axis - Plane questions..
Aaron Eberhard replied to TheLordsToe's topic in Industrial Forum
I'm sorry, but I can't resolve anything from the screenshots.. You'll need to post a file, or, at least, email it over to me, or include screenshots of every page of your convert toolpath so we can see what the Linking and Tool Axis control is. -
2022 Convert to 5 Axis - Plane questions..
Aaron Eberhard replied to TheLordsToe's topic in Industrial Forum
I think you'll need to post a file to get accurate help here, but, as a quick guess, you may just need to move the plane you're working in to the origin of your WCS. So when you set up "Custom Plane #1", hit this button: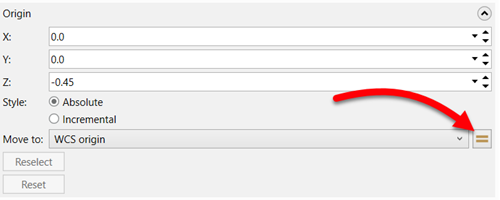
-
Depends on whether you're using a modern post or not. Older posts pretty much ignore the control def, but if you're using a newer post you should be fine in the control def. Sorry if I wasn't clear
-
...Writing this down and wandering out to the ol' Robodrill... Also, another vote for NEVER allowing G0 motion, especially on a 5 axis machine. My preference is to have the post automatically convert them to feed moves at your max rate, then it's always controlled. It seems like there's always some weird edge case that will bite you in 3 years after you've gotten totally comfortable with how the machine's going to react, but on this new part you have to do... On machines that don't allow doglegs, you'll still often get weird jerky motions in G0 5 axis mode, whereas if you do it a G1, it'll be a lot smoother.
-
Being how you're hard milling, I'd recommend trying to use the Pocket routine to "dynamically" rough the material out. You can use Rotary Advanced if you prefer the pattern for the floor finishing, or keep with Pocketing. After that I'd probably go for a Swarf toolpath to rough the walls, since they're tapered. If you're insistent on profiling the part, I'd recommend using a Unified toolpath set up parallel to the floor, or morphing between the top edge and floor curve, that'll give you better control options and trimming than you'll get from Curve.
-
Best and fastest way to learn Unified?
Aaron Eberhard replied to [email protected]'s topic in Industrial Forum
Certainly do, sir. I'm world-wide Shoot me a PM or send an email over to [email protected]. -
Best and fastest way to learn Unified?
Aaron Eberhard replied to [email protected]'s topic in Industrial Forum
I highly recommend an actual training class. Perhaps see what your reseller has or look into having someone come onsite if that's more practical. To be fair, I haven't watched the online offerings so I can't critique how they're doing it, but I've been teaching 3 day multiaxis classes mostly on Unified alone, depending on how deep the students want to go. Edit: I forgot to add a big benefit of the in-person class is that they can often be customized to exactly the type of parts & problems you're running into.. It's VERY hard to teach a "general" multiaxis machining class, and since I only do individualized training for each company, I always get sample parts & current problems to base my class on, and I know others here do it the same way (Colin, Ron, etc.). -
Pocket Toolpaths Still Run Through a Boss, After All These Years
Aaron Eberhard replied to Jobnt's topic in Industrial Forum
Oh, yeah, a few other thing to know going into Dynamic paths, in no particular order: * Use a good High Speed calculator. I use HSM Advisor, but the Harvey Tool/Helical calculator app is awesome as well. * Use the full flute length, unless it's excessive. For example, if you have a 3" deep pocket w/ a 1/2" endmill, go at least 1" deep per pass if you have the flute length. These settings: will control how successful you are in your cut. The minimum toolpath radius is "what is the smallest radius this toolpath can create" and it will be machine dependent. if you're cutting mild steel with a good spindle, you may find yourself running at 500-600 IPM, but your machine can only keep up @ 500 IPM in a radius of .100", anything smaller than that and it starts to slow down. Either make the radius smaller or the whole path slower to keep an even chip load. The microlift & backfeed rates are the most often overlooked time savings in it, you can often shave off 30-40% of your cycle time by setting that right. The microlift is how much it pulls off the surface to travel across it between cuts so it doesn't drag the tool in the surface or chips, and the back feed rate is how fast it does it. On a reasonably modern machine, a .003-.005" lift and whatever the max feed rate of your machine is should go in there.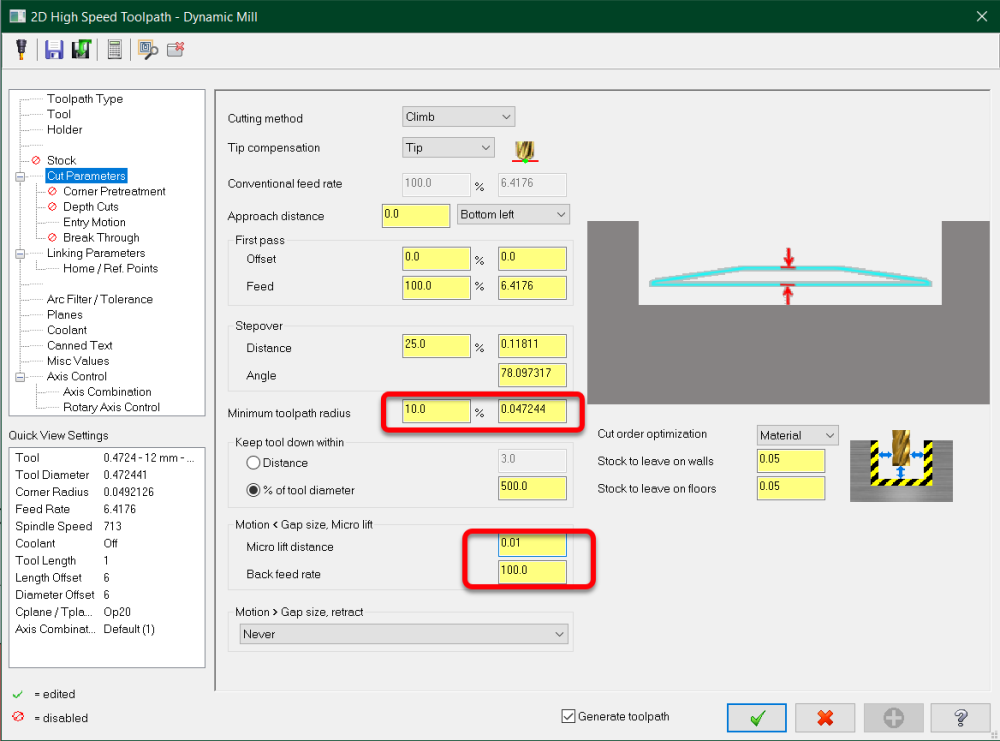
-
Pocket Toolpaths Still Run Through a Boss, After All These Years
Aaron Eberhard replied to Jobnt's topic in Industrial Forum
Good luck on your journey into Dynamic paths. If you haven't seen it yet, make sure you hit the "preview Chains" button in the chaining dialog. It will show you exactly what you've told the algorithm to cut, so you can immediately know whether you're going to get what you want out it before even entering parameters. -
Do you have to create a plane for each hole rotary drilling?
Aaron Eberhard replied to CNCZACK's topic in Industrial Forum
Yeah, you have to have the rotary axis listed in the axis combo, or else I don't think it'll even show you those options in the toolpath. Looks like that should be the right setup, but like I said, I don't know that I've ever used the "Rotary Axis Positioning" option, so I'm no help there, sorry! I've only used this for Axis Sub. -
How to Set Arc Center Points off by Default? (Solved)
Aaron Eberhard replied to Isaiah's topic in Industrial Forum
All of the visual/command/customized/window visibility & position/etc. (anything not in Settings>Config) are saved when you exit Mastercam. The problem is, if you have multiple copies of Mastercam open, the last one to close is the settings that get saved. I often see people have 3 copies open, change one, close it, then later on close one of the "stock" ones, and then those settings are used when the next one is opened, not the customized ones. If you're trying to set yourself up, open only one copy of Mastercam, change any settings you want to be changed then exit Mastercam. So in this case, turn off Home > Display > Arc Center Points, then exit your only copy Mastercam. If it's still happening, then your user .workspace file is set to read only or you don't have privileges to edit/save it, and you'll need to talk to IT about why that is. They're stored for each user in C:\Users\XxxxX\Documents\My Mastercam 202x\Mastercam\CONFIG- 6 replies
-
- 3
-
-
-
- mastercam 2023
- arc center points
- (and 4 more)
-
Do you have to create a plane for each hole rotary drilling?
Aaron Eberhard replied to CNCZACK's topic in Industrial Forum
Sorry, I missed this yesterday. I was using Axis Sub, not Positioning. I can't recall the last time I used positioning, or if I ever did, but I think that's more for planar moves that happen at different angles (i.e., contour toolpaths that you want it to resolve the plane to do each face on or whatever). In this case, I mean to just do an axis sub. I'm pampered because I live in 5 axis worlds, so I never really use these old options -
Do you have to create a plane for each hole rotary drilling?
Aaron Eberhard replied to CNCZACK's topic in Industrial Forum
Yeah, in Tool Axis Control, that'll only be unlocked if you have the drill/curve 5ax license or full multiaxis license. For the post, if it's a newer post, I'd check that the axis combo doesn't have the rotary axis listed in it, if it's an older post, well, who knows? Might be worth a call to your reseller, especially if you got the post from them. Just to confirm you got it set up right, here's a simple example using the default post that will generate the correct code for a Y axis substitution. Rotary Axis Sub.mcam -
Pocket Toolpaths Still Run Through a Boss, After All These Years
Aaron Eberhard replied to Jobnt's topic in Industrial Forum
I believe with all of 2d toolpaths, the intention is that you select the point first, then the toolpath chains. I'm surprised it worked at all with the point afterwards. But like others, this regens fine in any versions I have installed (22-24), so at least this particular issue was fixed 3 or 4 years ago. -
Pocket Toolpaths Still Run Through a Boss, After All These Years
Aaron Eberhard replied to Jobnt's topic in Industrial Forum
That's what mama always said. Can you post a file yet? -
Do you have to create a plane for each hole rotary drilling?
Aaron Eberhard replied to CNCZACK's topic in Industrial Forum
If you have multiaxis, you can just choose "tool axis control" and set it to 4 axis. If you don't, but they're all rotated around center, you can use rotary axis control to create a 4 axis toolpath. -
Pocket Toolpaths Still Run Through a Boss, After All These Years
Aaron Eberhard replied to Jobnt's topic in Industrial Forum
I can't tell what's going on in your pictures. Are you chaining a start/end point and upset that it's going to the start/end point? Can you upload a file? Looks like a pocket for Dynamic to me... -
Most likely no, you are not. Any specific error messages are carried back across. This is simply the MW equivalent of "Unexpected Error." As always, if you can send a file to QC, they can track down the source of the error and provide more information, but most likely it's due to some combination that there is not an error message for.
-
Pffttt... .Reading instructions!?
-
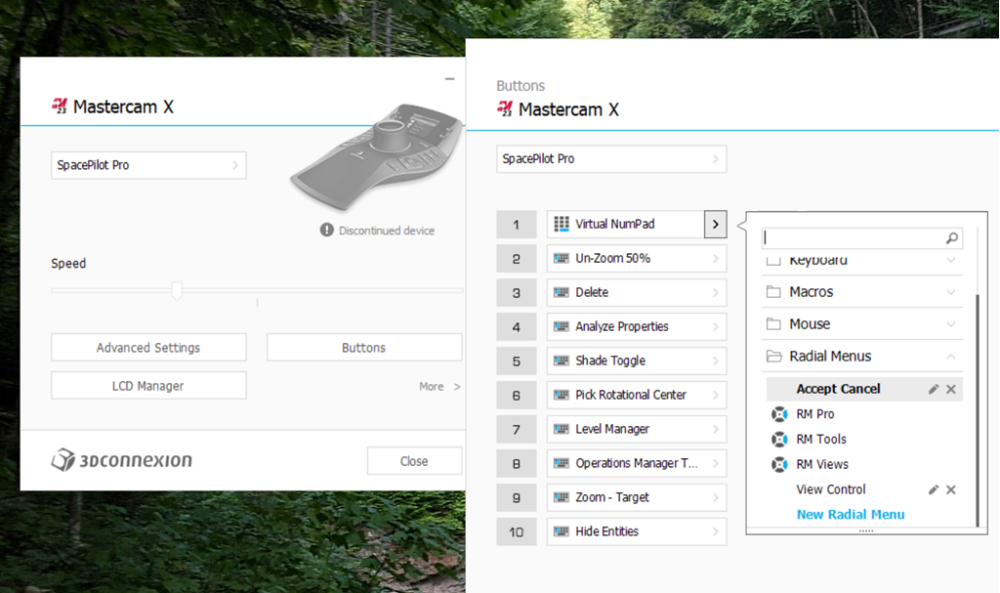
I can't imagine it matters which mouse you have? I mean, physically it's just a button regardless.. I know you stay up to date on the drivers, so I have no idea? I happened to have a SpacePilot Pro on the shelf, and it still shows up for me? Any chance you're not highlighting the Mastercam window before clicking "Buttons?" Notice how mine says Mastercam X at the top. It also tells me that I'm a very naughty boy, and my SpacePilot Pro is a Discontinued device
-
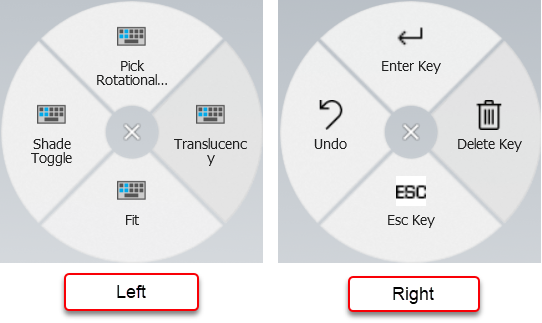
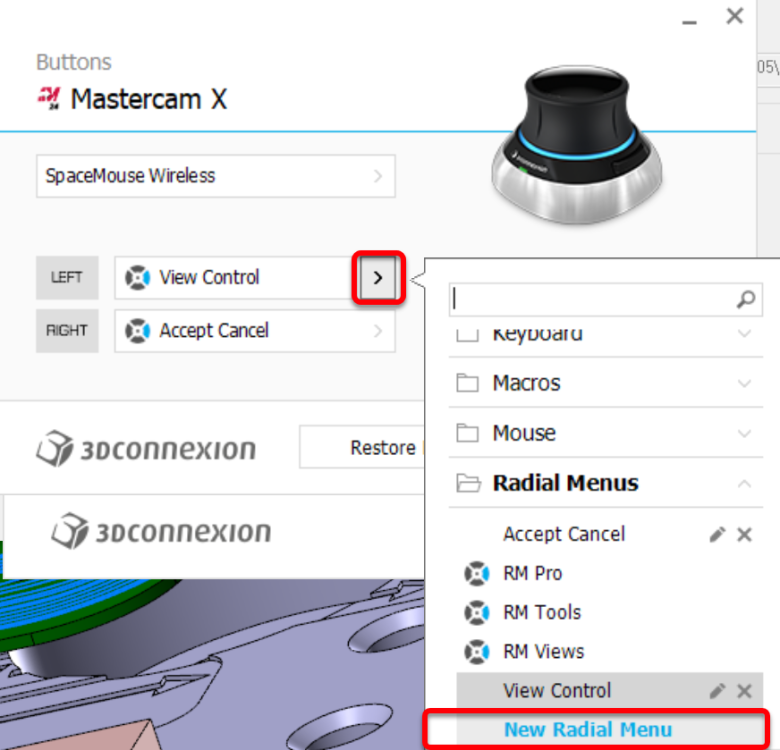
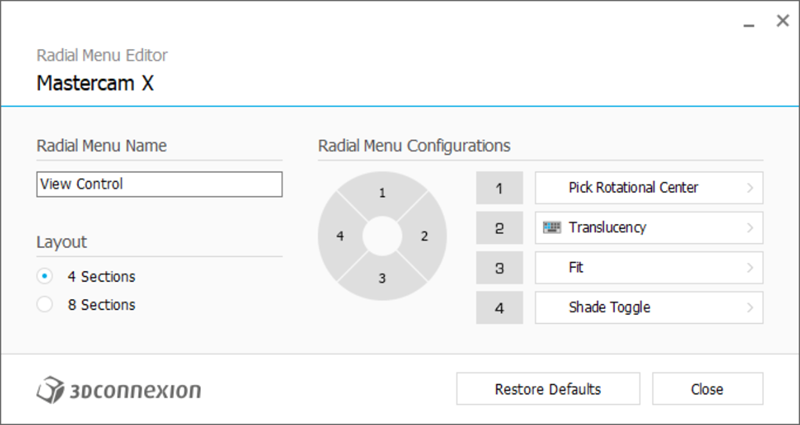
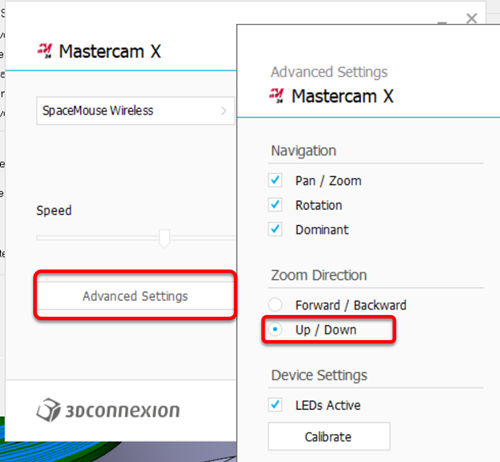
Here's my button layout, it seems to be fairly good as I've given it to a few people to get started: To make a menu like that, configure your buttons,and choose "New radial menu" from the flyout: Then create a new one (I called my two "view control" and "Accept Cancel": Also, as a preference, under "Advanced" options I prefer to have my Zoom set to Up/Down: