Leaderboard


Popular Content
Showing content with the highest reputation on 11/10/2021 in all areas
-
Here's what's in the readme.
 3 points
 -
https://store.piersonworkholding.com/vacuum-level-monitor.html PIERSON MAKES THIS WHICH CAN TIE INTO YOUR E-STOP/FEED HOLD CIRCUIT AND STOP MACHINE WHEN VACUUM DROPS BELOW A CERTAIN THRESHOLD, MAYBE THIS WOULD BE AN OPTION FOR YOU?2 points
-
As always, thanks Colin. I appreciate your vast knowledge on all this stuff. I'll give it a try today!2 points
-
Analyze Chain in 2022 > puts you immediately into "Chaining mode" + the Screen Prompt says "Analyze Chain 1, select an entity to start a new chain." click on the start entity of the chain > it will chain from the start point, to the first break in the chain. This section is now "selected" and shows up as such. leave the Analyze Chain dialog box open > now right-click in the 'graphics display', but not directly on the geometry. This will launch the Attributes Toolbar + Right-Click menu. use the Wireframe Color Drop-Down menu, and pick a new color for the selected chain. Now, you want to see your color change, so use the little "unselect chain" button, to de-select the 1st broken section. You will notice that the color changed, and you are still inside the 'Analyze Chain' menu. Now, pick the entity on the 'far side of the 1st break', and you'll select a new "first chain". Repeat the process for chaining colors, of each chain section. I was able to color a chain with 10 different sections, pretty quickly, by just remembering to use the "unselect chain" button. One other tip I'd recommend is to modify the "selection options". File > Configuration > Selection > Disable 'Use glow highlighting' Disable 'Use stipple on solids/surfaces/meshes' Disable 'Use dashed on wireframe' That will make 'selection' seem much more like previous versions of Mastercam (X9-ish).2 points
-
Remember that "on the fly", you can simply click the "3D" on the bottom blue bar, in Mastercam, and that will swap from 3D to 2D. That way you can stay "in the function", create your wireframe, and then exit the function before deleting the 3D geometry if needed.1 point
-
This is something I have been doing since coming back to Mastercam 3 years ago, although there are times I forget to switch which is often followed by a few 'polite' words and some clicking of the back (undo) button.1 point
-
Well, since there seem to be a couple of issues, I was wanting to find out what was changed before I install it.1 point
-
Today I was told by the MLC Cad applications tech I was working with that CNC Software is now aware of the issue and will be addressing it within the next update.1 point
-
Well if you wanted to get real slick you tie an emergency shut off to the solenoid and when it looses vacuum you don't loose anything. I would think an isolation process would be better with a 3 way valve. I would use the machine to move the 3 way valve to one area and machine it keeping all possible vacuum on the lot of 12 parts. Once done the machine then moves the switch to the 2nd position to machine the next 12 and then rinse repeat for the last 12. Now you keep max vacuum isolated to 12 parts. Make a Ring and turn off the spindle and drive the tool into the ring with a hole and then just move the machine from position one to position two and then from two to three. Want to think outside the box then do something like this and then should be good to go. Now if you use the emergency stop process then you shouldn't loose any parts and could still keep it running when thing are running good.1 point
-
Having spent a week in 2022 now, I guess I'd give it mixed reviews. Some things I find more helpful and intuitive. The stock models definitely process much more quickly. And yet other things they've broken and now I have to do more work than in 2019. In the end our reseller told me a few years ago that they didn't have to support us more than 3 versions back, and so, at least, I have yet to find any 'fatal flaws' in 2022 like I did in 2020 and 2021 which kept us from moving up. One day I dream that CNC Software will come out with a new version WITHOUT ANY NEW BELLS AND WHISTLES, but simply fixing everything that has gotten broken over the years, that many of us on this forum have complained about. I do think 2022 has addressed a few of those issues, finally, but not enough of them.1 point
-
No such thing as a cloud….it is someone else’s computer…..1 point
-
I have witnessed this first hand in the last few weeks. Constant issues and problems for a customer that was running like a clock, IT moved everything 3 weeks ago to Onedrive for the user accounts and nothing but issues and inconsistent problems. Crashing and losing the Mastercam license. Verify not working correctly and this is 2020, 2021 and 2022 users. Before that happened everyone was really happy. Now they are not happy, but they know their IT created the issue not Mastercam Software. I have to wonder how many IT run places create so many problems for Software that get blamed when all along it is the IT policies and groups really creating the havoc.1 point
-
Got a part with some every tight areas to machine some radius in it. I was fighting hard with Morph between 2 curves to get the toolpaths I wanted. I could get part of it, but nothing that really gave the motion I was after. I finally use some tilt curves and the motion was better than I was looking for. Trick is how to create good tilt lines the toolpath will react with. I figured it out by using the Surface would lead/lag for the tool axis control. I then set the Title Angle at side of cutting direction to 7 deg. I make the Side Title Definition Ortho to lower edge curve. I then backplot the toolpath and use the backplot limits to redcue certain tilt line I want from the toolpath. I save them to a level. I then go back to the toolpath and change the Tool Axis Control to Lines and pick the lines I want. Now I have got a very nice looking toolpath that goes and does exactly where and what I want. Sorry no sample file to share this time.1 point
-
I think it should stay at the bottom until I move it. I think it is a great tool I can move up the tree and add tool paths as I need.1 point
-
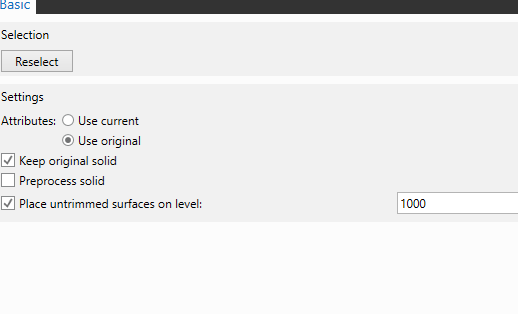
for over 11 years we have only ever programmed using surfaces so when we call in a new part it comes in as a solid then we create surfaces from that solid, then we select use original and either keep original solid or just un check that depending on what were doing, we have standards set up using colors from our designers so that we know what to do and what not to do on certain parts and areas kind of like what needs machined and what don't sort of thing, well now when you convert and have use original it ignores it and makes everything one color which has worked for the 11+ years I have been programing.
 0 points