Guess_who
-
Posts
336 -
Joined
-
Last visited
-
Days Won
6
Content Type
Profiles
Forums
Downloads
Store
eMastercam Wiki
Blogs
Gallery
Events
Everything posted by Guess_who
-
I am not familiar with the E33's, but we do have a bunch of NX51's, A88's, and two D500's. Are you referring to the data server? When does it give you this error? When you search for the program or when you trying to use the M198 P????.
-

EZTRAK won't cut circles
Guess_who replied to mikecommscope's topic in Post Processor Development Forum
Check you control definitions. -
EZTRAK won't cut circles
Guess_who replied to mikecommscope's topic in Post Processor Development Forum
Based on a quick internet search I do believe that the EZ Trak also uses "Event" programming similar to the Prototracks we have. You may want to look in the operations manual and see if using a DXF would work. -
EZTRAK won't cut circles
Guess_who replied to mikecommscope's topic in Post Processor Development Forum
I'm sorry I was thinking of a ProtoTrak. They use events. Not the EZTrack. Can you post what the G-code looks like? Is the machine setup to use IJK'S, or R's. I think the EZtracks are similar to the Prototrak where as they like Fanuc 6M code. -
EZTRAK won't cut circles
Guess_who replied to mikecommscope's topic in Post Processor Development Forum
What does your code look like? What is the machine doing? Alarming? We use a modified version of a Fadal post for or EZtraks. Everything works just fine with it. But usually we just use the events to create the programs right on the floor for a DXF file. It's pretty quick and easy. -
Go to you machine Def and double click on the lathe spindle, then you can try and modify the continuous axis type and see if that helps. I'm not exactly sure what your trying to cut, but sometimes for contouring you need to use signed continuous. But again, I'm not really sure what you're trying to do.
-
Ok, so I think I have this re-done for something pretty close to what you want. BUT IT HAS NOT BEEN PROVEN ON THE MACHINE YET. SO what I would do is load it in the machine then MDI the G65 P9998 A45, and then your G59 should be re-calculated to your current X, Y, Z zero on your part. You can use a tooling ball and an indicator to verify that it is calculating correctly. Macro information: With this macro there is no need to set zero at center of rotation Used for the 4th axis rotating around the -X- Uses G59 so operator cannot use that offset When the macro run you will be in G59, so DON’T RECALL any other offset in your code until tool change. You do not need to cancel the macro, just G65 P9998 to your next position Macro is for positional ONLY, it’s won’t work for full 4 You must set variable #501 and #502 in the macro so that the macro knows where true center line is ( and if you move the 4th axis indexer, you’ll need to find those positions and modify them in the macro again) This macro assumes A- is clockwise and vise-versa, if your -A- axis is opposite, you’ll need to correct the math to flip the sign for the calculated -Y- and -Z- You must re-position in X, Y, and Z after macro runs to move to the correct position. PLEASE, PLEASE, PLEASE, double check my math and make whatever corrections are needed. I have not tested these changes on the machine. % O9998(MORI 4TH AXIS) ( G65 P9998 A ) ( A = ROTATION ) ( MACHINE USING G59 ) (CHECK ZEROS) #501=-10.( IS CENTER LINE OF ROT IN Y ) #502=-12.( IS CENTER LINE OF ROT IN Z ) #130=#1( TRANSFERS THE A TO 130 AND 133 ) #133=#1 #135=0 (INIT TO ZERO 135) IF[#4014EQ59.]GOTO5 (I BELIEVE THIS LINE NEEDS TO BE KILLED ) #121=#4014( FINDS THE CURRENT OFFSET ) N05 #110=#4003( FIND G90 OR G91) #112=#5004( FIND CURRENT A ) IF[#121LT54.]GOTO950 IF[#121EQ54.]THEN#135=5220 IF[#121EQ55.]THEN#135=5240 IF[#121EQ56.]THEN#135=5260 IF[#121EQ57.]THEN#135=5280 IF[#121EQ58.]THEN#135=5300 IF[#121EQ59.]GOTO960 IF[#110EQ91]GOTO980 (G91 ERROR) #141=[#[#135+2]-#501]( IS Y AXIS ) #142=[#[#135+3]-#502]( IS Z AXIS ) #143=#[#135+4]( IS A AXIS ) N20 (***********************************) (********** CACLULATIONS ***********) (***********************************) N60( ANGLE, HYP. ) #101=ATAN[#141]/[#142]( CALCS ANGLE ) #101=[#101]-360. #102=SQRT[[#141*#141]+[#142*#142]]( CALCS HYPS LEG ) N90( NEW VALUES A,Y,Z ) #134=[#133]-[#101]( ADD 2 ROTATIONS TOGETHER ) #135=[sIN[#134]]*[#102]( RECALCS Y ) #135=[#135]*[-1.0] (FLIP SIGN) #136=[COS[#134]]*[#102]( RECALCS Z ) (*********UPDATES OFFSETS **************) N100( UPDATE G59 ) #5321=[#[#135+1]( TRANSFERS X - NO NEED TO MODIFY ) #5322=[#501+#135]( UPDATES Y ) #5323=[#502+#136]( UPDATES Z ) #5324=#143( UPDATES A ) GOTO1000 ( **** THESE ARE ALARMS ****) N950#3000=151( NO WORK CORD.SPECIFIED ) N960#3000=152( THIS WORK CORD. IS RES. ) N970#3000=153( A VALUE IS NOT PROPER ) N980#3000=154( NO G91 ALLOWED ) N1000 M11(UNLOCK) G0G90G59A#130 G1A[#130-3.]F100. ( TO REMOVE BACKLASH) A#130 ( TO REMOVE BACKLASH) M10 (LOCK) G00 M99 M30% Good luck, and let me know if I can help with anything else.
-
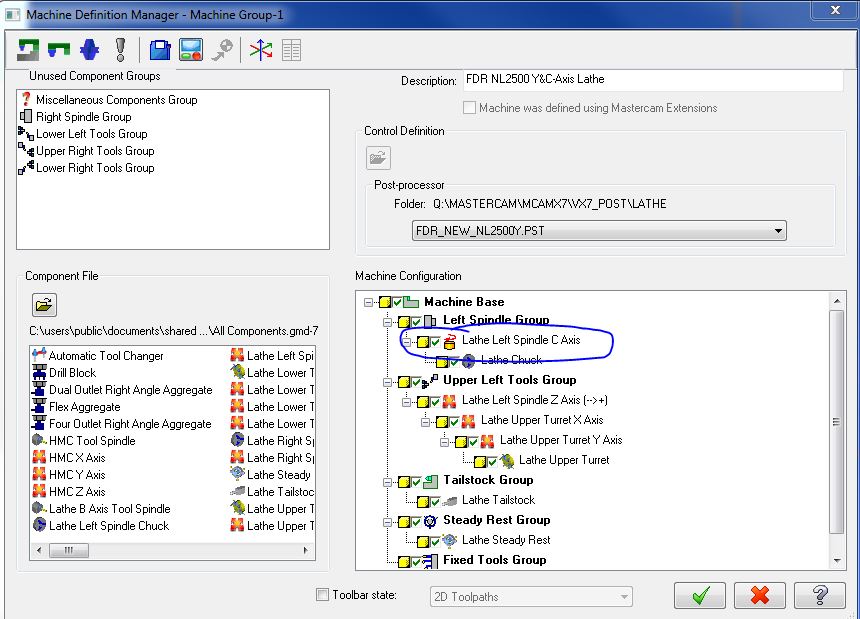
Does this picture represent your machine configuration, minus the 5th axis of course. You just have the 4th axis I assume rotating around the -X- axis? If so, I'll see if I can find some time to help you out. I would just need to know your configuration.
-
I will insert the 5th axis macro for VMC here. This is for a trunnion style 5th axis table, but it can easily be modified for 4th. Usage is pretty simple. Program centerline, and just use the G54. This particular macro will do all of it's calculation in the G58, so the operators cannot use G58 for anything. The code would look something like this S2000 M3 G0 G90 G54 G65 P9998 C90. A10. X-4.594 Y-2.3749 G43 H1 D2 Z2. M8 Z.18 ........ As soon as the program goes into the macro, the code starts using the G58 with calculated values. We've been using these type of macros for well over 15 years here, and it makes setup easier, as well as programs. Of course this will only work for positional 5th axis work. :9998(MORI 5TH AXIS) (CHANGED Z FROM -16.8484) (9/11/13 P.H. ) ( G65 P9999 C A ) ( A = ROTATION ) ( C = ROTATION ) ( MACHINE USING G58 ) (CHECK ZEROS) #500=-23.9885( IS CENTER LINE IN X ) #501=-11.9326( IS CENTER LINE IN Y ) #502=-16.8554( IS CENTER LINE IN Z ) #100=#3( TRANSFERS THE C TO 100) #103=#3 #100=[#100]*[-1.0] #130=#1( TRANSFERS THE A TO 130) #133=#1 IF[#4014EQ58.]GOTO5 #121=#4014( FINDS THE CURRENT OFFSET ) N05 #110=#4003 #111=#5005( FIND CURRENT C ) #112=#5004( FIND CURRENT A ) IF[#121LT54.]GOTO950 IF[#121GT57.]GOTO950 IF[#121EQ58.]GOTO960 IF[#121EQ59.]GOTO960 IF[#121EQ54.]GOTO11 IF[#121EQ55.]GOTO12 IF[#121EQ56.]GOTO13 IF[#121EQ57.]GOTO14 GOTO970 N11 #140=[#5221-#500]( IS X AXIS ) #141=[#5222-#501]( IS Y AXIS ) #142=[#5223-#502]( IS Z AXIS ) #143=#5224( IS A AXIS ) #144=#5225( IS C AXIS ) GOTO20 N12 #140=[#5241-#500]( IS X AXIS ) #141=[#5242-#501]( IS Y AXIS ) #142=[#5243-#502]( IS Z AXIS ) #143=#5244( IS A AXIS ) #144=#5245( IS C AXIS ) GOTO20 N13 #140=[#5261-#500]( IS X AXIS ) #141=[#5262-#501]( IS Y AXIS ) #142=[#5263-#502]( IS Z AXIS ) #143=#5264( IS A AXIS ) #144=#5265( IS C AXIS ) GOTO20 N14 #140=[#5281-#500]( IS X AXIS ) #141=[#5282-#501]( IS Y AXIS ) #142=[#5283-#502]( IS Z AXIS ) #143=#5284( IS A AXIS ) #144=#5285( IS C AXIS ) N20 (***********************************) (********** CACLULATIONS ***********) (***********************************) N60( ANGLE, HYP. ) #101=ATAN[#140]/[#141]( CALCS ANGLE ) #101=[#101]-360. #102=SQRT[[#140*#140]+[#141*#141]]( CALCS HYPS LEG ) N70( INCREMENTAL ROTATION ) IF[#110EQ90]GOTO80 GOTO980 (#103=[#111]+[#100]) (#133=[#112]+[#130]) N80( ABSOLUTE ROTATION ) N300 N90( NEW VALUES C,X,Y ) #104=[#100]+[#101]( ADD 2 ROTATIONS TOGETHER ) #105=[sIN[#104]]*[#102]( RECALCS X ) #106=[COS[#104]]*[#102]( RECALCS Y ) #137=[#500]+[#105]( RECALCS X FROM HOME) #138=[#501]+[#106]( RECALCS Y FROM HOME) #145=[#137]-[#500] #146=[#138]-[#501] N300 (***************************) (**FOR A CALC **) #131=ATAN[#146]/[#142]( CALCS ANGLE ) #132=SQRT[[#146*#146]+[#142*#142]]( CALCS HYPS LEG ) N300 N90( NEW VALUES A,Y,Z ) #134=[#133]-[#131]( ADD 2 ROTATIONS TOGETHER ) #135=[sIN[#134]]*[#132]( RECALCS Y ) #135=[#135]*[-1.0] #136=[COS[#134]]*[#132]( RECALCS Z ) N300 (*********UPDATES OFFSETS **************) N100( UPDATE G58 ) #5301=#137( UPDATES X ) #5302=[#501+#135]( UPDATES Y ) #5303=[#502+#136]( UPDATES Z ) #5304=#143( UPDATES A ) #5305=#144( UPDATES C ) GOTO1000 ( **** THESE ARE ALARMS ****) N950#3000=151( NO WORK CORD.SPECIFIED ) N960#3000=152( THIS WORK CORD. IS RES. ) N970#3000=153( A VALUE IS NOT PROPER ) N980#3000=154( NO G91 ALLOWED ) N1000 M69 G0G90G58C#103 G1C[#103-3.]F100. C#103 M68 M11 G0G90G58A#130 G1A[#130-1.]F100. A#130 M10 G00 N1100M99 M30
-
We use a rotation macro for all of our 4th and 5th axis machines. Basically we program using just a G54, then as the part rotates to a new position, it recalculates the new fixture offset values and places them in G59 for use. It's actually a pretty simple macro. This allows us to program centerline regardless of where they place the part on the machine. Makes life much easier.
-
Here is a very simple subprogram macro that we use here. O9981( DRILLED HOLE SPECIAL ) ( E = #8 ENTER/EXIT FEEDRATE ) ( F = #9 - CUT FEEDRATE ) ( I = #4 ENTER CUT FEED OR .6 OF CUT ) ( R = #18 - START DRILL R-PLANE ) ( S = #19 - FULL DIA -Z- FOR INIT FEED ) ( T = #20 - RAPID PLANE ) ( W = #23 - START BREAK-THRU -Z- ) ( Z = #26 - FINAL -Z- DEPTH ) #100=#5003 IF[#19EQ#0]THEN#19=#18 IF[#20EQ#0]THEN#20=#18 IF[#4EQ#0]THEN#4=[#9*.6] IF[#23EQ#0]THEN#23=#26 IF[#8EQ#0]THEN#8=[#9*5.] G0G90Z#20 G1Z#18F#8 Z#19F#4 G1Z#23F#9 Z#26F[#9/2] Z#18F[#8*2] G0G90Z#100 M99 Then we have our post setup to spit out just a G65 or G66 P9981 If you want to see the post code used, let me know. Just an idea.
-
It should be an easy fix, but as Jparis said, we need more information. My guess is that it is in the ptlchg0$ section. Look in you post and show us what it says under that section. Post the entire section up until the next section starts. Look for this area in your post; ptlchg0$ #Call from NCI null tool change (tool number repeats) Also you may want to jump over to the post section of this forum and ask for help.
-
I'll do that. Thanks.
-
We have Vericut and Wintool here. I'm not a big fan of Wintool. It is always way behind on updates for the MasterCam interface and it's still a bit buggy. Not very much support either.
-
i found a way to fix every problem in X7
Guess_who replied to oneyankfan1's topic in Industrial Forum
In X7 you can change your backplot settings back to the old X6 style, and at least the backplot will function just as it did in X6. I really don't like the new verify either, but like I said I 90% of my collision detection is done with backplot and I finish it off with Vericut. -
I have a dumb question. What is the HLE capable of? Is the save function disabled? If I offer it to our QE or some floor personal, I really don't what them changing anything and being able to save back over our original files.
-
Small world. I grew up in Churchville-Chili. I left when I was 20 because the job market seemed to be shrinking. Hopefully it's gotten better than it was 20 years ago. Good luck with your part.
-
Try playing around with the SUFACE HIGH SPEED - RADIAL path. Looks like that might work OK. What's Roc NY in your location. Is that Rochester NY? That where I'm originally from.
-
i found a way to fix every problem in X7
Guess_who replied to oneyankfan1's topic in Industrial Forum
I was talking about the latest and greatest that MasterCam has to offer, I wasn't making a comparison to any other CAM packages. Although at my company we have NX, Esprit, and MasterCam and probably 90 percent of all the programming is done in MC for one reason or another. -
i found a way to fix every problem in X7
Guess_who replied to oneyankfan1's topic in Industrial Forum
You are making a lot of assumptions. First off, I use traditional backplot, and Vericut. And you very well may be a faster programmer, I have no idea. But in my 22 years I have yet to be laid off or fired, so I must be doing something right. I think what your trying to say is that the new verify is slow and buggy. I agree with that, but I don't use Mastercams verify anyway. -
Does this help at all? Just keep in mind these are located in three different areas of the post. The first is near the top where all of your variables are formatted. The second chuck goes where your drill cycles are located, and the third at towards the bottom of the post. # -------------------------------------------------------------------------- # format thread mill macro 9989 cycles # -------------------------------------------------------------------------- fmt "D" 2 P9989_D # ( D = TOOL DIAMETER ) fmt "M" 2 P9989_M # ( M = MAJOR DIAMETER ) fmt "T" 2 P9989_T # ( T = THREADS PER INCH ) fmt "S" 2 P9989_S # ( S = SPRING PASS ) fmt "R" 2 P9989_R # ( R = R-PLANE ) ********************************************************* if drillcyc$ = 14, # Helical Thread-mill macro 9989 [ refht_a = refht$ P9989_D = tldia$ #TOOL DIA P9989_M = peck1$ #MAJOR DIA P9989_T = peck2$ #Threads per Inch P9989_S = peckclr$ #SPRING PASS P9989_R = refht$ #R-PLANE "(**** CUSTOM MACRO P9989 ****)", e$ pdrlcommonb if peckclr$ > 0, pcan1, pbld, n$, "G66", "P9989", pfzout, *P9989_R, *P9989_M, *P9989_T, *P9989_S, *P9989_D, *feed, e$ if peckclr$ < 1, pcan1, pbld, n$, "G66", "P9989", pfzout, *P9989_R, *P9989_M, *P9989_T, *P9989_D, *feed, e$ pcan1, pbld, n$, pfxout, pfyout, e$ pcom_movea ] pcanceldc$ #Cancel canned drill cycle if drillcyc$ < 8, [ result = newfs (three, zinc) z$ = initht$ if cuttype = one, prv_zia = initht$ + (rotdia$/two) else, prv_zia = initht$ pxyzcout !zabs, !zinc prv_gcode$ = zero pbld, n$, "G80", e$ ] if drillcyc$ > 7 & drillcyc$ <> 15, [ prv_gcode$ = zero pbld, n$, "G67", e$ clear_plane = initht$ *clear_plane, e$ ] if drillcyc$ = 15, [ prv_gcode$ = zero # pbld, n$, "G67", e$ clear_plane = initht$ *clear_plane, e$ ] ******************************************************* [drill cycle 15] 1. "Thread Mill MACRO-9989" 3. "" 7. "M = Major Thread Dia" 8. "T = Threads per Inch" 9. "S = Number of Spring" 10. "" 11. ""
-
i found a way to fix every problem in X7
Guess_who replied to oneyankfan1's topic in Industrial Forum
X7 works great for me. A few bugs, but with as many mass improvements as X7 has, I think it's to be expected. It's the price you pay to be on the cutting edge. -
Can you Post feed rate on every line?
Guess_who replied to nakaroto24's topic in Post Processor Development Forum
Well let me start by saying that I don't use the fr$ in my posts so I'm probably not the best guy to give you an answer. But it looks as simple as adding an asterisk in front of the fr$ after the comma. But I'm not familiar with the fr$ function. Try editing the line to look like this and see if it works. if fr$ > 0, *fr$. -
Why doesn't X7 show the coolant on/off
Guess_who replied to Trapper Paul's topic in Industrial Forum
I agree. I never paid much attention to it. All though it would be nice to use a font color and customize. Maybe customize by coolant on/off, of plus stock condition. Something more visible for those of use who really can't stand when their operations manager is not collapsed. Just my two cents. -
totally agree with you. And I have noticed this same bug. This also happened in X6. See if you can't submit this as a bug, so maybe they can get it fix. The first rule of MasterCam should be, never, ever, violate check or boundary surfaces. EVER. This is why I also use Vericut. BTW - I think you should have this set to inside, not center.