JayM
-
Posts
180 -
Joined
-
Last visited
Content Type
Profiles
Forums
Downloads
Store
eMastercam Wiki
Blogs
Gallery
Events
Everything posted by JayM
-
In X8 we can have multiple Right click menu's. Each Workspace contains its own Context Menu settings.
-

select point cplane and tplane prolem in x7
JayM replied to thanhsonnguyen's topic in Industrial Forum
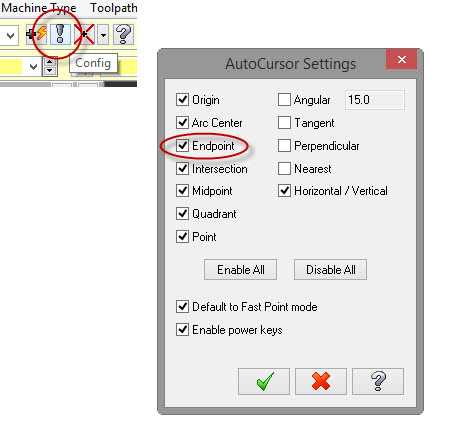
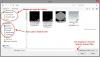
Check the autocursor settings. Maybe Endpoint is not selected as one of the snap points. See the attached screenshots.
-
select point cplane and tplane prolem in x7
JayM replied to thanhsonnguyen's topic in Industrial Forum
Man I am have a really hard time understanding the question. My try to put it a different way or upload a file with some notes on it. -
It happens in a particular set of circumstances that I haven't nailed down. But it is one of those things that once it happens to you the first time, and you figure out how to fix it, it never is a problem again.
-
The part should be positioned as a lathe part. When a multitasking machine definition is loaded the "Tool Angle..." button becomes active. Use this to set the angle of the turning holder. You might also talk to your reseller about adding the Mill-Turn on your license.
-
Edit Common parameters is typically used to change settings shared among toolpaths, of course the Sort options is not one of them. If all of the operations are drilling the same geomtry you can drag the geometry from one toolpath to another. The sort options are copied as well. Hope this helps.
-
I think all of the same capabilities are still there
-
odessa, please understand that everyone here is willing to help. We just need some information to be able to provide you with the proper answer. Usually when you think you are giving us to much about your issue it is just barely enough. Attached is your Mastercam file with some sample probing toolpaths, a couple of touch point, work offset setting and even a broken tool check. But all of this being output correctly is dependent on your post. Looking at your zip2go there is a hodge podge of machine files, I am guessing that this was not provided by your reseller. I would highly recommend going to your reseller and asking them to provide you with a set of post files specific for your machine and probe. PROBE-TOOLPATH EXAMPLES.mcx-8
-
As to why I can't say specifically but I would assume it was not on a whim just to mess with us. The nature of all software is change, I know I for one interact with my computer, phone even the bank differently today than I did 5 years ago, much less 20 years ago. I expect I will continue to adjust habits as software and technologies develop and improve.
-
I know this still does not resolve your question but another option would be to use the new transparency toggle.

-
I think this is a non-issue. If you want to save the file click save, it will save it. The file that was opened is the one that will be saved, it will not overwrite a file that exists in a different directory.
-
This is really really hard to help without the file. Upload your Mastercam file. One thing you could try is breaking the geometry at a specific point that will become the start point for both the chains. Also Mastercam includes several sync options that could help you specifying where the geometry should line up.
-
I don't think this is a tool library issue. Sounds like more preparation and planning would help resolve these issues. Most mill programs number their tools, 1,2,3 ... in the basic order that they are used. Some shops like to have dedicated tools. For example if you drill and tap 1/2-13 holes frequently in your shop, having a center drill, drill, chamfer and tap setup in the machine at all times would be useful. Then you could always have these tools at a specific number say 10, 11, 12 and 13 respectively. The issue is the variety of tools that can be required on a mill from job to job. Different diameters, lengths angles, etc could change the tools that you need for a part. A typical mill may have between 15 - 30 tool stations making a dedicated tool setup in the machine impractical for most shops. If you have big machines with 100+ tool stations then using this type of setup may be more practical, but it still requires a lot of dedication from the shop and instruction / documentation. To resolve your particular situation in the future always use different tool numbers for each operation of a job. Then the tools and programs could easily be moved from machine to machine without having to edit the program. Of course nothing could replace planning and preparation before the program is even loaded and ran.
-
Are you plugging the hasp into the tablet or the keyboard? If you are plugging it into the tablet, try plugging it into the keyboard's USB ports and see if that works.
-
Take small steps, lots of flood and it should get through it.
-
Here is another way of roughing out this type of profile. Once you have the slot roughed in, the nice thing about stepping along the shape to rough it is that the cut is very consistent and it uses the side of the endmill. Part in Question-ALT.mcx-8
-
If it is a flat pocket and regularly spaced around the diameter you could create one toolpath and use Toolpaths > Transform > Rotate to duplicate it. If the pockets are wrapped on the diameter, like a window in pipe, that would be an axis substitution.
-
I wouldn't say there is a setting that you are missing. Mastercam has a single Part to part distance that controls the distance they are from each other. Depending on the parts and sheets and the fill quantity I get some variations on the exact distance that each part is from each other. But it is never less than the distance that I set and does not vary to far from my desired value. I chalk it up to Mastercam balancing between optimizing my parts on the sheet and maintaining a critical distance.
-
Send a zip2go of your program
-
In your contour ramp give it a finish multipass of .000 and keep tool down. See attached program. contour ramp 2 pass finish.mcx-8
-
If the server is on the same LAN as the client computers there should be no need to edit the nethasp.ini file. The clients will broadcast to the entire network for a license and the server will respond to it. If you have some other setup then you would specify the server address as the NH_SERVER_ADDR NH_SERVER_ADDR = 192.168.2.70 ; IP addresses of all the NetHASP ; License Managers you want to search. ; Unlimited addresses are possible. ; ; Possible address format examples: ; IP address: 192.114.176.65 ; Local Hostname: ftp.aladdin.co.il if the IP is going to be dynamic then you will have to use DNS to address the server with a host name. In that case you would just use the hostname instead of the ip address.
-
No, for 4/5 axis work your WCS should be fixed for all operations, think of it as your G54 work offset on your machine. The Toolplanes are what create rotations in Mastercam, you will have one toolplane for each position that you want to rotate to. Those toolplanes should have the same origin as the WCS just point Z at a different position from the WCS.
-
Mastercam's Default "Back" view has the X and Y rotated from "TOP". By using "BACK" you are telling the machine to rotate the part in two axis which your machine is not capable of doing. Instead, create a new View that is rotated about X with the Z point towards the face that you want to cut. See the attached program. PART.MCX-7
-
<----- When you bust out the claws, people get very agreeable.
-
There is no need to convert it to surfaces, Mastercam can work with the solid model just as well. You could probably surface machine it but that would require several tool plane positioning movements. I think xycnc's suggestion of rotary would be a good starting place.