Reece L Gibson
-
Posts
600 -
Joined
-
Last visited
Content Type
Profiles
Forums
Downloads
Store
eMastercam Wiki
Blogs
Gallery
Events
Everything posted by Reece L Gibson
-
It not used right now....
-
Mike Rosa showed me this back on Ver 8.1 That's when Jim Evans was still teaching the post class Guess it shows how old I am...(We are..) Roll Die Project.pdf ROLLDIE.MCX
-
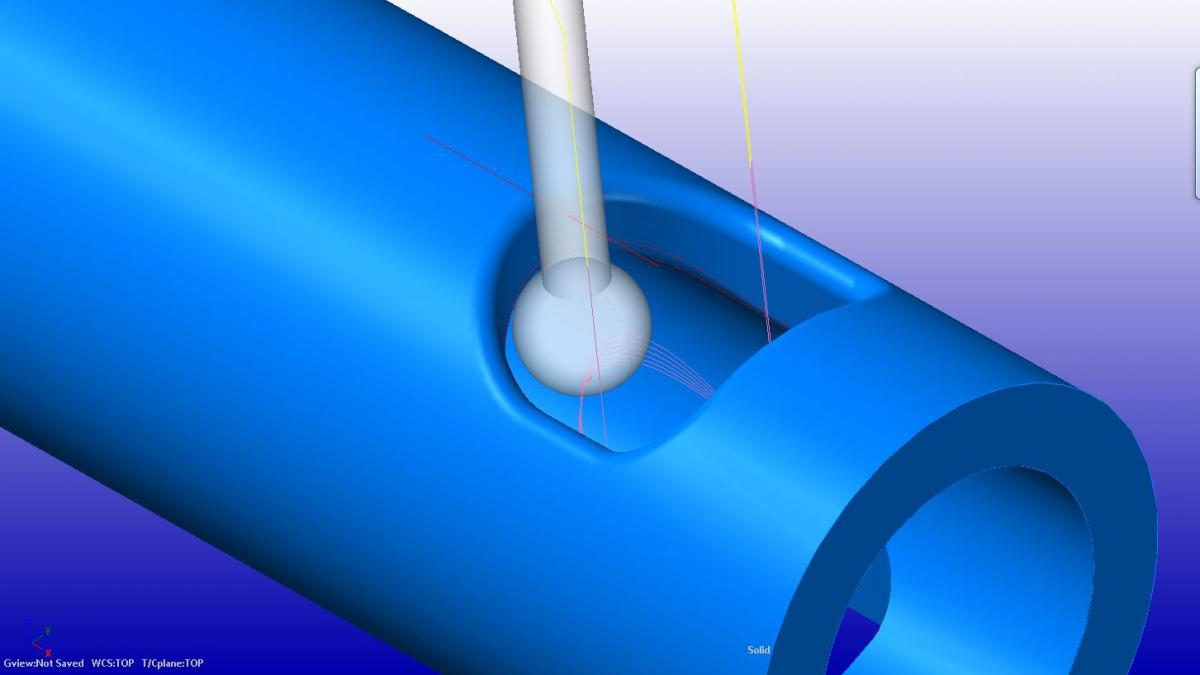
The roll die c-hook creates toolpaths around a rotary axis. The toolpath can be rounded or squared on outside sharp corners. When a tapered tool is used, the tool can run up and down the crease formed at the intersection of two walls at an inside sharp corner. Inside sharp corners with non-tapered tools are not handled and will eventually give an error.
-

Need HELP!! programming BSPT thread
Reece L Gibson replied to Michaelcncstudent2014's topic in Educational Forum
Hi Mike, You just want a sample file? -
Transform toolpath creating geometry bug
Reece L Gibson replied to Sticky's topic in Industrial Forum
Is this a HMC, or VMC machine definition? -
Transform toolpath creating geometry bug
Reece L Gibson replied to Sticky's topic in Industrial Forum
What is the rotation view set at on the other tab? -
Graphic Card drivers... or lack of a graphic card period.. Try to update/change the current Graphic card drivers
-
lathe face drill needs to be ipr feed
Reece L Gibson replied to Pete Thomson's topic in Post Processor Development Forum
toolno = t$ * 100 + tloffno$ -
lathe face drill needs to be ipr feed
Reece L Gibson replied to Pete Thomson's topic in Post Processor Development Forum
Probably the easiest way is to set up a Misc real to trigger feed per rev. If it's a drill cycle, might go thru the drill cycle Declare / format your variables: use_pitch : 0 #0 = Use feed for tapping, 1 = Use pitch for tapping fmt "N" 4 n_tap_thds$ #Number of threads per inch (tpi) fmt "F" 2 pitch #Tap pitch (inches per thread) Might capture it in "pdrlcommonb" post block if mi6$, use_pitch = 1 if use_pitch = 1, pbld, n$, "G95",e$ else, pbld, n$,sgfeed, e$ (Drill cycle post block) mtap$ #Canned tap cycle, mill pdrlcommonb if use_pitch, pitch = 1/n_tap_thds$ pcan1, pbld, n$, *sgdrlref, pgdrlout, pfxout, pfcout, pfzout, prdrlout,*pitch, strcantext, e$ else, pcan1, pbld, n$, *sgdrlref, pgdrlout, pfxout, pfcout, pfzout, prdrlout,pffr, strcantext, e$ pcom_movea -
Hi Ekii, another way for C axis output is just switch to a Generic 4Ax VMC. Leave your tool path settings alone.Edit the machine definition, Double left Click on the A axis rotary Icon, and change the rotation to "Z" axis. X and C axis motion will occur.
-
ROTARY B AXIS INDEXING WITH SURFACES.MCX-6 Hi Mic6, Try the Advanced 5 ax toolpath "Morph between two curves" Use 3 axis Output.. Looks pretty good. Use the collision control, shank avoidance. TUBEWINDOWBACKSIDERLG.MCX-7

-
ROTARY B AXIS INDEXING WITH SURFACES.MCX-6 Hi Mic6, Try the Advanced 5 ax toolpath "Morph between two curves" Use 3 axis Output.. Looks pretty good. Use the collision control, shank avoidance.
-
X & Y coordinates problem with generic fanuc 5x post
Reece L Gibson replied to beginner1977's topic in Industrial Forum
Could you share a file with the tooplath? -
Might submit a file if possible I have seen this before
-
Neither is the person who brought this to my attention.... I am sure there is a good reason for it. Learn, unlearn, re-learn.... Seems if your working with some type of software, that's the way it goes...
-
I believe the rotating plane matrix has changed as well. In VX6, If you rotate a plane 90 deg about the Y, Z axis points to the right. In VX7, Z axis will point to the left.
-
Change drilling depths within a drilling cycle in mastercam
Reece L Gibson replied to powerfulp's topic in Industrial Forum
Roger is the man!.... If your points or arcs are in 3-d Space, just select the bottom of the hole And your depth to incremental. The canned drill Cycle should pick it up. Lot more options Doing it Rogers way. -
Translating toolpath with B axis output ADVANCED
Reece L Gibson replied to segama's topic in Industrial Forum
Start at the top toolplane, rotate the plane about the X axis 30 degrees, apply the Finish toolpoath. Return to the top toolplane, rotate the plane about the Z axis 60 degrees, now rotate the plane you just made 30 degrees about the X axis, apply toolpath to 2nd spoke.. repeat for remainder of spokes. I used the 3 axis blend toolpath. -
Ability for system to know you only have solids on the screen and not have to go tell the system you have to go pick the solid to enable solids abilities I knew I liked you for a reason!
-
Milling at an angle with c axis problem
Reece L Gibson replied to wdg5555's topic in Industrial Forum
I will look at it if I knew where they moved the FTP link -
Try: [email protected] We switched servers
-
Can you share the file?
-
Is X- the normal side you are usually on for regular turning?
-
I would come down,but I have to travel to the middle of the state for some onsite stuff. But I'll tell you what I will do, is show you the fix for it. [email protected]
-
Wow,never heard of this issue before......