-
Posts
1,210 -
Joined
-
Last visited
-
Days Won
85
Content Type
Profiles
Forums
Downloads
Store
eMastercam Wiki
Blogs
Gallery
Events
Everything posted by cncappsjames
-
I think we have a winner for the oldest post to be brought back to life.
-
Arrrrrrrrrrrrrrrrrrrr Matey!!!!!
-

verification of a toolpath in 2021
cncappsjames replied to Born to machine's topic in Industrial Forum
If they had a competing product I'd give that statement credence but since they have nothing even remotely like it, I rate that statement very unlikely. -

Carbide thru tool drill recommendations
cncappsjames replied to Tinger's topic in Machining, Tools, Cutting & Probing
Mitsubishi, Sumitomo, Kennametal and Mikron are my favorites and I'll use Harvey or Guhring in a pinch. -

Switching Probe On/Off with M96 and M97
cncappsjames replied to mayu's topic in Machining, Tools, Cutting & Probing
For programming a probe, you can get the Renishaw Trigger Logic app... -

Switching Probe On/Off with M96 and M97
cncappsjames replied to mayu's topic in Machining, Tools, Cutting & Probing
#4 is the variable sometimes used for "I" if that helps... -

The Meaning of Probe Calibration in XY
cncappsjames replied to mayu's topic in Machining, Tools, Cutting & Probing
-

Switching Probe On/Off with M96 and M97
cncappsjames replied to mayu's topic in Machining, Tools, Cutting & Probing
Branching, GOTO, looping, subs, etc.... that is so they can use many things in many ways for many situations. Maybe not the most "efficient", but, definitely quite flexible. O9833(REN*PROBE*STOP) (F-4012-0519-AH) (COPYRIGHT*1990-2019*RENISHAW*PLC.*ALL*RIGHTS*RESERVED) IF[#1EQ1.]GOTO4 #31=0(PROBE*STATUS*OFF*CHECKING*1=ON/0=OFF) IF[#23EQ#0]GOTO1 () PCLOS N1 M19 #8=1 M98P9724 IF[#5NE#0]GOTO15 #2=#5043-#116 #4=0 #32=#2-[0.10*#129] #[#111+5]=#[#111+5]OR576 #[#111+5]=#[#111+5]XOR576 N15 () GOTO4(DELETE*TO*ENABLE*MULTI*PROBES) () #147=#147+9833 IF[#147NE[9833+2]]GOTO2 M98P9712 GOTO6 N2 IF[#147NE[9833+4]]GOTO3 M98P9713 GOTO6 N3 IF[#147NE[9833+6]]GOTO4 M98P9714 GOTO6 N4 (-->PROBE*OFF) M85(PROBE*OFF) (<--PROBE*OFF) () IF[#5NE#0]GOTO6 IF[#1EQ1.]GOTO7 IF[#31EQ0]GOTO6 G65P9725Z#32F[100*#129] IF[ABS[#5043-#116-#32]GT#123]GOTO5 G0Z#2 #4=#4+1 IF[#4LT8]GOTO4 G65P9700E460. N5 G0Z#2 N6 #147=#0 #149=0 #[#111+5]=#[#111+5]OR256 #[#111+5]=#[#111+5]XOR256 IF[#5NE#0]GOTO7 () (-->USER*M/C*STOP*CODE) (<--USER*M/C*STOP*CODE) () N7 G53 M99 -

The Meaning of Probe Calibration in XY
cncappsjames replied to mayu's topic in Machining, Tools, Cutting & Probing
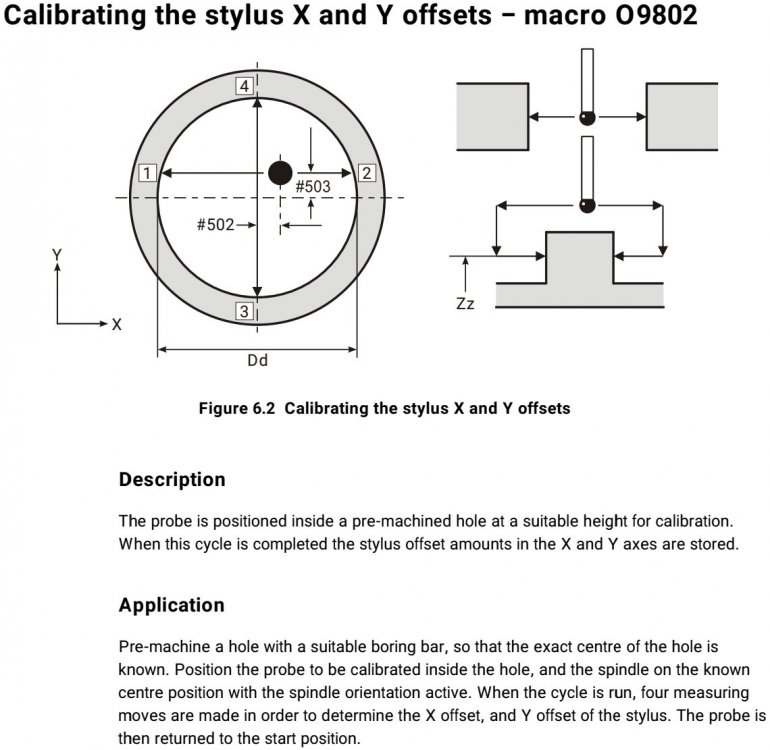
It's not really lag "time", it's lag distance. #502 and #503 for X and Y non vector calibration respectively and #510-#518 for probe radius trigger points on vector calibration. -
I would rate that statement as extraordinarily unlikely. Nothing is impossible which is why I won't say that. It would require a rewrite that doesn't make sense to even a company like AD. It is a non competitive product to any of their offerings or any other product on the market frankly. It's only competition might be ICAM and NC Simul... sort of. Even those aren't really in competition because with those packages you can build your own machines whereas CAMplete cannot. At least for the foreseeable future since the machines are factory verified unlike Vericut, NC Simul, and ICAM. Post Processing, Collision Checking and Gcode simulation for certain machine tools is what it does. The biggest change I see happening for the foreseeable future is expanding the machine offerings. I look back at our conversations regarding Dassault's acquisition of SW... a lit of us thought they would kill it off. So far doesn't even look possible at this point and the fact they still haven't killed off using the Parasolid kernel... JM2CFWIW
-
None so far that I have noticed. I expect this acquisition to be different than the others.
-

Switching Probe On/Off with M96 and M97
cncappsjames replied to mayu's topic in Machining, Tools, Cutting & Probing
Here is a typical O9832 I see. I don't see anything in there that isn't necessary besides the comments. When starting a probe, It's best to enable ALL the things it may need to ensure proper use so the resulting data is not corrupt. Renishaw has been doing this for a long time. There is reasoning behind what they do and why they do it. That doesn't mean their stuff can't be improved upon though. Be cautious when making large scale changes. O9832(REN*PROBE*START) (F-4012-0519-AA) (COPYRIGHT*1990-2017*RENISHAW*PLC.*ALL*RIGHTS*RESERVED) (-->USER*M/C*START*CODE) M19 (<--USER*M/C*START*CODE) () #3=1 #6=2 #8=1 M98P9724 N1 #2=#5043-#116 #4=0 #32=#2-[0.10*#129] () GOTO4(DELETE*TO*ENABLE*MULTI*PROBES) () #147=#147+9832 IF[#147NE[9832+2]]GOTO2 M98P9712 GOTO9 N2 IF[#147NE[9832+3]]GOTO3 M98P9713 GOTO9 N3 IF[#147NE[9832+4]]GOTO4 M98P9714 GOTO9 N4 #31=0(PROBE*STATUS*ON*CHECKING*1=ON/0=OFF) M5 N5 () (-->*PROBE*ON) IF[#5NE#0]GOTO55 M19 N55 M108(PROBE*ON) G04X1.(PROBE*DWELL) (<--*PROBE*ON) () IF[#5NE#0]GOTO9 IF[#31EQ0]GOTO9 G65P9725Z#32F[100*#129] IF[ABS[#5043-#116-#32]LT#123]GOTO8 G0Z#2 IF[#4EQ8]GOTO7 #4=#4+1 GOTO5 N7 G65P9700E380. N8 G0Z#2 N9 #147=#0 #149=0 IF[#23EQ#0]GOTO10 POPEN N10 M99 -

Switching Probe On/Off with M96 and M97
cncappsjames replied to mayu's topic in Machining, Tools, Cutting & Probing
In order for the M-Codes to "just turn the probe on and off", the installer would have to wire it in to the machine and do some stuff in the ladder. -
It's BADASS software. Been using it since 2006 and it truly makes 5-Axis programming a pleasurable experience. I can handle tilt/rotation preferences without having to think about Misc.Int/Reals amd making sure I have the right values/bias, etc... I just worry about my toolpath... as it should be.
-
Thanks @Leon82!
-
Do a 2D contour in MC. On the filter page, break arcs into lines. I usually use around .010" because that small is going to look like normal feed lines and typically won't bog down a control as long as it has some sort of look-ahead feature. Once the project is imported into CAMplete, change the toolpath from a 3+2 to a 5-Axis path then and pick the side where I have enough stroke (say X-) and force it to stay centered on Y and on the X- side. CAMplete then will spin the C-Axis instead of just a profile. That's the best way I can explain it not sitting in front of my workstation. HTH
-
Any chance you've got CAMplete? It's easy to take a contour path and make it spin C-Axis there.
-
That's badass @Tim Johnson. We helped a customer develop a process to ease some of the bottleneck in QC by doing non critical dimension inspection in the machine. I think there were only 30-40 features total IIRC and 5 of them were critical. They knew they could have done it all but their customer was leery of the machine that created the parts was inspecting the parts so they made this compromise. They used a Serialization MACRO on the part and each *.DAT file had the serial number in it so they could trace parts to reports. I remember the initial discussions with the customer "... our machine can do that?". Yessiree! I think I wrote about the same as I wrote up above and they did all the rest. Warmed my heart.
-

Probing Without Locking the Spindle
cncappsjames replied to mayu's topic in Machining, Tools, Cutting & Probing
If your machine does not have spindle lock (M19 usually), any spindle rotation whatsoever during the probing process will result in an inaccurate measurement/calibration. Should this be the case in your machine the only real option you have is to get the values in #502 and #503 to 0. Sometimes this means dialing in your stylus run out to 0 (or less than 1µm), sometimes it means creating run out. #503 and #503 are where the trigger points are. -
You'll need to activate the tool length offset I believe... I always do anyway. I'm not familiar with O9011. In a standard InspectionPlus installation, single surface (X, Y, or Z) measurement is G65P9811. % O0555; (MODIFIED 9011) (MACHINE IS IN MM) ; (MANUALLY POSITION PROBE) (SET G54 TO CURRENT MCS) #5221=#5021 #5222=#5022 #5223=#5023 ; G91 G43Hnn(Probe's TLO) G90 ; G65 P9832 (PROBE ON) ; (SET G54 IN X) G65 P9811 X12. S1 ; G65 P9833 (PROBE OFF) ; M2 %
-
Was communicating the other day with someone and the question was posed about a probing scenario and they wanted to output the probing data in a certain way. So we went through the data they wanted, how they wanted to see it and I thought back over the years and we've had similar questions have com up. Figured I'd share. The asterisks (*) in the DPRNT statements will output a space in the output file. the numbers in square brackets ([24]) means 2 decimal place to the left and 4 decimal places to the right. N1T1M06 G5.1Q0 M132 G90G54B0C0 G54.4P1 G68.2X0Y0Z0I0J0K0 G53.1 M131 G43H#517 G90G10L52 (WRITING TO PARAMETERS) N20R17 (CHANGE TO USB) G11 (FINISH WRITING TO PARAMETERS) G65P9832 POPEN (OPEN I/O CHANNEL) G65P9810X5.8895Y0F200. G65P9810Z3.0F120. G65P981-Z.25.F80. G65P9814D1.750 N135 DPRNT[X*POSITION*IS****#135[24]] N136 DPRNT[Y*POSITION*IS****#136[24]] N137 DPRNT[Z*POSITION*******#137[24]] N138 DPRNT[DIAMETER/SIZE****#138[24]] N140 DPRNT[X*ERROR*********#140[24]] N141 DPRNT[Y*ERROR*********#141[24]] N143 DPRNT[SIZE*ERROR*******#143[24]] N145 DPRNT[TRUE*POS.*ERROR*#145[24]] PCLOS(CLOSE I/O CHANNEL) G90G10L52 (WRITING TO PARAMETERS) N20R5 (CHANGE IO TO DATASERVER) G11 (FINISH WRITING TO PARAMETERS) M01 % The file (usually a *.DAT file but can/is determined by parameter) will output what you see below. X POSITION IS 5.8895 Y POSITION IS .0003 Z POSITION -.2500 DIAMETER/SIZE 1.7507 X ERROR .0005 Y ERROR .0007 SIZE ERROR .0007 TRUE POS. ERROR .0017 Hope this opens up some possibilities or discussions for you.
-

Legacy Renishaw Probe Calibration Macros
cncappsjames replied to mayu's topic in Machining, Tools, Cutting & Probing
% <PROBE_CALBRATE_XY> (PUT STYLUS INSIDE RING GAUGE) (RING GAUGE DIAMETER) #100=1.7812 S10M3 G4X0.5 M5 #502=#0(CLEAR X OFFSET) #503=#0(CLEAR Y OFFSET) #17=.5(OVER TRAVEL) G65P9025A1.C1.D#100Q#17 (RENISHAW EASYSET) #1=#140(X OFFSET) #2=#141(Y OFFSET) (-) S10M3 M5 M19 (-) G65P9025A1.D#100Q#17 (RENISHAW EASYSET) #3=#140(X OFFSET) #4=#141(Y OFFSET) (AVERAGE OFFSET) #5=[#1+#3]/2(AVERAGE X) #6=[#2+#4]/2(AVERAGE Y) G65P9832(PROBE ON) G65P9810X#5Y#6F50. G65P9802D#100Q#17 G65P9803D#100Q#17 G65P9833(PROBE OFF) G00G53Z0 M30 % -

DMC 125 FD4 mill turn setup
cncappsjames replied to CastingGuru's topic in Machining, Tools, Cutting & Probing
This is one of those "opinion" things. There won't be 100% concensus. Myself, I've always preferred to have ONE single file when possible no matter how many machines I am running the part on. There are exceptions to that but that is my preference. HTH
Join us!
eMastercam - your online source for all things Mastercam.
Together, we are the strongest Mastercam community on the web with over 56,000 members, and our online store offers a wide selection of training materials for all applications and skill levels.


