Aaron Eberhard
-
Posts
1,406 -
Joined
-
Last visited
-
Days Won
103
Content Type
Profiles
Forums
Downloads
Store
eMastercam Wiki
Blogs
Gallery
Events
Everything posted by Aaron Eberhard
-
Yeah, there's different "classes" eligible for the free update.. All home licenses are (even if you have the "pro" version installed but you bought it from an OEM like Dell through their "home" line of PCs), and any (all?) of the OEM-installed OSes in a corporate environment (you bought a Dell at work and it came with Windows installed). My understanding is the ones that won't be eligible for the free update are the corporate licenses where it was NOT installed on a PC when they bought it, e.g., IT builds all of their own computers and installs it from their site license.
-
Also, if you guys haven't tried it yet - Define your stock in your Operations Manager, and then just set your 2d Dynamic toolpath to "from outside," and only define an Avoidance Region. No need to define a Machining Region at all, it'll figure it out from your stock.
-

Do you move your part or Make a new WCS?
Aaron Eberhard replied to Pitka_Guru's topic in Industrial Forum
Just an FYI specifically about Multiaxis: Previously, the toolpaths were NOT WCS aware (i.e. if you told it to rotate around the X axis, that was TOP's X axis, not the WCS you were working in). Starting with X9, ALL multiaxis toolpaths should be working correctly relative to the WCS that your toolpath is set to. Hope this helps! Cheers, -
Great, thanks Josh! It hasn't gotten to me yet, but last week was our big reseller conference and I was out sick today, so I'll probably see it tomorrow. Cheers,
-
Yeah, I'm lame now Two forums is just a bit too much to squeeze in every day.. I do try, though!
-
Hey guys, Have you sent in the files you're having issues with to qc or your reseller? I haven't seen anything get to my inbox about this recently, and I can't get it fixed without an example Our internal QC/Apps guys recently found a drill issue, but I can't tell from your email if this would be covered by that. Just an FYI: You'll likely get a faster response from someone at CNC if you post at http://forum.mastercam.com/ , I don't get to emastercam nearly as much. Thanks!
-
'Ello Gents, I started to type up a reply, but then I just recorded a video The summary: Use a lollipop definition for X8 (in X9, you can use a tapered ball mill). Don't over-constrain the algorithm, and use the automatic tilt strategy. I think this might be a better job for Parallel to Surfaces, but I was trying to stay true to your original email which asked for a "waterline-like finish." Speaking of which, in X9, I'd just do it with a Waterline toolpath, and the holder collision set to "tilt to avoid gouge." And you'd be done https://youtu.be/hDVzbVjSPnA Cheers, Aaron
-
Yep, it was a defect that was caused by the defaults not being loaded correctly after you saved them while in an "advanced" 5 axis toolpath. It should be working now, but if you're still in an X8 environment, you can copy your .default file from C:\Program Files\mcamX8\common\SharedDefaults\mill\Ops to your share directory, C:\Users\Public\Documents\shared mcamx8\mill\Ops . Cheers,
-
Craig, Yes, it would be nice. There's a few holdups to it, the main one is that Multiaxis Link doesn't dig through the individual toolpaths, it only inserts a link at the start & end of an op. A Transform op is one big toolpath, so it's not quite as easy as you would think to "hijack" some of the linking moves internally. Since these required some changes to the Transformed ops, we held off on this release while we made sure the rest of it was solid. Cheers,
-
Glad to hear it Thanks again for sending in the bug, looks like we've got it nailed down. It's a bit late to make it into X9 release, but we'll get it out as soon as we can.
-
JMahon - When I run into stuff like this, I always swap out to a generic post to see what output I get, at least then I know which department to send my queries to If you are finding something, feel free to send an email into [email protected] and put "attention Aaron" somewhere in it. Thanks for taking it for a test drive and let me know how you like it. Craig- Glad to hear it's working well for you! Thanks gents!
-
Glad you guys like it
-
Mastercam X9 Public Beta now open
Aaron Eberhard replied to Jim Evans from CNC Software's topic in Industrial Forum
Although your version will be the cleanest possible way to do it, if you use the "Advanced" options under the Migration Wizard, you do have the option to pick and choose what types of files you update, so you can update your machine & posts, but not migrate anything else (for example). It's a much cleaner & easier way to migrate specific file types without getting everything migrated. -
Tool and holder runs through entire part when simulating 4-axis
Aaron Eberhard replied to mmoya's topic in Industrial Forum
Looks like you lads are suffering from your control def not being set to match your machine. I'd take a look at this thread and make sure that you have it set up right: http://www.emastercam.com/board/topic/75105-how-to-address-dog-leg-rapids-in-the-x7-verify-or-why-does-verify-show-gouges-that-arent-there/ As for verification rotating the part vs. the tool, change your focus instead of focusing on the workpiece, focus on the tool. That will keep the tool vertical and rotate the workpiece instead:
-
To be fair, that was a ridiculous situation to troubleshoot. I wouldn't call it user error. For anyone playing along at home, Murlin was seeing that entity ID#194464 was causing a problem. To help him out, I used Analyze > Number/Database > Number, and then I typed in that number. That let me view what it is (trimmed lofted surface) and what level it was on (in this case, 45). So I turned off everything but level 45. Now, I used Analyze > Surface/Solids > Test Surfaces, turned on all the options and selected all on level 45 (either use the Select All function or just hit CTRL+A in the graphics screen). I got a warning that there were two small surfaces. The previous screen said small surfaces had less than .0001 of surface area! I told it to change the color of them to something else. I hit Okay to everything else. So, to see what these surfaces were, I used "select ALL > ", and then did Screen > Hide, and I saw what looked like a little tiny line when I hit "Fit". I selected all of that color and deleted them. Those two surfaces were too small to triangulate, so that's why it was popping up that error (and working perfectly fine). It was a result of trimming/manipulating those surfaces.
-
Dave, There's no tools inside Mastercam that will really do much.. Your best bet in this case is to move it from a known point (in the case of your stock model, choose the edge of the solid or wireframe that made it up). If it's an STL, you can choose to import the lines with it which will give you entities to grab onto. There probably should be an enhancement to allow you to create curve on one edge (or all edges) of the mesh.
-
Also, if you save it as a PMesh, you can stay internal to Mastercam. It'll be a mesh entity on the screen that you can just drag/drop with Transform Dynamic, copy/paste.
-
I thinka you like it!
-
It works in X8, it'll just pivot around the center point. You cannot define a center of rotation in X8 with one, but you can in X9.
-
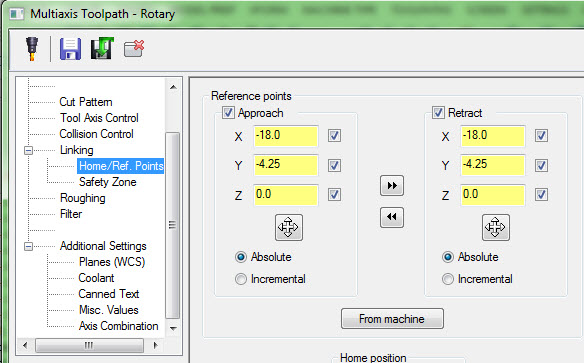
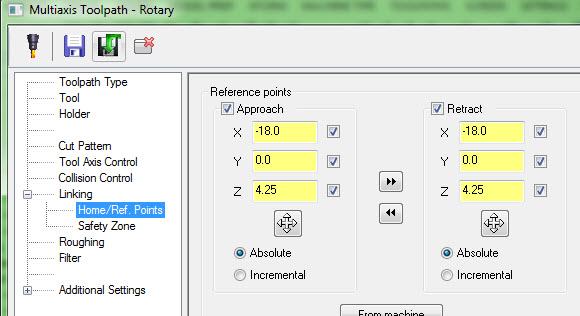
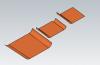
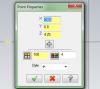
Hey Murlin, I've been taking a look at this for you, thanks for the file! I'll reply to your email privately, but I wanted to put this up here for anyone else who experiences this as well. For anyone playing along at home: Murlin did a great job of diagnosing an issue where his Reference Points seemed to be inverting when creating a new toolpath. I think what's catching you in this case is that Rotary 4Ax is TPlane aware, and it will rotate things like Reference Points to maintain the same position in a new plane. This toolpath was created before Mastercam had WCSes, so it used TPlane as its' method of calculating what you meant by an XYZ position. In the file you sent me, it opens in TOP/TOP/TOP: Now your toolpaths are set to TPlane 270 (which is the top rotated 270* about the X). The reference points in the toolpath #52 are: Now, if I create a new Rotary toolpath, I get these reference points: What!? Okay, let's make the point on your file using TOP/270/270: Now, let's change to TOP/TOP/TOP and analyze that same point: Ah ha! So that's the reason for the inversion when you create a new Toolpath. When you create it new, it's using the TOP/TOP/TOP WCS & Planes instead of TOP/270/270 like the other toolpaths. I couldn't get any issues to occur when copy/pasting the last few toolpaths, so I'd appreciate some steps to reproduce that issue. Hope this helps! Edit: Oh, and that looks like a fun part to make
-
Cool, I appreciate it I can't get it fixed if I don't know about it. - I'll take a look at it and make sure it's in front of the right audience. Just a general note, I might have noticed this issue a bit earlier if it had been on our forum. Cheers, Aaron
-
As a followup, I can't reproduce any issues with it? What am I doing wrong? I created two rotary 4 axis ops (#1 & #2), that have both drive surfaces and check surfaces selected. I copied those toolpaths to the group below (Copied Ops), and then tried to edit/reselect/show/remove the drive and check surfaces from the copied ops, and I haven't had any problems: What am I missing? Rotary 4x copy paste.zip
-
Perhaps they are aware of it, but it hasn't come across my desk yet either as customer requests logged or by the water cooler, so I'm not aware of them. I'm taking a look into it now, of course, but it's always easier if I already have a file that has reproduceable steps instead of trying to blaze my own path If it's been fixed in X9, well then, problem solved I don't recall any stories being worked on relating to rotary surface selection issues with copy/paste, though....
-
Hmm.. I copy/paste toolpaths all the time.. This sounds like it would be a good thing to send into QC, Müřlıń®.
-
File extentions in Mastercam code Expert
Aaron Eberhard replied to monty's topic in Industrial Forum
Hey Monty, There's a knowledgebase article that will point you in the right direction here: https://kb.mastercam.com/KnowledgebaseArticle50034.aspx It's specifically about TXT files, but the same thing works with PIM or any other extension you have to deal with. Cheers,