Aaron Eberhard
-
Posts
1,406 -
Joined
-
Last visited
-
Days Won
103
Content Type
Profiles
Forums
Downloads
Store
eMastercam Wiki
Blogs
Gallery
Events
Everything posted by Aaron Eberhard
-

MORPH BETWEEN 2 CURVES BEST TOOLPATH EVER
Aaron Eberhard replied to crazy^millman's topic in Industrial Forum
I thought we already solved this one, Keith? Sam - I got your emails, they're on my list of things to get to today! -
MORPH BETWEEN 2 CURVES BEST TOOLPATH EVER
Aaron Eberhard replied to crazy^millman's topic in Industrial Forum
I sent you a PM good sir, I'd be interested in talking about this a bit more -
MORPH BETWEEN 2 CURVES BEST TOOLPATH EVER
Aaron Eberhard replied to crazy^millman's topic in Industrial Forum
Whenever I teach a multiaxis class over here, I tell people that this is my favorite toolpath in the whole lot, and I use it for 80%+of all the multiaxis work I do.. I love it. Gcode - Bull nose has been supported since X6 (I think?), it should work fine.. Compressor Sam - There's an option on your Tool Axis Control about where on the tool to cut with, and one of the options is "leading edge," That might get you on the path.. Or, you can work with Ron, and that WILL get you on the path Ron - Awesome work as always, and a very cool part, thanks for sharing the vid! If I realized you hadn't seen the light earlier, I would have evangelized the benefits of Morph to you earlier- 86 replies
-
- 1
-

-
- 5 AXIS
- PORTING LOLIPOP
- (and 1 more)
-
4th Axis Pell Mill on an Impeller Crazy Milman style
Aaron Eberhard replied to crazy^millman's topic in Industrial Forum
Nicely done (as always!) Looks like fun! -
Axis Substitution Bug? Or something else
Aaron Eberhard replied to Guess_who's topic in Industrial Forum
Ray - Would you mind posting up a z2g with the post so I could take a look for it, or if you're not comfortable sharing it on here, send me a PM and I'll tell you how to bounce it over to me.. -
Bob - Do you mean you're not going to run the file on the machine with TCP? Sorry if this is a recap, but I like to be thorough for anyone reading the thread TCP Basically allows the control to compensate for a tilt in angles all through a move, not just at the vector itself (like a G43.3 Tool Tip Comp would do).. If you only have Tool Tip Comp, you can get gouges in between the vectors, since the machine won't, say, move the Z to keep track of the B, and only adjust at the next vector. You'll definitely want to have Vericut set up to match your machine, or you'll get false positives. I haven't used Vericut enough to know how to turn it on or off in there, though.. Sorry! If you're not using it on the machine, try setting the file to use a MUCH finer step-over or Max Angle Step.. I generally set my max angle step to ~.125-.25* anyway..
-
Axis Substitution Bug? Or something else
Aaron Eberhard replied to Guess_who's topic in Industrial Forum
Hey Ray, Obviously I don't have your post, so I can't test the output with your exact settings, but I noticed that on your curve5axis, you have it rotating around the Y Axis (which is correct based on my understanding of your setup), but your Axis Sub toolpath is set to rotate around the X, which would shift everything by 90*... -
Sounds like you're not using TCP in Vericut (or your file?), so you're seeing the mark from when the tool repositions before its' actual position is compensated.
-
Youtube Superstar, right here I was playing the part of a hapless customer looking at what was going on. I play that part quite well. Yeah, everyone over there is awesome to work with Michael does pretty good driving, too! We hit the Nurburgring the day after the show to throw down some laps.
-
Sounds like your 3 to 5 settings are a bit wonky.. Can you post up a file? Jeremy is on the right path, though, if you want a specified scallop height, the Triangular Mesh toolpath will do it.
-
That was a beautiful cut, too The finish wasn't even bad for a "roughing tool."
-
Hey AsDesign - I took a quick look at your file, and it appears that you're selecting the whole tube for the drive surface, and then selecting the top, "cylinder" part as a check surface as well. So, what you're doing it is telling it "cut this whole thing, and don't gouge, but if you happen to touch this cylinder (which is part of what you're supposed to cut), then stop making a toolpath." I reselected just the top manifold face for the check surface, changed the stock to leave to 0 and stepdown to .010 and it regenerated fine.
-
Peon - Always happy to help! Daryl - Understood. Sounds like you're getting the most out of it Just remember that you can save & load defaults from the menu bar, so you don't have to exit Mastercam, edit the file, reload Mastercam, etc... Just open verify, save your defaults, and you can edit or play however you want. So you can change it on-the-fly...

-
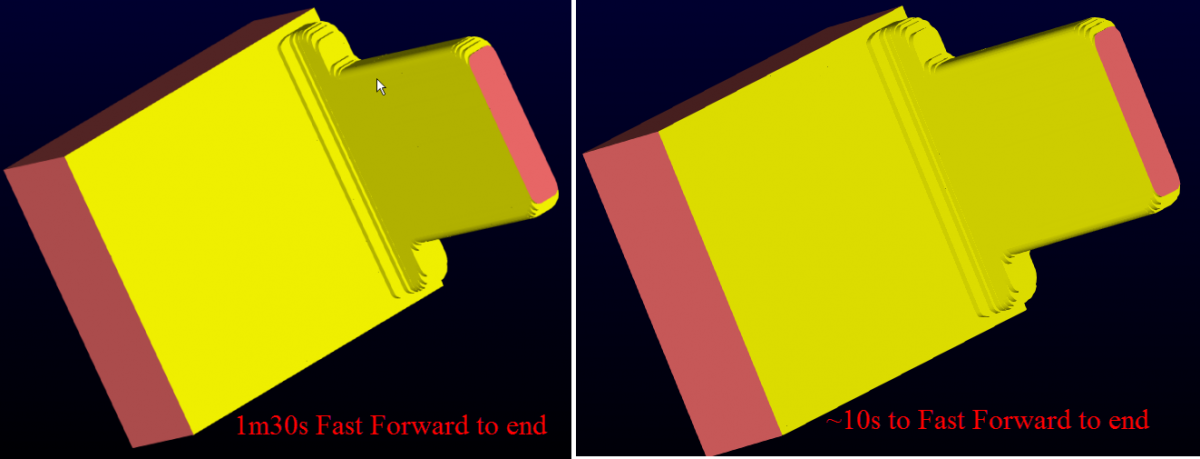
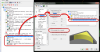
Yep, with those settings it's slow to live run over here as well. CamMan is on the right path as far as it running better (3d arcs will probably run better on your control as well). Quick question for you, Daryl: Did you arrive at the Precision Factor of 2 back in X7, or have you reevaluated that as a default since Mu1 came out? The reason I ask is that we reworked the algorithm based on feedback and examples for Mu1, and all of the settings were turned "up." That means than an X7 MU1 value of "1" is equal to an X7 value of ~1.6 or so. So that means you're forcing everything to start a X7 value of ~3. I used to leave mine set ~2.2 in X7 (I think that's what it was, I said it on the forum a long time ago, but it doesn't really matter), but now I can leave it at 1, and just crank up the precision slider if I need it. The sliders' adjustment range also got tweaked, so defaulting to 6 probably isn't necessary anymore, either, but that's not the biggest slow down. In general, I'd recommend setting your Precision factor down between 1-1.5, and sliding it up on the bar if you need a bit more for certain toolpaths. I've attached a comparison screenshot here. PF 2 & Index 6 on the left, PF 1 & Index 5 on the right. I couldn't tell a difference, except for speed:

-
Sorry Ray, I won't have a chance to install X5 today or hunt down a lab computer with it (if any still have it on?).. I've added a few pictures of my workflow to hopefully help you out, though. I'm replying here instead of to the PM (Personal Message) you sent, in case this helps others out as well.

-
Hola Ray, (Un(?))Fortunately, it's been quite a while since I've used a computer X5 installed, so I used X6 here, but I put the file up on the FTP for you if you can open it. One big thing I did was to stop driving the rest machining off of a CAD File, and instead built a Stock Model through each step. That gave me the drive geometry for rest machining, which processes a lot faster. On the 2nd toolpath (6mm cutter), I set the "rest machining' parameters to "ignore small cusps," so it wouldn't try to get as many tiny corners. This resulted in a smaller toolpath than yours did as well. Then I generated a stock model from that toolpath as well. After that, I jumped right to the 2mm cutter, as I don't think the 4mm was really getting that great of a workout, and by controlling your step-over, you'll get the same material removed with less time than running the 4mm in between. I don't know exactly how long it took to generate, but on my system, driving the 2mm cutter against the Stock Model from the 6mm cutter probably took between 5 & 10 minutes. Using this method caused the whole file to only be ~50mb with stock models included. I verified the output so you can see what I got, if you look in the same place, I put a copy there called 'MARK HEADSTONE70414 - ACE.zip" Best of luck with the project.
-
Yeah, it makes it way nicer. But you may not have that capability, Greg, your signature shows X7 Sp2, that was added in Mu1, so you'd have to go about it the way that djstedman said..
-
You could also load a tool as an assembly, if you built the assembly in Tool Manager.
-
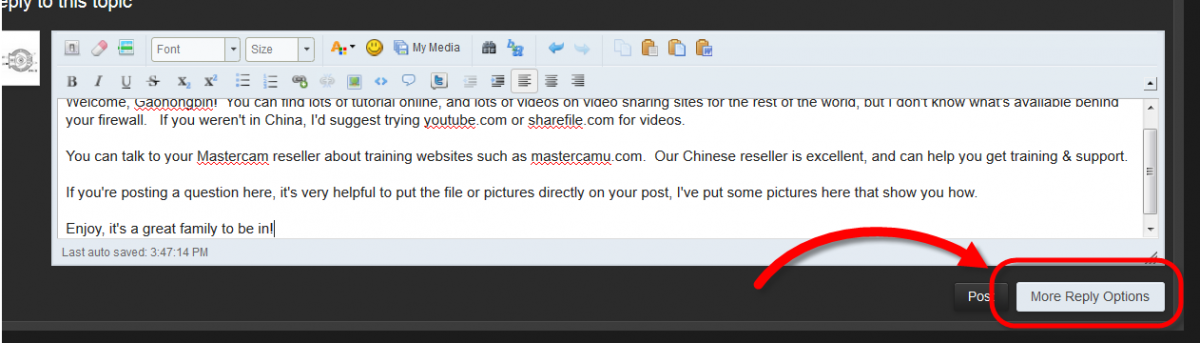
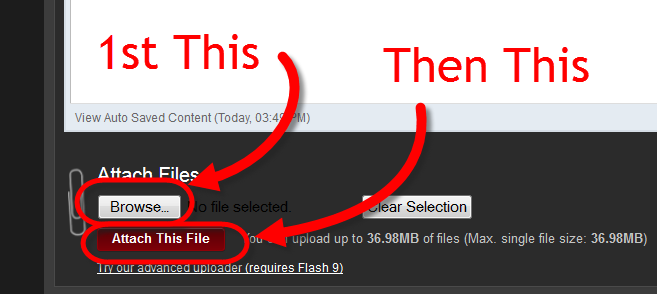
Welcome, Gaohongbin! You can find lots of tutorial online, and lots of videos on video sharing sites for the rest of the world, but I don't know what's available behind your firewall. If you weren't in China, I'd suggest trying youtube.com or sharefile.com for videos. You can talk to your Mastercam reseller about training websites such as mastercamu.com. Our Chinese reseller is excellent, and can help you get training & support. If you're posting a question here, it's very helpful to put the file or pictures directly on your post, I've put some pictures here that show you how. Enjoy, it's a great family to be in!


-
Looks like a fun (and educational!) way to spend a day at the shop!
-
CT (New England: MA, CT, RI) - Mastercam User Group
Aaron Eberhard replied to scooke4073's topic in Industrial Forum
I had a great time at the event, and met a lot of new people. It seemed like all of the customers I met over there got a lot out of the talks. Hi everyone I met -
Glad you like it The real trick is after you move/scale/reposition, you can build a stock model off of that Pmesh, and then do rest roughing ops against it..
-
An addendum to Mike's idea, if you build it into a Stock Model, then your can convert that stock model into a Poly-Mesh that you can manipulate (move, scale, etc). Create that stock model and then right click on it, go to Mill Toolpaths > Stock Model Convert to Pmesh...
-
Chip thinning calculator for HSM here...
Aaron Eberhard replied to danielm's topic in Industrial Forum
Chris - Youtube is the easy button, and you can always make the links "blind" so you can only see them if you click/know the link... I know I've said it before, but thanks for that awesome database and to all the people who contribute to it. -
Right click step file, 'open with' (browse) X7
Aaron Eberhard replied to Thee Rickster ™'s topic in Industrial Forum
Rickster - I've seen this before, and unfortunately your IT guy is wrong, it's a windows-being-stubborn thing... But if you have access to the registry (AND ARE COMFORTABLE DOING THIS!), you can fix it by changing the path in HKEY_CLASSES_ROOT\<FILE EXTENSION>\shell\open\command\ and edit the Default key. There may be a duplicate entry in HKEY_LOCAL_MACHINE instead, I can't remember. Fill in <File Extension> with whatever you're trying to load, like .stp. That's what Rogers' app does for you.. As always, back up any changes, etc..