


Leon82
-
Posts
2,193 -
Joined
-
Last visited
-
Days Won
12
Content Type
Profiles
Forums
Downloads
Store
eMastercam Wiki
Blogs
Gallery
Events
Everything posted by Leon82
-
You might have a license tied up . Ours doesn't even give a warning. It just lets you click on the operations with nothing happening
-
I save a copy with the material in the name of I want it saved. Then you pick the one you want they will be relatively close to each other in the library
-
is that the guy who was rambling about graphical control of the tool path? i need to re read this thread i missed where it went off the deep end
-
trim tool path. supr easy make geometry half the tool bigger t least so it doesn't plunge into stockem
-
sometimes you need to draw a custom one and depending where it overlaps you can control the tool entry area so it doesnt need to helix or ramp
-
with rest machining you make the boundary bigger for tool entry. you only need to make one side bigger
-
sometimes power surface can give you something good for avoiding a hole
-
if you copy them you may need to rechain everything but all the settings will be the same so i think its a little less work
-
there is an engraving path that should work. you could also use surface horizontal and pick the floor as drive and top of the letters as check but i would try a pocket set to zigzag with a tapered wall angle in depth cuts
-
you would make a plane on the bottom and copy the operations and switch the plane to the bottom . then it will verify correct and you could either bost it all or just the first half. transform rotate may work with y as the axis of rotation but i would have to mess around with it to see. you mat need to make a rotation plane
-
I did that for the yasda we have it was cutting a line on an angle before it did it
-

How to copy toolpath(s) from G54 to G55 in Mastercam
Leon82 replied to PGcam's topic in Industrial Forum
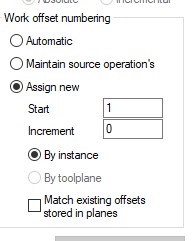
put the increment at one also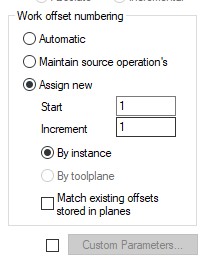
-
you can force optirough to 2D with the steep shallow
-
modelprep, hole axis
-
How to copy toolpath(s) from G54 to G55 in Mastercam
Leon82 replied to PGcam's topic in Industrial Forum
-
when i was messing with mine there was a value in the post for axis of rotation but it was older. it mat be in the machine def now
-
How to copy toolpath(s) from G54 to G55 in Mastercam
Leon82 replied to PGcam's topic in Industrial Forum
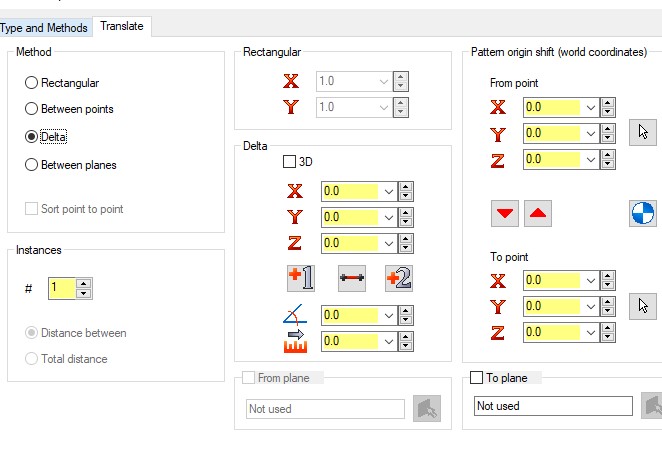
You don't have to make a duplicate plane. You can assign a new offset per instance and keep the offset distance at zero. -
its for machines without look ahead. you take a piece of aluminum or delrin and mill a hole and spring it out. then you increase the feed until it overcuts and put the values in the machine def or that box i cant remember. then when you use the function it should slow down the tool to avoid overshoot on the servos.
-
Pitch in your little gems that make mcam life easier
Leon82 replied to jlw™'s topic in Industrial Forum
it does the same with the show all button also -
If it's trimming or tilting to avoid the holder it will need regen
-
i get these with circlemill sometimes mostly with 10mm holes. never found a solution. i usually draw a new hole a little bit different size.
-
I use the black background
-
on top of those i have found a tighter tolerance will remove those sometimes
-
has anyone had trouble 5 axising on a mam72-35v?
Leon82 replied to Leon82's topic in Machining, Tools, Cutting & Probing
All three that ran the program. The pc4 is an ac machine. Both mam72 are bc and only a couple years apart -
Miniature Endmill Inspection
Leon82 replied to Cp5010's topic in Machining, Tools, Cutting & Probing
Our yasda had a dynavision. You can see the flutes on the TV screen.

