


Chris In-House Solutions
-
Posts
433 -
Joined
-
Last visited
-
Days Won
3
Content Type
Profiles
Forums
Downloads
Store
eMastercam Wiki
Blogs
Gallery
Events
Everything posted by Chris In-House Solutions
-
5 Axis drilling on 4 different planes with 1 WCS
Chris In-House Solutions replied to RCgendraft's topic in Industrial Forum
Is the rotary axis inline with the tilt on the trunnion? You probably need to shift the part up along the Z-Axis so the part is above the origin relative to where it is setup in 3D space on the machine. You can set this up to use a single work offset you just need to make sure the part is located properly within Mastercam relative to where it is located on the machine. -
5 Axis drilling on 4 different planes with 1 WCS
Chris In-House Solutions replied to RCgendraft's topic in Industrial Forum
Attached is my program. I've created one operation and set Misc. Real #7 & #8 to 3 to prevent the machine from going home. The code appears much shorter and easier to make sense of. Let us know if this is what you are seeking. 5 axis test1.zip -
Complex Mill-Turn with Mastercam. Is it possible?
Chris In-House Solutions replied to Etrain's topic in Industrial Forum
I went onsite a couple of years ago to prove out a post for a Nakamura NTJ-100 Nakamura Tome NTJ 100 not as complex but it was still a complex machine. The customer was using Mastercam to program the machine and no verification software when I was onsite. They bought the machine used and I think they were trying to get camplete to give them simulation. The post needed a few minor tweaks but pretty much worked right away. With these machines I would definitely want some sort of verification software. Without it the prove out time on parts would take a lot longer. -
Set the machine offset to 0 and let the post calculate the angles you will use. If you want to use the machine offset then you need to re-orientate the part and re-select the tool/construction planes.
-
just a guess but do you have the "Snap to Grid" option enabled? If you do it can cause frustration when trying to draw a free form line as your describe above. If you have that option enabled I suggest you disable it.

-
Assistance with surfacing this feature
Chris In-House Solutions replied to Sigurd's topic in Industrial Forum
I created 3 sweep surfaces based off the wireframe geometry that is on level 400 in my file. I find when using a flowline toolpath it is always better to have a single surface vs 2 or more patched surfaces. -
Does your machine have a sub spindle? The machine I loaded had a sub spindle and that option was not available. In that case I would create two separate .MCAM files. Or you could try loading a second machine group into a single Mastercam file. That might get messy with the way things are handled with Mill-Turn though.
-
Assistance with surfacing this feature
Chris In-House Solutions replied to Sigurd's topic in Industrial Forum
Blend seems to be the best. But here are a few more toolpaths on this part. I put a Flowline toolpath on here as well. Those surfaces and geometry can be found on level 400. shutoff pin 2021 test.mcam -
Assistance with surfacing this feature
Chris In-House Solutions replied to Sigurd's topic in Industrial Forum
Raster or Blend would would work as well. Put the part file up here and I'm sure someone will throw a toolpath or two on the part for you. The issue might be everyone here has an Industrial seat and your trying to learn on HLE. So the part file would be saved as a .MCAM file which you will not be able to open on the HLE. You will likely need to create a containment boundary (Sihouette Boundary - Wireframe toolbar) to prevent the tool from rolling over the edges of the part. -
IKE PROCESSOR HELP
Chris In-House Solutions replied to BIGDRUMOFFICIAL's topic in Post Processor Development Forum
Looking at your part file I believe the coordinates are coming out correct based on the way the planes are currently setup. My recommendation is that you reach out to our inside tech support and ask for assistance. They can log onto your computer and work with you to get the result you desire. If they need assistance they can reach out to the post team to clarify or ask post related questions. I believe this is an issue with the way your planes are setup but it can be difficult to determine exactly what is needed though a few lines of text on here. I'm just not 100% sure exactly what you are looking for to be able to assist you on here. Talking to someone and having them teach/show you what needs to happen might be the best course of action here. -
IKE PROCESSOR HELP
Chris In-House Solutions replied to BIGDRUMOFFICIAL's topic in Post Processor Development Forum
If you do not want the post to output G52 shift you can open the post and set swt_shft_loc = -1 -
Stock setup menu off screen on laptop
Chris In-House Solutions replied to kcornerback's topic in Industrial Forum
Click in the Name Field, hit tab and then hit space... that will get you out of that window. You might have to try a different screen resolution or plug in a second monitor. -
Mitsubishi MV1200S Wire EDM
Chris In-House Solutions replied to Dizcharge's topic in Industrial Forum
If you reach out to your reseller they may have one or they might be able to get one from CNC Software. -
Active Reports Data Field CNC file location?
Chris In-House Solutions replied to Steelab's topic in Industrial Forum
If you open the help menu and click on "Setup Sheet XML Outline and Tag Glossary Overview" under the related topics and then click on the "Setup Sheet XML Outline and Tag Glossary Overview " again it will list all the tags and a brief description of what they do. This should help you find the tag you are looking for if it is available. -
@So not a Guru If you want to cut the surface you need to eliminate the depth cuts. I also changed the depth and top of stock values you had on the linking parameters page. I changed the step over and toolpath rad to help regen the toolpath quicker. AXIS_SUB1.mcam
-
"New" computer not recognizing HASP
Chris In-House Solutions replied to Micallen's topic in Industrial Forum
Also if its a NetHasp you need to install the NetHASP License Manager on the new computer where you are plugging in the NetHasp. Even if you are using the NetHasp locally you still need to install the NetHASP License Manager. -
I've never had an issue using the wizard and updating posts. But there is a chook that is made to update posts so its something that should be used more often but I don't think many people know about it. If I'm updating a post that is more then 3 versions back I will use the chook cause it doesn't care how old the post is. Then you still have to jump through multiple versions to update the machine/control def using the migration wizard.
-
You have to do a fresh install there is no way to click a button and update from an older version to Mastercam2021 Once the software is installed you will want to Migrate your files (posts/machine/control definitions) from the previous version to the Mastercam2021. There is a guide called Transition_Guide.pdf in the following folder: C:\Program Files\Mastercam 2021\Mastercam\documentation\en-US. It will assist you through the process. Or you can likely call your reseller and ask them for assistance as well.
-
HELP 2D TOOLPATHING FROM A 3D FILE
Chris In-House Solutions replied to jonathan joseph's topic in Industrial Forum
It looks like the part file is a solid model. You can create curves on on all edges then select the wireframe you want to cut. -
Mastercam Lathe doesnt support Machsim. Mastercam Mill-Turn will allow you to simulate the Turret, locator and tool. You will need to contact your reseller to see if your machine is available and get a quote for Mill-Turn.
-
Have you tried using approach/retract points. You may have to also put in a point toolpath for verification purposes. Mastercam isn't aware what machine you are using so it doesnt know that your machine has tilted the table or head and rotated it to get to the next plane. I've seen this before and the fix was to put a huge clearance value in for verify purposes or use approach/retract values.
-
Is your toolpath going from one side of the part to the other side? So lets say from the left side to Right side?
-
List of toolpaths not supported by mill turn
Chris In-House Solutions replied to AGreen5's topic in Industrial Forum
@AGreen5 In-House Solutions has the ability to modify the .machine file for you. If you want to reach out to us we can discuss options for making the changes you require. Send me a PM and I can provide you with the email address to reach out to for these modifications. -
If you verify your part does your stock come in? My initial guess would be that your stock isnt setup in Mastercam job setup 100% properly. If I load a part in the simulation I can see my stock... different machine but I can see the stock (see pic below). Can you post a copy of your file?
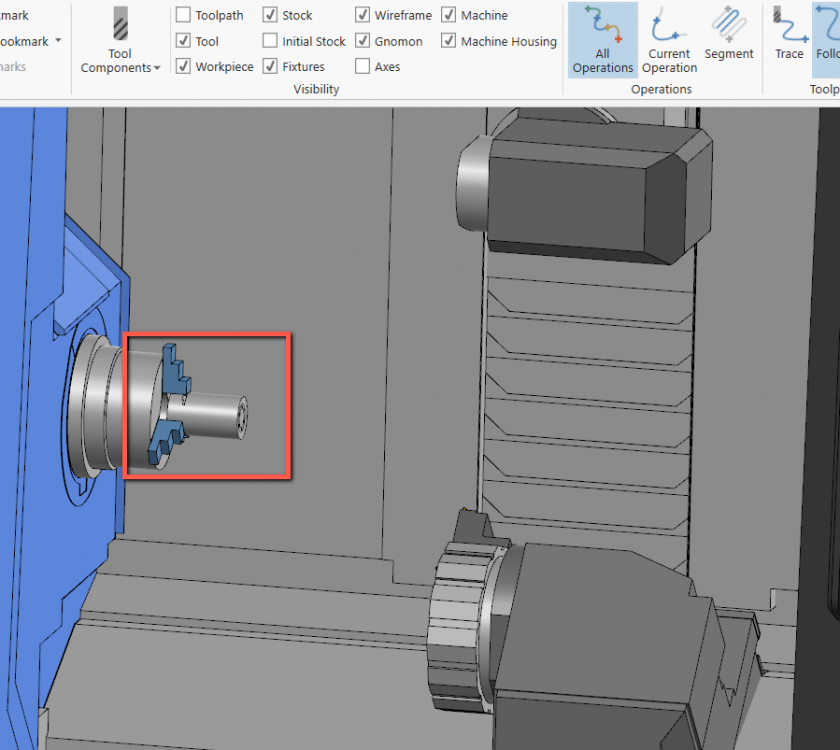
-
Are you using Mill-Turn or trying to use machine simulation? if you are using machine simulation it doesn't officially support lathes. Our post department has made it work but the list of limitations is about a page long so its not something we typically setup.


