Chris In-House Solutions
-
Posts
433 -
Joined
-
Last visited
-
Days Won
3
Content Type
Profiles
Forums
Downloads
Store
eMastercam Wiki
Blogs
Gallery
Events
Everything posted by Chris In-House Solutions
-
Hey Tim, I got the same behavior as you are describing. I will make a video up and send it into CNC Software. PcRobotics can you confirm you did the same process as Tim describes above?
-
PcRobotic, I used the generic post that came with Mastercam2018 and the latest mpmaster post and didn't get the same results as you. I could be programming this toolpath slightly different than you which may result in different output. Based on my test it seems your post may require a modification to not output that code.
-
Hey PcRobotic, What post are you using? Did you try this with the default post that comes with Mastercam2018? Perhaps one of the parameters in the Area Mill toolpath got changed and your post needs to be modified? I will test it once I get into the office this morning and let you know what I end up getting.
-
Hey tjamscad as Greg mentioned you can edit a post from Mastercam to work with this machine. When you buy a post you are paying to have a post that you dont have to edit . If you dont have programming knowledge it might be worth while to purchase as post verse editing it. Your time might be worth more doing other things rather than learning how to edit a post. I know In-House Solutions has a post for this machine and know of a couple of customers in the area that use it.
-
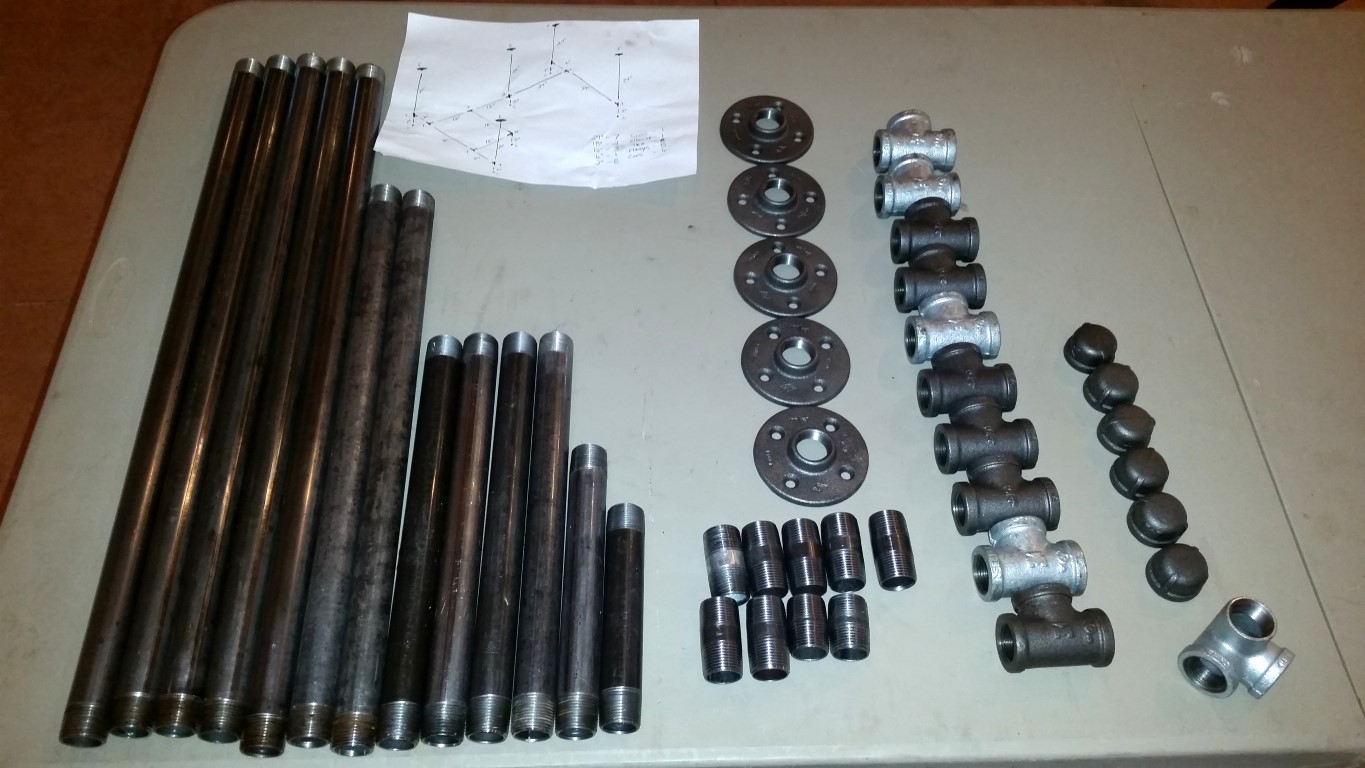
Okay I cant take a picture as he is currently in his office in a meeting. He used threaded pipe similar to the picture below and then made 2 platforms. The platform sits on top of his desk so if he wants to sit he can remove the his sit stand desk. One of the platforms is to rest his laptop on and one is for his keyboard & monitor mount to sit on. The threaded pipe allows it to be adjusted to different heights.
-
One of the guys here made himself a "portable" stand desk. He made it so he could change the height a few people in the office have used it and seemed to like it. I think I'm going to attempt to make something myself when I get time. Since I sit either in my car for most of the day or at a desk for most of the day I think it would be beneficial to be able to stand for part of the day. Let me see if I can take a picture of it and put it up here. Perhaps it will inspire someone here to improve on his design.
-
If you are cutting a 3D Shape Surface Finish Blend will work.
-
ahaslam, See the attached file. When I downloaded your file it appears you had the same size tool loaded for the second area mill operation. I think that was your issue. I recreated the operation and picked your 1/4 inch tool and I believe it should give you the toolpath you are looking for. 13999 DOOR SURFACING 30IN CUBE 110885 CL.zip
-
2017 Active reports will not disply screen shot
Chris In-House Solutions replied to TBP's topic in Industrial Forum
TBP what graphics card do you have on the PC with the issue? Do you have the most up to date graphics card drivers installed? -
Hey Frankieboy, You can download the add on from our website: http://www.inhousesolutions.com/downloads-installation/ I can probably find you a sample file as well and send it you.
-
Mastercam 2018 Backplot tool option
Chris In-House Solutions replied to tony1001's topic in Industrial Forum
Hey tony1001 it appears that option was removed for Mastercam2018. -
Entry Helix Outputs Line Segments
Chris In-House Solutions replied to Spotterhphc's topic in Industrial Forum
Spotterhphc you can turn on helix support in the control definition and test the output on the machine. Based on your description this might be set to "No helix allowed".
-
Okuma Multus U4000
Chris In-House Solutions replied to Goldorak's topic in Machining, Tools, Cutting & Probing
Hey C^Millman whats your Sync Code method? I believe the post group here at In-House typically uses Misc. values which relies on the end-user to keep track of the codes and input them on the operations where they are needed. -
Okuma Multus U4000
Chris In-House Solutions replied to Goldorak's topic in Machining, Tools, Cutting & Probing
Hey Goldorak, If you end up purchasing a mp based post (not MT) You would control the lower & upper turret via an axis combination. This machine would come with 4 Axis combinations. Upper/left (upper turret cutting at main spindle), Upper Right (upper turret cutting at the sub spindle), Lower/Left (lower turret cutting at the main spindle) and Lower/Right (Lower turret cutting at the sub spindle). In-House Solutions has a post for this machine available. If you contact your resller ask them to contact [email protected] for a quote. -
Hyundai HIT 250 MS
Chris In-House Solutions replied to Henk's topic in Machining, Tools, Cutting & Probing
Hey Henk, In-House Solutions has a post for this machine. This machine has a few different cycles that are not typical for newer Siemens controls. If you contact your resller ask them to contact [email protected] for a quote. -
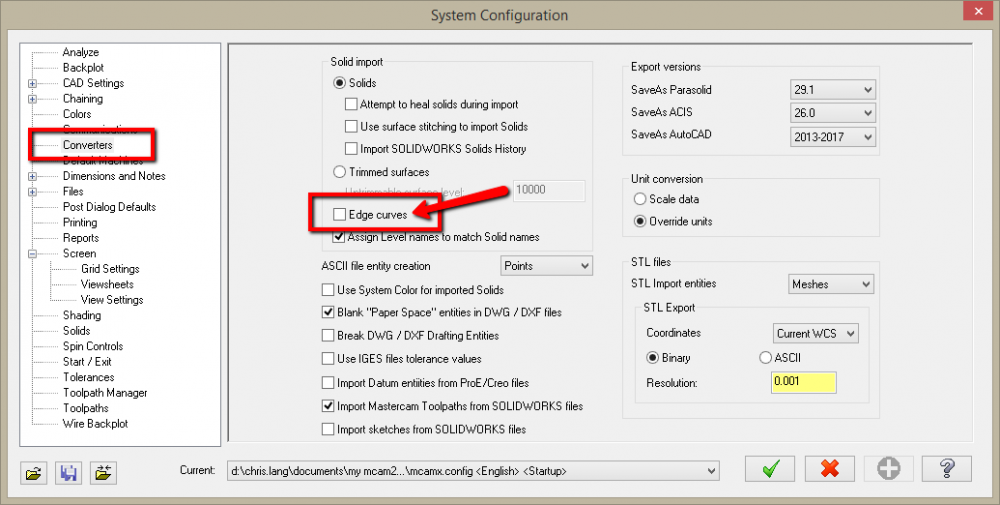
In the configuration, under Converters, solid import you can tell it to always create edge curves.
-
Sumac Andy the screen shot you show is the newer Swarf toolpath. Foghorn Leghorn explained what the differences are. If you want to use the newer swarf style toolpath you will need to follow Aaron Eberhard instructions.
-
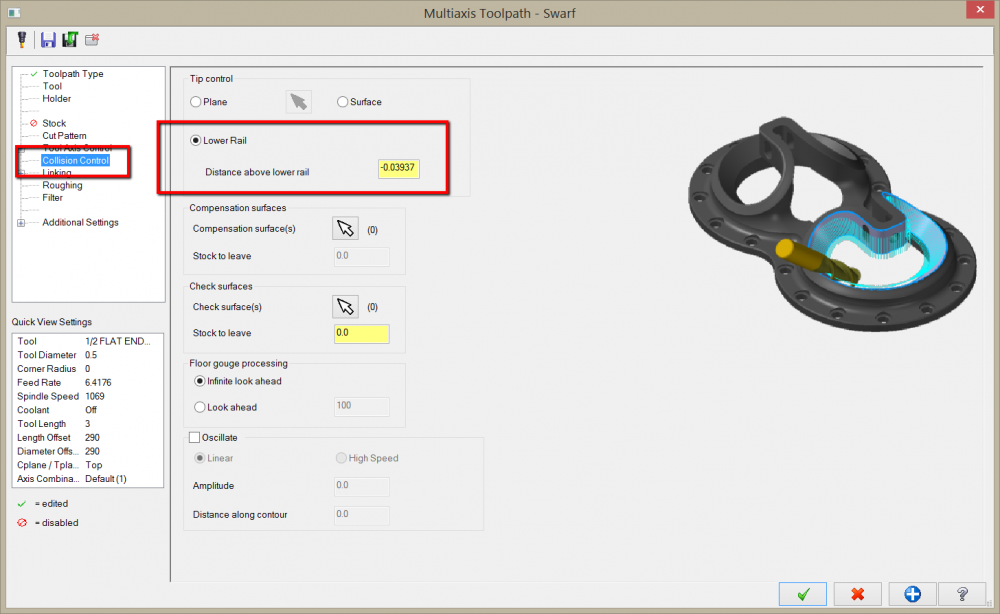
Gary there are a couple of swarf toolpaths in Mastercam. If you use the Swarf on the Application page you can tell the tool to go deeper using the collision control page as shown in the screen shot below.
-
Verify comparison: Mastercam X6 vs Mastercam 2017
Chris In-House Solutions replied to Titanium's topic in Industrial Forum
Hey Titanium, I remember reading a thread here a while back (5+ years ago) that mentioned having a good graphics card resulted in faster verify results. On my laptop I verified your part in roughly 1 Minute and 10 seconds using Mastercam 2017. I'm just wondering what your computer specs are on the system that you are attempting to verify this part on? Below are the important specs of my system. My Laptop has an integrated graphics card but I turned it off in the Bios since I was having issues with it. ------------------ System Information ------------------ Time of this report: 5/11/2017, 14:09:32 Operating System: Windows 8.1 Pro 64-bit (6.3, Build 9600) (9600.winblue_ltsb.170427-1704) Language: English (Regional Setting: English) System Manufacturer: Dell Inc. System Model: Precision M4800 BIOS: A13 Processor: Intel(R) Core(TM) i7-4810MQ CPU @ 2.80GHz (8 CPUs), ~2.8GHz Memory: 16384MB RAM Available OS Memory: 16324MB RAM Page File: 7208MB used, 25498MB available Windows Dir: C:\Windows DirectX Version: DirectX 11 DX Setup Parameters: Not found User DPI Setting: Using System DPI System DPI Setting: 120 DPI (125 percent) DWM DPI Scaling: UnKnown DxDiag Version: 6.03.9600.17415 64bit Unicode --------------- Display Devices --------------- Card name: NVIDIA Quadro K2100M Manufacturer: NVIDIA Chip type: Quadro K2100M DAC type: Integrated RAMDAC Device Type: Full Device Device Key: Enum\PCI\VEN_10DE&DEV_11FC&SUBSYS_05CC1028&REV_A1 Display Memory: 10119 MB Dedicated Memory: 1957 MB Shared Memory: 8161 MB Current Mode: 1920 x 1080 (32 bit) (60Hz) Monitor Name: Generic PnP Monitor -
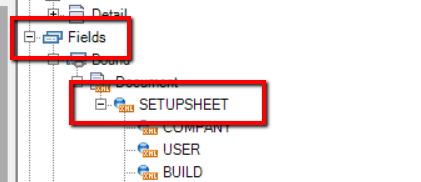
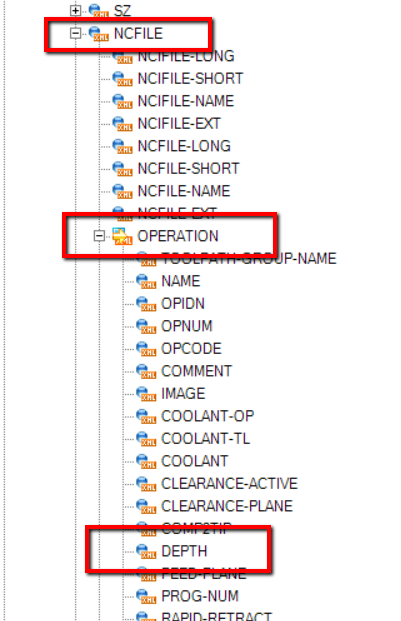
I believe you are looking to pull the depth from an operation into an active report using the active report designer. The information above is the parameter number that you would input in a post to pull that value. I think the "tag" you are looking for can be found under the following structure. Fields --> SETUPSHEET --> NCFILE --> OPERATION --> then select DEPTH. I believe our active report setup sheet which you can download from this site may have the field setup in it (its been a while since I've looked at it). You may be able to trace it back to its source tag if this isn't the one you are looking for.
-
Kunfuzed Stock model would work but it wouldn't necessarily tell you how much stock is left on your model/surfaces. That would be determined by how much stock you left on your drive surfaces and floor surfaces.
-
lollipop machining possible in highspeed
Chris In-House Solutions replied to Frankieboy's topic in Industrial Forum
Hey Frankieboy, I believe you can only Finish surfaces with undercuts using surface finish contour and surface finish flowline. I don't believe that is supported in the HS toolpaths but perhaps someone here knows a trick I don't know. -
It will tell you the difference between the cut model and your actual model. But is that not what you are looking for as you want to ensure there is extra stock on the piece for heat treating? Let me know if I miss understood your original question.
-
In verify you can compare the verified part to an STL (part file). You can change the start and end values by going to the MastercamSimulatorDefaults.xml file that is found in the following folder: C:\<Users.Name\Documents\my mcam2017

-
Latest Mastercam2017 version should be 19.0.15109.0 You can download the updates from Mastercam.com and install them if for some reason it says there are no updates available. If by chance you are still running a beta version of the software you will have to un-install it and re-install it.