Thad
-
Posts
8,914 -
Joined
-
Last visited
-
Days Won
17
Content Type
Profiles
Forums
Downloads
Store
eMastercam Wiki
Blogs
Gallery
Events
Everything posted by Thad
-

Mostly done in extensive upgrade in our use of Mastercam
Thad replied to sharles's topic in Industrial Forum
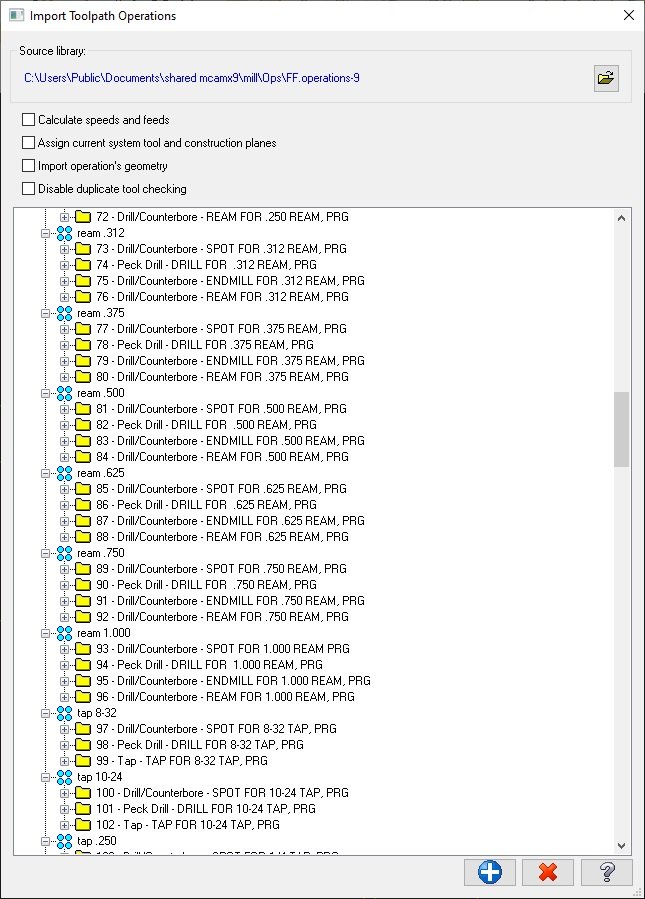
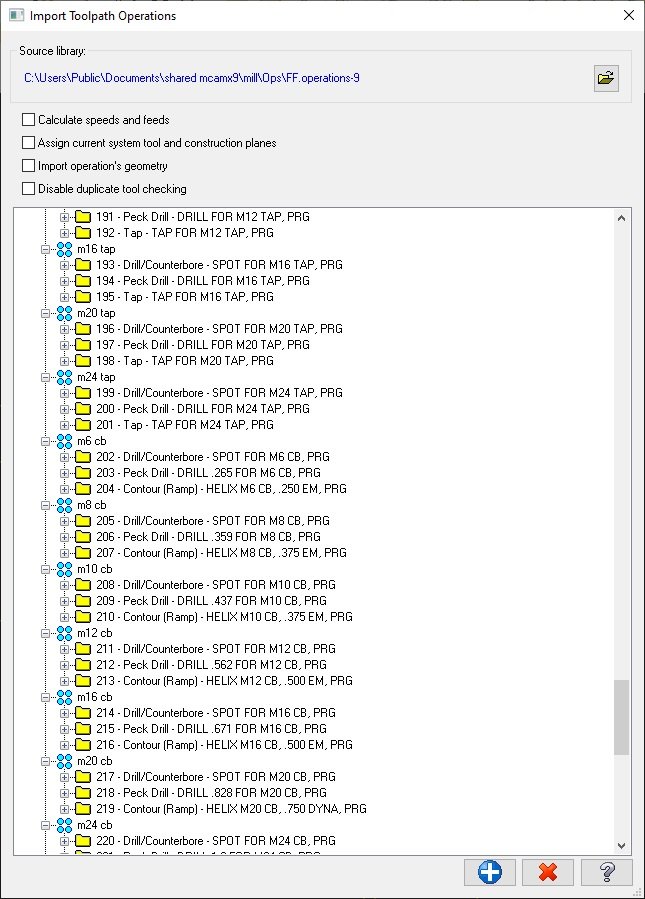
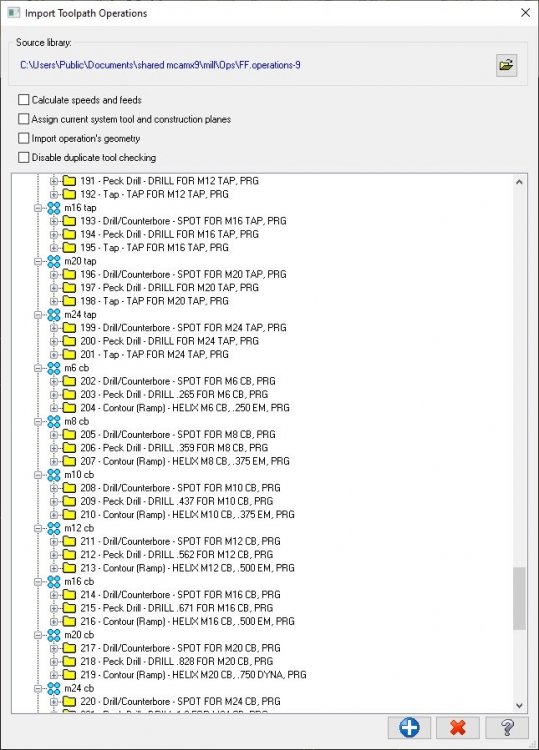
Why stop at editing your toolpath defaults? Make an operations library. With toolpath defaults, you can only set the parameters for a single pocketing operation or a single contour operation. Don't you want different defaults if you're using a 3/16 end mill versus a 3/4 end mill in a pocketing toolpath? Take lead in/out, for example. Percentages can be OK for some of these settings but I like to define constant numbers for most of those things. You can do that with an ops library, but you can't with the defaults file. Here's a few shots of my library. I have pocketing, contouring, finishing operations for each tool that I use. I also have groups of ops to perform common tasks like reaming, tapping, c'boring. I have all of my spot drill ops go a little deeper than actually needed so that when the hole is complete, there's already a chamfer on the hole. 95% of my programming is covered in my library so I just import the ops and go.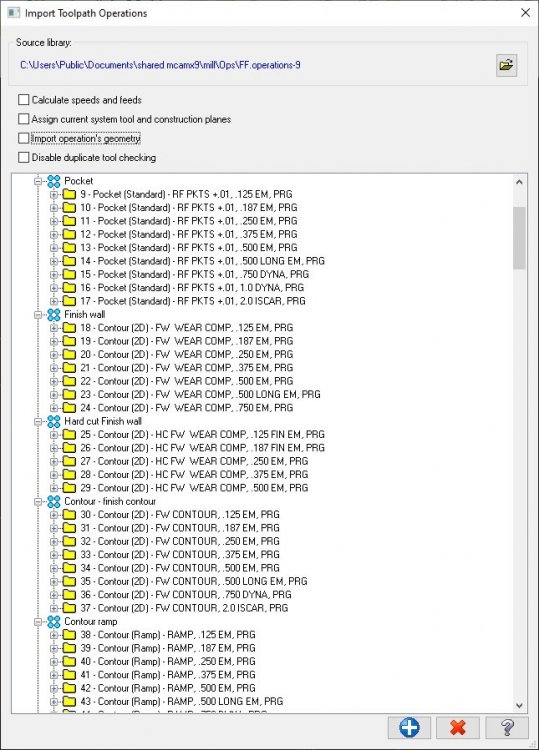

-
I believe he's merely complaining that there is no wear/control/whatever comp option in the swept 2D toolpath.
-
That doesn't excuse the painfully slow zoom that MC users at this forum have been complaining about for almost 20 years now.
-
Wouldn't simply forwarding their email (with the file attached) show them a record of what was sent?
-
Can you be more descriptive than "NADA"? Do you get an error message? If so, what does it say? If no error message, just a blank screen with no entities? Is it a .SLDPRT or a .SLDASM file? It may not be a version conflict. That's not true.
-
Pitch in your little gems that make mcam life easier
Thad replied to jlw™'s topic in Industrial Forum
Yes. Once they're selected, you can do things to them. If you only wanted to see surfaces on the screen, Quick Mask All-Surfaces, then Alt+E. To get everything back on the screen, Alt+E again. To further useful selections, after isolating all surfaces, select the ones you want for op1 (for example) and change them to a different color. Then later, you can QM all color green (or whatever) to select all of those surfaces. Even further, when you want to select all surfaces EXCEPT the green ones...QM all surfaces, then Alt+E. Then QM all color green->Invert selection->Alt+E->Alt+E and you'll have all surfaces that aren't green on the screen that you can easily window. The options are practically endless. With a little bit of practice, you can select/deselect a great number of options very quickly. -
One of the joys of the new MC interface....way more mouse clicks to accomplish the same thing.
-
Also, check out the Important Topics - Please Read Before posting topic pinned at the top of the page. There's a link in there to the X+ discussion thread. Feel free to ask any specific questions.
-
You can't window them?
-
Jay, Is the FTP still up? A new forum member asked me about it just recently.
-
You mention in your topic that you're looking for wireframe. I suspect that you don't want to (not necessarily, anyway) actually create spiral wireframe, but rather a toolpath that will cut in a spiral motion. Correct? If so, try peel mill using 2 lines. You should be able to get a spiral looking toolpath by tweaking your lead in/out radius.
-
Pitch in your little gems that make mcam life easier
Thad replied to jlw™'s topic in Industrial Forum
Mastercam used to have a macro recorder but I think it was eliminated when the X series of MC came out. -
One thing nearly as irksome as "0 points selected"
Thad replied to SlaveCam's topic in Industrial Forum
While it may be irksome, shame on you for not using A Form Filler. -
Where can I find out what service pack I'm on?
Thad replied to Joeyls319's topic in Industrial Forum
File-Help-About Mastercam button. There's a version number there. It doesn't explicitly say what SP you're on, but if you copy/paste that version number here, someone really smart at the forum could probably tell you. -
Basically, the same thing is accomplished, but to use the parameters properly, enter .5 for your roughing tool diameter and then enter a value in the Clearance field to extend the toolpath enough to accommodate any other stock, such as the min toolpath radius, allow a little bit of overlap, etc. Nitpicking, I know, but I just wanted to point it out since JB is a new MC user. Another helpful hint is to click the ? on any parameter page and then click the Field Definitions tab. It tells you what each parameter on the page does.
-
Since you had problems with it working before, I recommend starting from scratch with a fresh install. There isn't much to the setup process so you should be back up and running pretty quick.
-
Instead of a dynamic path, you could go with a 2D contour-remachine. That's more of a straight to the point toolpath that will only machine where it finds stock based on the parameters that you give it. In the 2D contour parameters, there's an option for 2D, ramp, or remachine.
-
+1
-
Now I see. The Demo version is a stripped down version that can't save, will only analyze to .XX, won't post code (or will post limited code), etc. That's why I answered the way I did above.
-
Why would you need proper speeds/feeds with a demo version?
-
X+ screen shot background color not changing to white???
Thad replied to jrauch's topic in Industrial Forum
Have you tried restarting MC? -
Found it. It's in the .workspace file. Open it with Notepad and changed the "applook" number. More info here... https://www.emastercam.com/forums/topic/78904-screen-background-color/
-
C'mon g, we all know that using the search feature at this forum is worse than death by bunga-bunga.
-
Yeah, something like that. It was definitely a text file.
-
This might be your best bet, Murlin. I believe the color schemes we're talking about weren't unsupported.