Chally72
-
Posts
499 -
Joined
-
Last visited
-
Days Won
32
Content Type
Profiles
Forums
Downloads
Store
eMastercam Wiki
Blogs
Gallery
Events
Everything posted by Chally72
-
Hi Shiva, The Multiaxis Course on Mastercam University is available to purchase through your reseller at any time. There is no reason you should not be able to purchase access to those courses today. If you are still having trouble after talking with your reseller again, please send me a private message and we can work it out. In addition to the purchasable Multiaxis Course, Mastercam University is currently offering Mill 2D, 3D, and Lathe courses for free. This does not restrict or change any other Mastercam University content, but is simply a way of opening up a large amount of intro courses for people to learn with while they are at home during this pandemic.
-
The issue is that NX has certain data embedded in the .prt file that will not come through. I used to have the same problem trying to get at NX drawing and dimension data with a seat of Solid Edge- and that was still in the Siemens family! The only option offered by my reseller at the time was to buy a seat of NX at a reduced price specifically to handle viewing and converting this data.
-
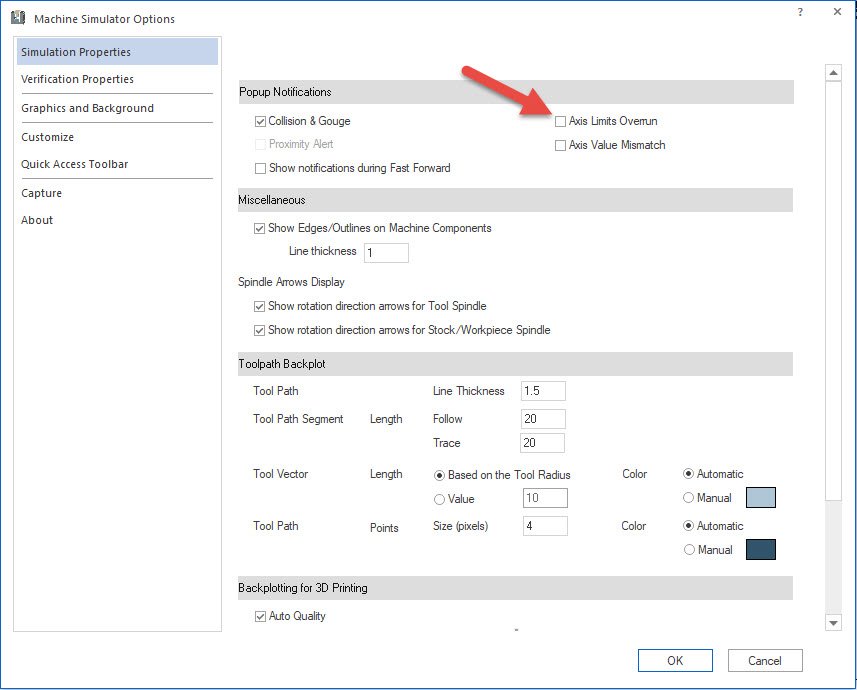
Just to clarify, you do not need a special post tied to the simulation. If you're not seeing the warning, make sure you turn on axis limits in the Machine Simulation options:
-
Your reseller should definitely be the first point of contact here. A little training on tool and locator setup from them and you should be good to go for this and any future tooling. If you still have questions left that they can't answer after training, please feel free to send me a message and I'll make sure you get whatever you need.
-
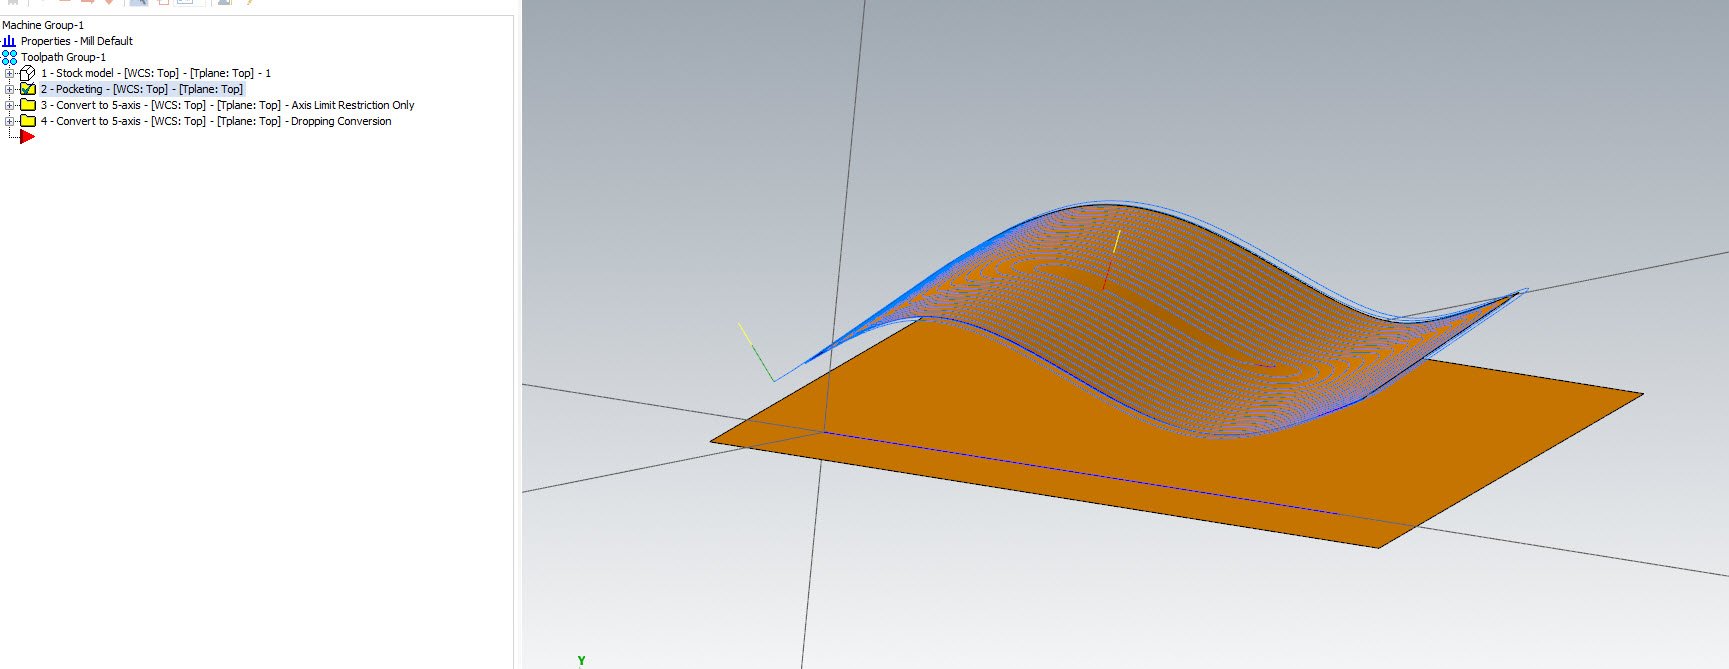
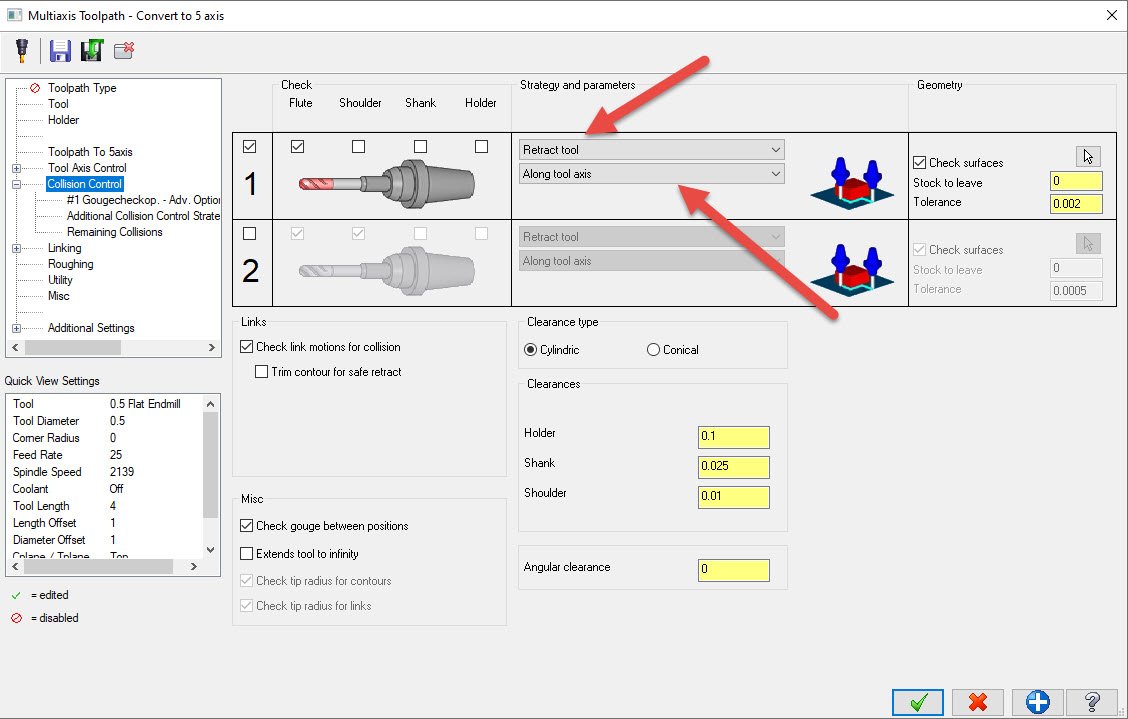
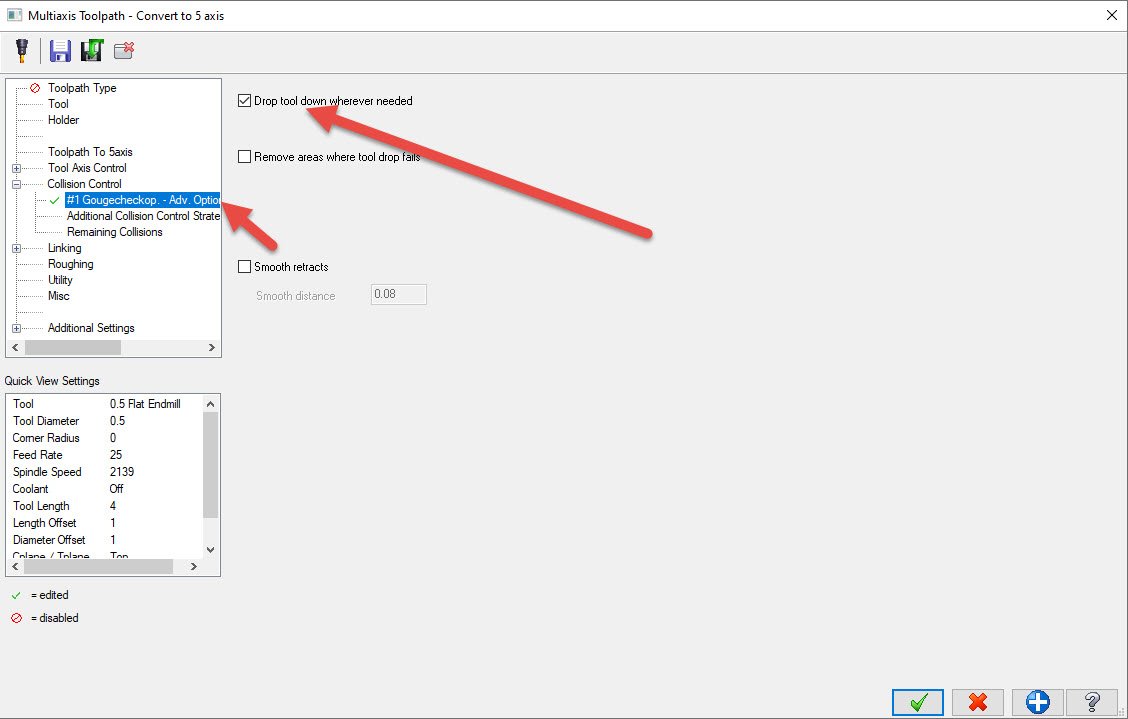
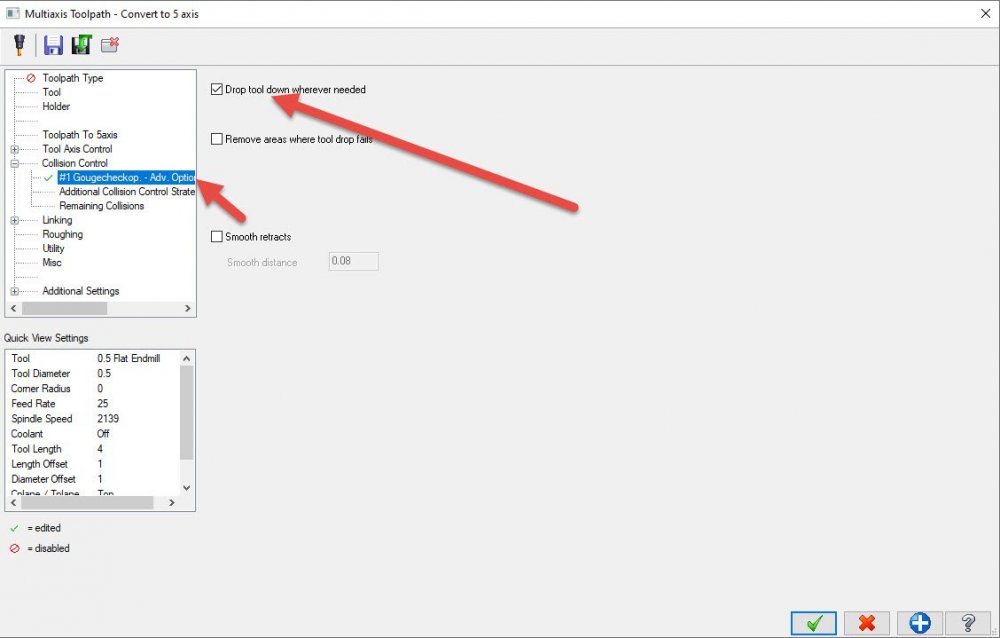
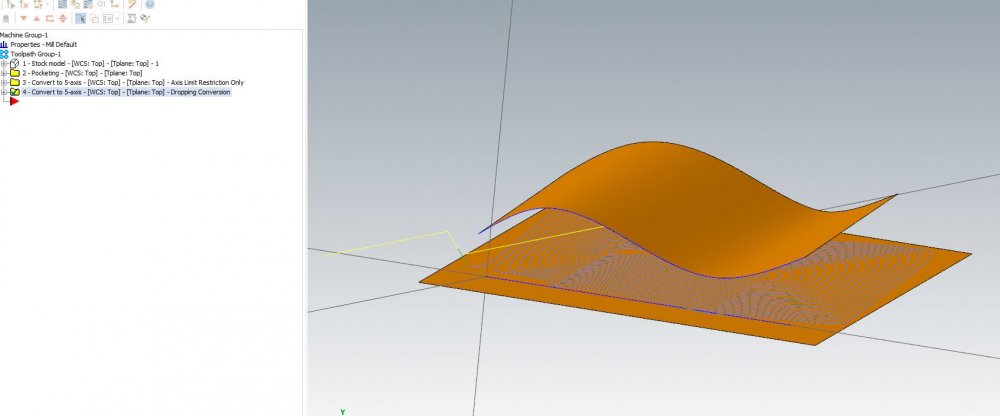
It's true that there aren't many controls if you want to limit machine angle, but it's important to point out that this path is forced to calculate against the floor vectors to ensure that we make safe dynamic style toolpath for all circumstances- IE, we don't introduce tilt that would overengage the cutter and blow up a tool. HOWEVER, because this is Mastercam we're talking about, we still have options here! Attached is a program where we've got a pocketing path on an undulating surface, and perhaps we want to get more specific with the motion. Case #1: We want to restrict the rotary angles so that the path will stay within our machine limits. Check out Path #3- I can use a Convert 3 to 5 axis toolpath even on other multiaxis paths like Pocketing. So here, I take the Pocketing toolpath, turn on Limits in Tool axis control, and limit my tilt motion to a 10 degree cone. Now I keep my dynamic-style motion and restrict it to my tilt needs. Note that this might overengage the tool in certain areas here, but if you're multiaxis roughing you're probably OK accepting some compromises such as this and you've got a conservative stepover to begin with. Case #2: We want to project or drop the roughing motion onto our true surface- the flat draft face underneath my "wave" surface that I toolpathed with the Op #2 Pocket. This is Op #4, for reference. So, once again, I'll use a 3 to 5 conversion path, and this time I'll use a little trick in Collision control. I'll set strategy #1 to Retract tool along tool axis: I'll set my Check surface as that drafted underside surface I actually want to cut down to. Next, I'll go into the advanced subpage for Strategy #1 that opened up when I made my strategy selection, and turn on Drop Tool. What this will do is project the toolpath DOWN along the vector of the tool until it comes in contact with the Check surface I set- which in this case is the final surface I actually want to cut. The end result is that I get the tool pointing/roughing motion created by path #2, but projected to the lower surface. I could combine these case methods and do both a projection and a restriction of tool angle, or add collision tilt away like a normal Morph/Parallel to avoid clamps/etc. The idea here is that while multiaxis Pocketing might not be able to give you exactly what you want due to the restrictions it calculates with, you can always take that motion as a starting point and modify it to suit your needs through a 3to5 conversion path. Hope this helps! Dropped Pocketing Example.mcam


-
Can you post your file? I can take a look and make some suggestions.
-
Directly editing the UV of individual solid faces is unfortunately not possible. You'll have to make Surfaces from Solids first, then use Edit UV or Reflow UV to change the UV flowlines to your desired pattern.
-
Hi Shiva, 1. Pocketing is pretty unique in that the tool axis control at every point of the path is entirely driven off of the floor surface you select. The tool will always point in the normal direction of the floor, so changing the floor is your handle for affecting tool pointing and establishing tilt limits. That's all well and good, you're probably thinking, but then you immediately run into the next problem- how do I change my floor shape but also cut my floor? One common way to use Multiaxis Pocketing is to draw a false floor below the geometry you're cutting that gives you the tool axis pointing you want, and then simply add the actual floor as part of the Part Surfaces selection that the toolpath will avoid. Here's an example where I want to rough a large amount of material at once from the pockets on the sides of this part, but I also don't just want to point the tool based on the floor surfaces and end up with essentially just motion around a big cylinder: So how did I get the toolpath that is displayed? I drew my own floor inside of the part, that has a gentle kick upwards at each end: Using this false floor, I am controlling the tool vector explicitly along the entire path, but still cutting against all of the actual part geometry; the false floor ends up only being used to point the tool. Here's the floor inside of the part geometry: You'll note that when the toolpath goes beyond the extents of the floor surface I've drawn, it just acts as if we've drawn a tangential straight extension onto the floor, and maintains that tool vector out to wherever the path goes to. 2. Morph is a little easier to understand, troubleshoot, and modify because of the options you have within the path to change the motion, but it can't ever be as efficient at roughing material as Multiaxis Pocketing. Things like the Morph Pocket option inside of the Roughing tab will get us closer to constant cutter engagement, "dynamic-style" motion, but still not close to what Pocketing will do. There are situations when I use one or the other, and there are definitely situations where it is just too difficult to produce a good Pocketing path because of crazy part geometry or machine/fixture constraints, and I need to go to a morph or parallel to get the power and explicit control I need to produce a usable toolpath. 3. In this example, the company wanted to make a video showing off the cutter doing full slotting before tackling the blades. For a production program, I'd probably be using Pocketing to dynamic cut the entire channel
-
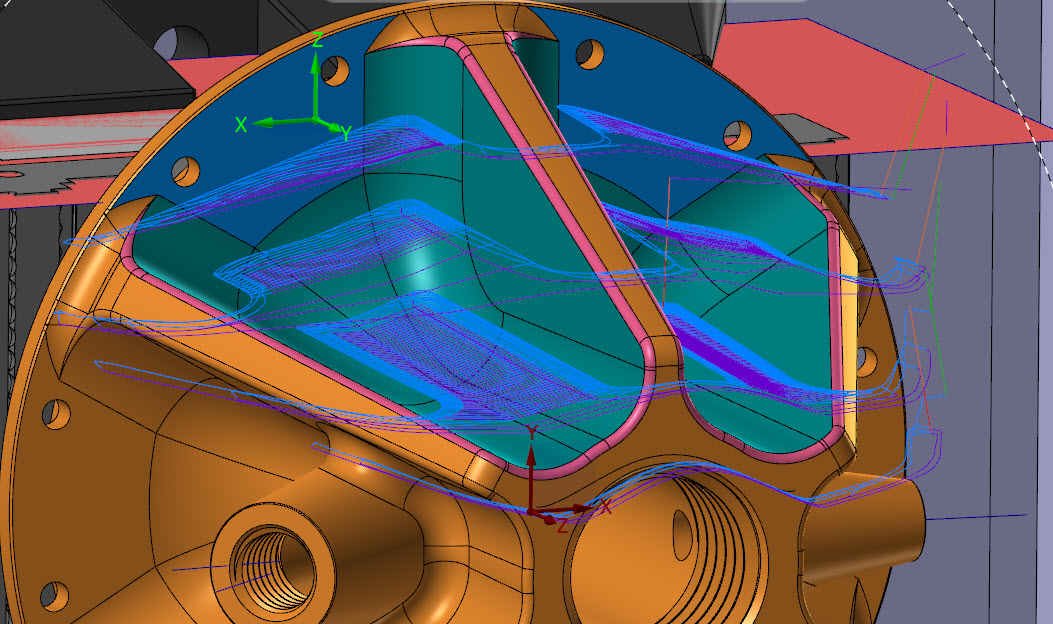
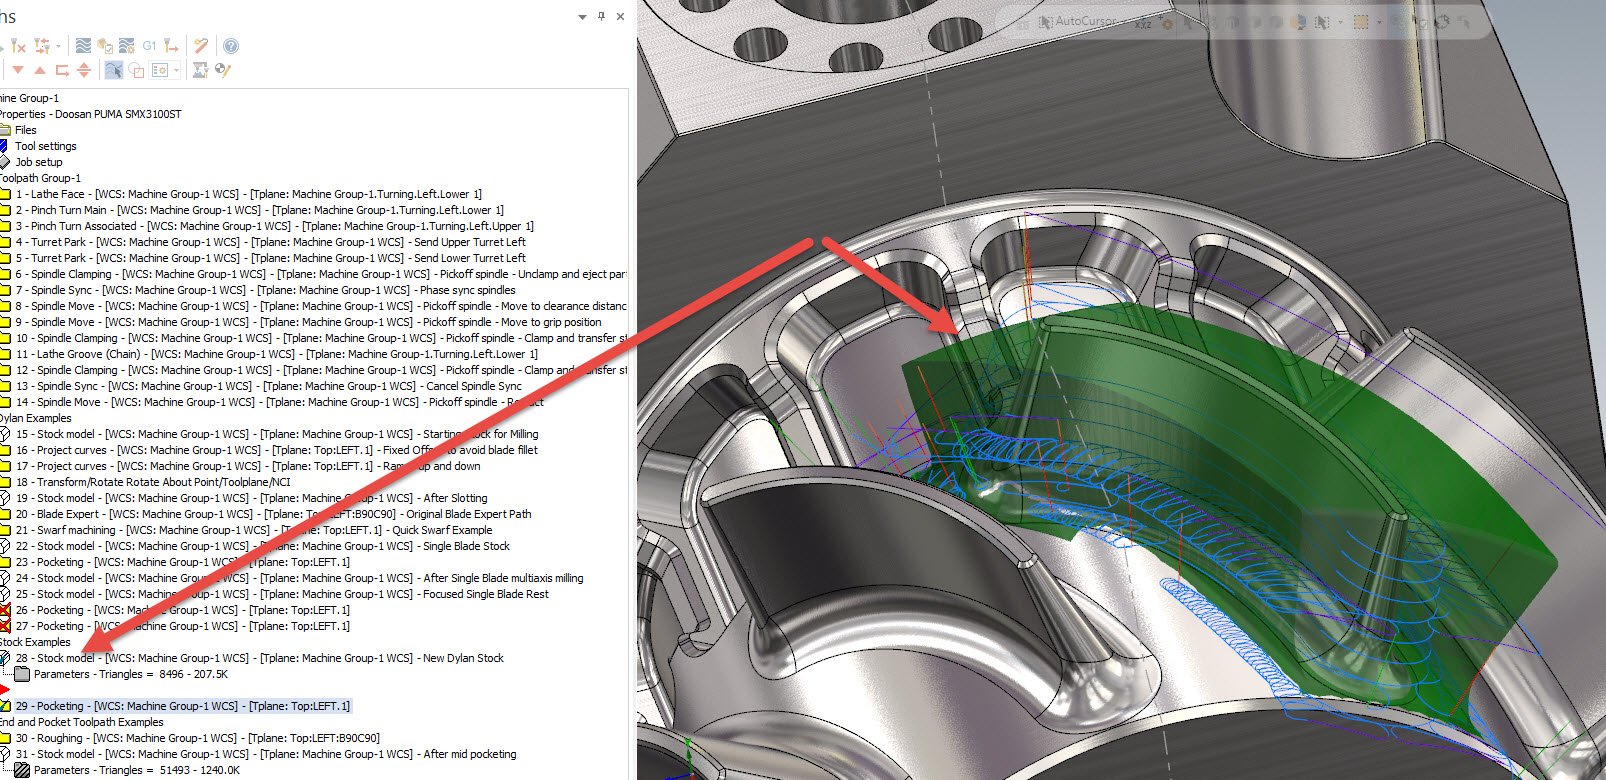
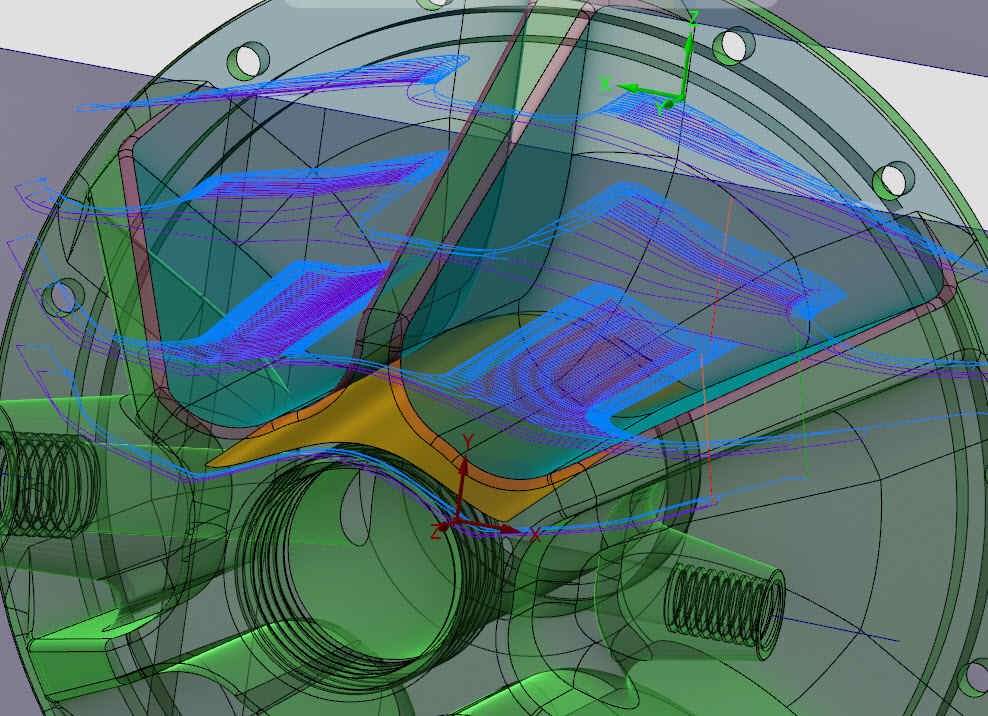
Here's a simple example where in this process, a cutter was sent down the center of each channel in an initial slotting op, and then we create a local stock plug that represents the stock left around each blade that we then target for a multiaxis Pocketing op to efficiently rough out:

-
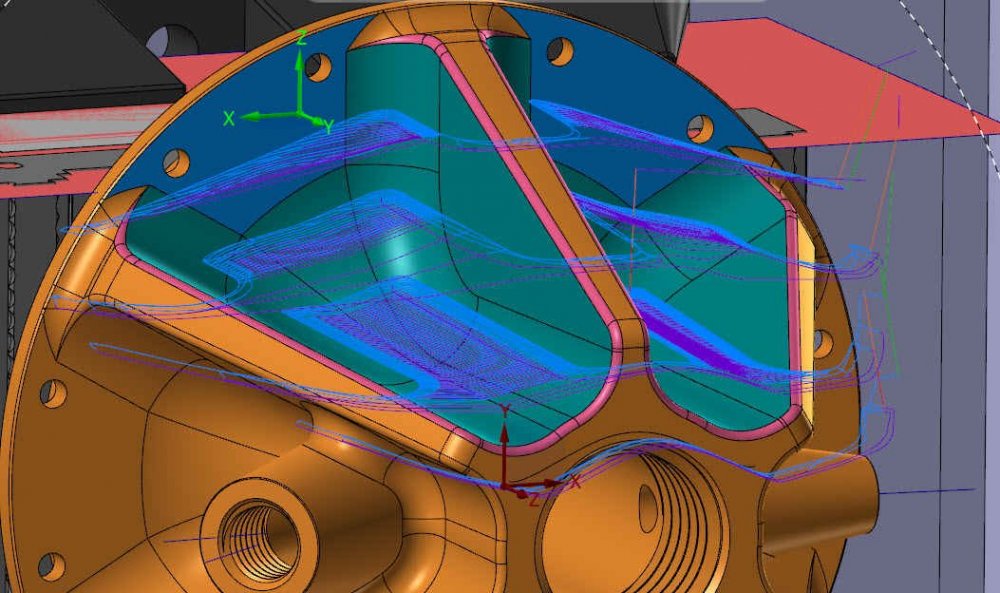
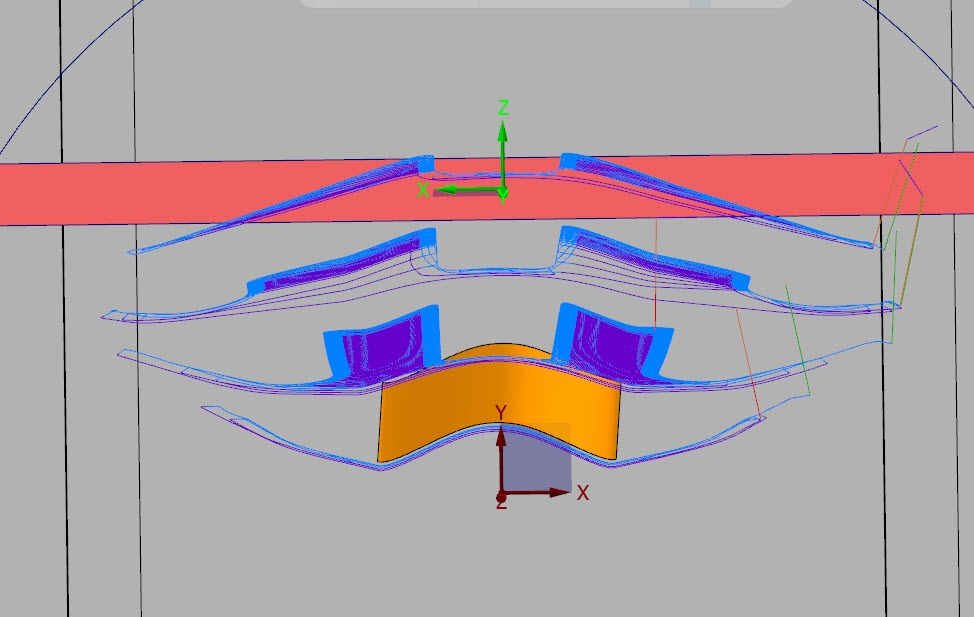
Are you using stock? Multiaxis pocketing is very aggressive in that if there is stock beyond the drive geometry, it will still go after it. For impellers/blade/hubs, what I usually do is create a stock "plug" that represents the stock of one channel. If you make it a solid plug, you can use the model prep push/pull tools to adjust entry and exit trims as well. Focusing Multiaxis pocketing using stock is the only way to go when you have complex profiles that no longer lend themselves to projected 2D boundaries.
-
Colin has hit upon the use cases pretty well, and Ron programs in the same method I do- in that I usually disregard stock setup and start with a stock model. For pretty much every program I create, a stock model is Op #1 in the toolpath manager. Here are some videos that I created for education that go into the use/view details of each type of stock model and provide examples. Video #2 gets into how to transfer stock between different machine groups, move lathe to mill stock, etc. Please excuse the poor audio quality of video #1!
-
Yep, that's the exact situation I was thinking of. Glad they were able to zero in on it.
-
Yes, one of the benefits of axis sub is the extremely clean code, motion-wise. Ron, I shot you a PM as I'd like to explore this topic further with you.
-
Coming back to this with some new insight! Ron, after being messaged by a fellow employee who caught this thread last night, I think I've narrowed down the issue with display discrepancies with axis sub. See second half of video below. Flycut, the first half of the video below goes through Ron's example file and shows the proper unroll position for geometry. File also attached. Axis Sub Example.mcam
-
To try to shed some flickering candlelight on the mysterious: With unrolling wireframe geometry in order to path it for an axis sub, you must always rotate it by 90 degrees (or -90 degrees) in the Positioning field of the Unroll command. I forget if it's positive or negative, but like trying to insert a USB, I am guaranteed to get it wrong the first time. The reason for the unroll clocking having to be 90 degrees off has been lost to the annals of time and no one seems to be able to give me a concrete explanation, but suffice it to say we can't change how it functions now or everyone who uses a black background would pick up pitchforks. By doing this clocking on the unroll, the rerolled axis sub should be clocked correctly, and should have a correct toolpath display and a correct backplot display. Now, what Ron is referring to, and what I have seen on two recent parts, is an issue where backplot does not match toolpath display on an axis sub operation in terms of clocking. I don't have a specific trigger for this issue, but from the instances I've run into, posted code is correct- it's merely one of the displays (I believe backplot) that is incorrect.
-
Correct. Each reseller is individually handling the requests and determining eligibility. For those reading this who do end up contacting a reseller about the deal, please be patient as there's been an influx of requests after the recent Titans of CNC Boombastic event, and by the time they're done processing your request, for a $160 package they're not making a dime on it for their time.
-
Another point that some may not be aware of- Subscription pricing for Mastercam is also now currently available. This falls in between the hobbyist version and a perpetual license, but obviously the pricing skews more towards the higher of those two. Last I checked, subscription was aiming to roll out quarterly increments for pricing structure.
-
If any of you 5 axis programmers haven't played with 2022's Unified yet or don't know what advantages it offers, below is a good intro video, with more detailed videos to come on the Mastercam Youtube channel in the coming weeks. No more starting with a Parallel and then changing directions midway through programming and having to recreate the entire path and all your settings in Morph/cuts along curve/etc!
-
The Titans site has Mastercam CAD and CAM lessons for all of the Building Blocks, Rocket series, and Art of Fixturing series. Additionally, the programming on their aerospace academy videos is Mastercam, though those videos focus more on machine and tooling process. The older 5 axis videos and such (content from 3 or more years ago) only have Fusion lessons. For those who don't know, the Hobbyist deal is a $160 promotion that gets you a full-fledged seat of Mastercam for a year- Multiaxis, blade expert, etc etc- that can post code. The stipulation is that you only may use it if you make less than $1500 per year with your work. The licensing and files are marked as Educational files, with licensing for this program initially being for 1 year, and we hope to extend this in the future and continue it for coming years.
-
Thanks for joining the call with us and though I'm not involved on the post end of things, you're in good hands with Gabriel. Having someone that can connect all the dots on-site if there's an issue can certainly cut days or weeks out of a troubleshooting process- it's been a tough shift performing this role almost totally remotely since the beginning of COVID.
-
If you have models of your machines, you can create your own machine simulation environments. Here are several videos that will help explain the process:
-
Hi RecceDG, I assume you've obtained the hobbyist Mastercam deal being promoted through Titans of CNC. I'd recommend taking advantage of the free training out there to get up to speed. This is not only the Titans videos, but also the free courses on Mastercam University that offer a more extensive walkthrough of interface minutiae and different features. The Signature Parts Youtube series on the Mastercam channel is a good one to catch up on new/improved Mastercam practical features from the last few releases. For the hobbyist offer, I believe you have access to generic posts, and you'd have to talk with your reseller or modify the generic posts yourself if you wanted to explore anything beyond that. Don't forget that you can directly open Solidworks files in regular Mastercam- and any toolpaths or work you might have done in MCFSW will also come along for the ride.
-
By chance are these operations locked to 4 axes in tool axis control? Can you post a file?
-
Actually- it's already up:
-
Critical depths is in my Top 3 for 2022, for sure! There's an extensive Signature Parts video coming on this from the official Mastercam Youtube Channel, so keep your eyes out for that one!