Aaron Eberhard
-
Posts
1,417 -
Joined
-
Last visited
-
Days Won
104
Content Type
Profiles
Forums
Downloads
Store
eMastercam Wiki
Blogs
Gallery
Events
Everything posted by Aaron Eberhard
-

Head/Head 5 axis kinematic calibration
Aaron Eberhard replied to huskermcdoogle's topic in Industrial Forum
This would be a great time to look into the book, "Secrets of 5 axis machining" by Karlo Apro. It's going to be extremely helpful with general concepts like this as you go through trying to bang that thing back into shape.. -
I do, he looks remarkably like me a sports the same IH Cub Cadet 149 that I have. The only downside is having to refer to myself in third person while my lawn gets done...
-
If you want to talk to CNC guys, we're mostly hanging out in the new forum now.. Some of us still show up here once a week or two (as we have time) to check the " You have been programming too long when......" thread, though:)
-
No.... Just because something is completely new doesn't mean it can't mimic the functionality of the old one. It follows the same workflow as the previous editor. Mastercam posts out the file and then launches the editor which opens the posted file from where-ever it was posted to. So you're assuming that it's spaghetti code based on? That's a little harsh... It appears that it's a function of the System.UriFormatException class in .Net, and googling "invalid URI: A Dos path must be rooted, for example, 'c:\'" will produce numerous examples of other .Net apps running into the same thing. I don't know the error value for it, though.. Sorry! Either way, it looks like the issue is getting addressed, Thanks Newbeeee!
-
What was the path that it was posting to? I've used it on windows networks with both absolute and relative paths before (i.e, f:\shared\etc\ & \\server\shared\etc)
-
Glad to hear you got it sorted out And it was a great discussion surrounding it. Thanks for posting up the conclusion!
-
I don't know, you didn't give many details in any of your posts... What were you posting, where were you posting to, is it reproducible, etc?
-
The error message is saying that whatever path it tried to read from isn't valid somehow. It does the same thing the old editor does, which is wait for the file to be posted and then open the posted file into the editor. It wasn't really "upgraded," it was written from scratch. You should have picked that up from the use of "URI," which didn't exist in DOS days What it's saying is that if you're trying to open a file, and that the path (URI means it could be a website [http], network drive [//ServerName], etc) is pointed to a DOS-based mapping system (i.e.: Microsoft's C:\, D:\, E:\, etc), that the path has to have a complete instruction. I.e., you can't open up \users\Public\Desktop\file.NC, you have to enter C:\users\Public\Desktop\file.NC. The editor itself will open from anywhere, and if the path is invalid, it'll give you an error based on that input.
-
I would see if the new swarf helps you out, because the angular change is more gradual. The old swarf was extremely literal, so when the chains were out of sync, the toolpath was the same (as Oscar mentioned above). Edit: Oh, and this would be an excellent case study for G-Code verification. If your control had TCP and you hooked up MachSim through your post, it would be 99% of the way there, but without TCP, this is a primo example of where you need to have something like CAMPlete or Vericut or whatever that simulates the machine motion the way your control interprets it
-
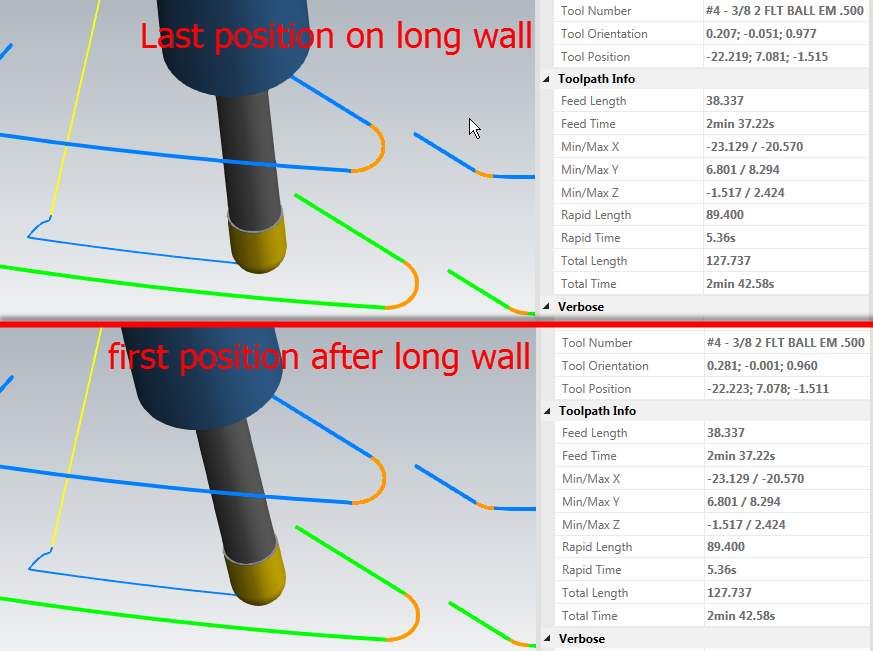
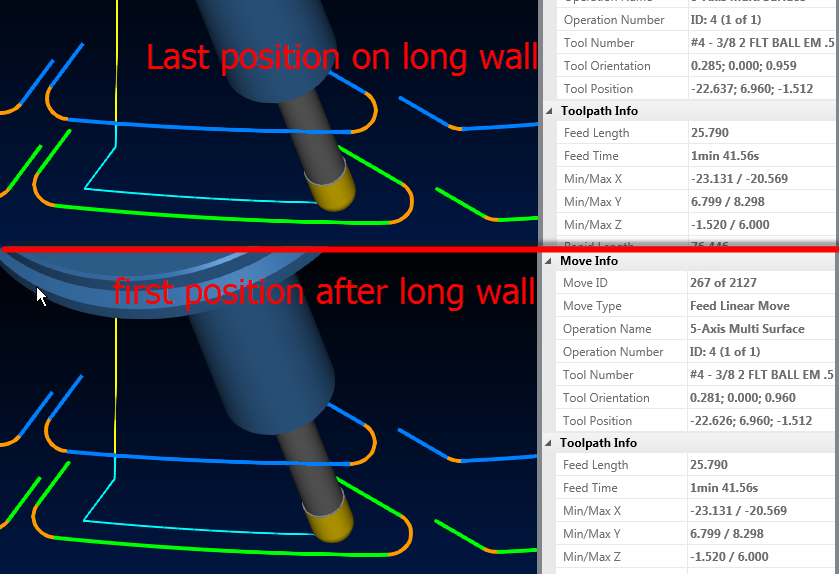
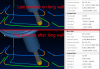
Hey CamMan1 - I took a look.. I'm going to go out on a limb and guess that you don't have TCP (or rTCP if you prefer that parlance) on this machine? Head/head machines are notoriously sensitive to stuff like this (large directional changes in a single vector). What's happening is that your post is compensating for the tool length (you have to enter a length to pivot amount, right?), or maybe it's handled in the control with a G43.3, but all that's compensating for is the start and end points of the vectors. In this case, picture the head moving from the last vector of the long wall (A) to the first vector of the short wall (B.) The two positions are correct, but what's happening between is that you X & Z moves (or Y & Z, I'm not certain how your machine is set up) should be compensated as the head rotates to keep the tool tip tangent, but it's not. It's moving the X & Z in a linear fashion from point A to B. The greater the angle change on each move, the more you'll gouge in between those vectors. There's not a whole lot you can do other than break the vectors up to a smaller, acceptable gouge, unless you have TCP, you'll never really eliminate it. And that's all TCP really does is just (in the background) break up multiaxis moves into really small segments, and makes sure the axis are properly synced through them. You can get a large part of the way there by specifying a max angle increment, and for something like this I'd start in the .1* range or so. The other option is to use the new Swarf toolpath instead of the classic. It's a lot more tolerant about things like this. You can see an example of the problem corner in these pics, and check it out on the file. Cheers, Aaron SNKPC60V 5 AXIS GOUGE ISSUE 2 - ACE.zip
-
Mastercam X8 Public Beta 1
Aaron Eberhard replied to Chris Bell CNC Software's topic in Industrial Forum
You're correct on all accounts here. -
MORPH BETWEEN 2 CURVES BEST TOOLPATH EVER
Aaron Eberhard replied to crazy^millman's topic in Industrial Forum
I thought we already solved this one, Keith? Sam - I got your emails, they're on my list of things to get to today! -
MORPH BETWEEN 2 CURVES BEST TOOLPATH EVER
Aaron Eberhard replied to crazy^millman's topic in Industrial Forum
I sent you a PM good sir, I'd be interested in talking about this a bit more -
MORPH BETWEEN 2 CURVES BEST TOOLPATH EVER
Aaron Eberhard replied to crazy^millman's topic in Industrial Forum
Whenever I teach a multiaxis class over here, I tell people that this is my favorite toolpath in the whole lot, and I use it for 80%+of all the multiaxis work I do.. I love it. Gcode - Bull nose has been supported since X6 (I think?), it should work fine.. Compressor Sam - There's an option on your Tool Axis Control about where on the tool to cut with, and one of the options is "leading edge," That might get you on the path.. Or, you can work with Ron, and that WILL get you on the path Ron - Awesome work as always, and a very cool part, thanks for sharing the vid! If I realized you hadn't seen the light earlier, I would have evangelized the benefits of Morph to you earlier- 86 replies
-
- 1
-

-
- 5 AXIS
- PORTING LOLIPOP
- (and 1 more)
-
4th Axis Pell Mill on an Impeller Crazy Milman style
Aaron Eberhard replied to crazy^millman's topic in Industrial Forum
Nicely done (as always!) Looks like fun! -
Axis Substitution Bug? Or something else
Aaron Eberhard replied to Guess_who's topic in Industrial Forum
Ray - Would you mind posting up a z2g with the post so I could take a look for it, or if you're not comfortable sharing it on here, send me a PM and I'll tell you how to bounce it over to me.. -
Bob - Do you mean you're not going to run the file on the machine with TCP? Sorry if this is a recap, but I like to be thorough for anyone reading the thread TCP Basically allows the control to compensate for a tilt in angles all through a move, not just at the vector itself (like a G43.3 Tool Tip Comp would do).. If you only have Tool Tip Comp, you can get gouges in between the vectors, since the machine won't, say, move the Z to keep track of the B, and only adjust at the next vector. You'll definitely want to have Vericut set up to match your machine, or you'll get false positives. I haven't used Vericut enough to know how to turn it on or off in there, though.. Sorry! If you're not using it on the machine, try setting the file to use a MUCH finer step-over or Max Angle Step.. I generally set my max angle step to ~.125-.25* anyway..
-
Axis Substitution Bug? Or something else
Aaron Eberhard replied to Guess_who's topic in Industrial Forum
Hey Ray, Obviously I don't have your post, so I can't test the output with your exact settings, but I noticed that on your curve5axis, you have it rotating around the Y Axis (which is correct based on my understanding of your setup), but your Axis Sub toolpath is set to rotate around the X, which would shift everything by 90*... -
Sounds like you're not using TCP in Vericut (or your file?), so you're seeing the mark from when the tool repositions before its' actual position is compensated.
-
Youtube Superstar, right here I was playing the part of a hapless customer looking at what was going on. I play that part quite well. Yeah, everyone over there is awesome to work with Michael does pretty good driving, too! We hit the Nurburgring the day after the show to throw down some laps.
-
Sounds like your 3 to 5 settings are a bit wonky.. Can you post up a file? Jeremy is on the right path, though, if you want a specified scallop height, the Triangular Mesh toolpath will do it.
-
That was a beautiful cut, too The finish wasn't even bad for a "roughing tool."
-
Hey AsDesign - I took a quick look at your file, and it appears that you're selecting the whole tube for the drive surface, and then selecting the top, "cylinder" part as a check surface as well. So, what you're doing it is telling it "cut this whole thing, and don't gouge, but if you happen to touch this cylinder (which is part of what you're supposed to cut), then stop making a toolpath." I reselected just the top manifold face for the check surface, changed the stock to leave to 0 and stepdown to .010 and it regenerated fine.
-
Peon - Always happy to help! Daryl - Understood. Sounds like you're getting the most out of it Just remember that you can save & load defaults from the menu bar, so you don't have to exit Mastercam, edit the file, reload Mastercam, etc... Just open verify, save your defaults, and you can edit or play however you want. So you can change it on-the-fly...

-
Yep, with those settings it's slow to live run over here as well. CamMan is on the right path as far as it running better (3d arcs will probably run better on your control as well). Quick question for you, Daryl: Did you arrive at the Precision Factor of 2 back in X7, or have you reevaluated that as a default since Mu1 came out? The reason I ask is that we reworked the algorithm based on feedback and examples for Mu1, and all of the settings were turned "up." That means than an X7 MU1 value of "1" is equal to an X7 value of ~1.6 or so. So that means you're forcing everything to start a X7 value of ~3. I used to leave mine set ~2.2 in X7 (I think that's what it was, I said it on the forum a long time ago, but it doesn't really matter), but now I can leave it at 1, and just crank up the precision slider if I need it. The sliders' adjustment range also got tweaked, so defaulting to 6 probably isn't necessary anymore, either, but that's not the biggest slow down. In general, I'd recommend setting your Precision factor down between 1-1.5, and sliding it up on the bar if you need a bit more for certain toolpaths. I've attached a comparison screenshot here. PF 2 & Index 6 on the left, PF 1 & Index 5 on the right. I couldn't tell a difference, except for speed: