Bill Craven
-
Posts
279 -
Joined
-
Last visited
-
Days Won
14
Content Type
Profiles
Forums
Downloads
Store
eMastercam Wiki
Blogs
Gallery
Events
Everything posted by Bill Craven
-
This chook is still included. ArcMultiEdit.dll Works for wireframe arcs.
-
Greetings all, I have developed a setup sheet that is really more of an Operation check list. Developed for minimal paper waste. It works with all three of the main program types without changing report templates: Mill, Lathe, and Mill/Turn. The operations are color coded: Blue is turning, Yellow is Milling, and red is Manual Entry. If the tools are named in Mastercam the way that I recommend, all of the information will be there for the operator: Insert codes, etc. Included in the zip file that is attached is a sample turning program with milling, the Active report templates, a Word doc with instructions on how to install and where to enter information. For best results, pay close attention to the Word doc on what and where I enter the names and comments of the tools and operations. Disclaimer: Use at your own risk. Active_Reports_OP_Tool_List_short.zip
- 49 replies
-
- 12
-

-

-
- active reports
- setup sheet
- (and 1 more)
-
Active Reports: Minimum Z depth for each operation
Bill Craven replied to saltedfish's topic in Industrial Forum
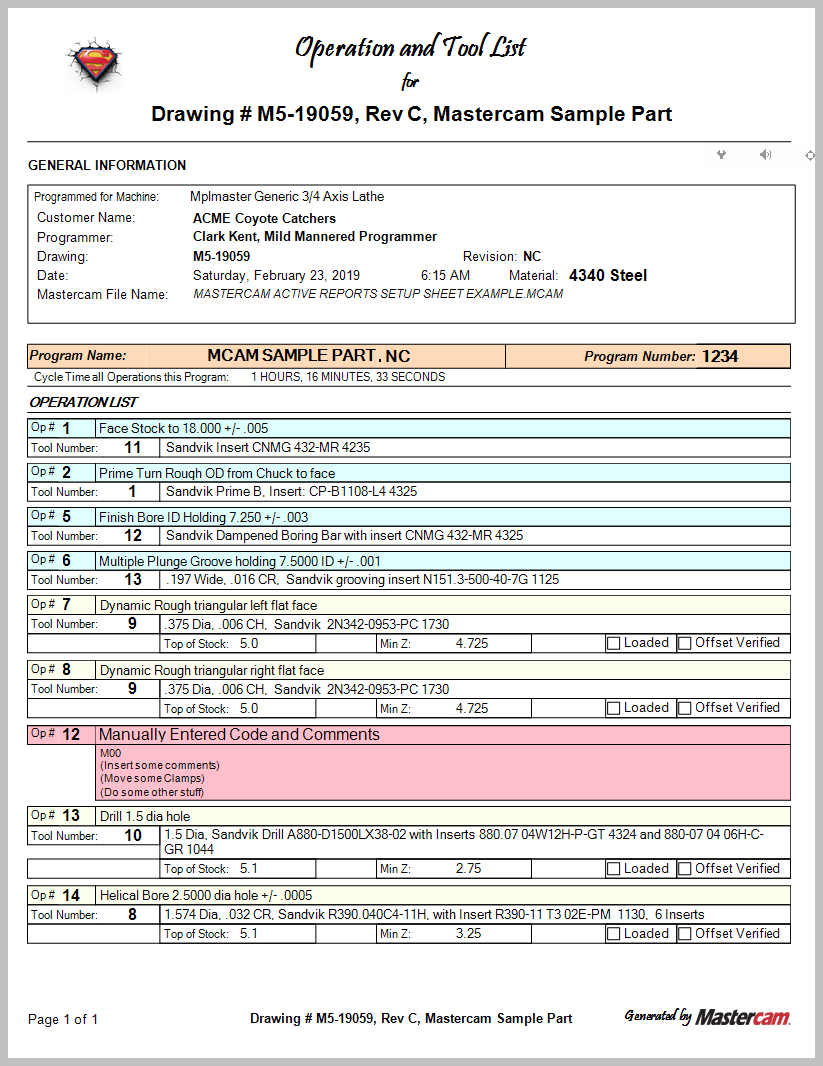
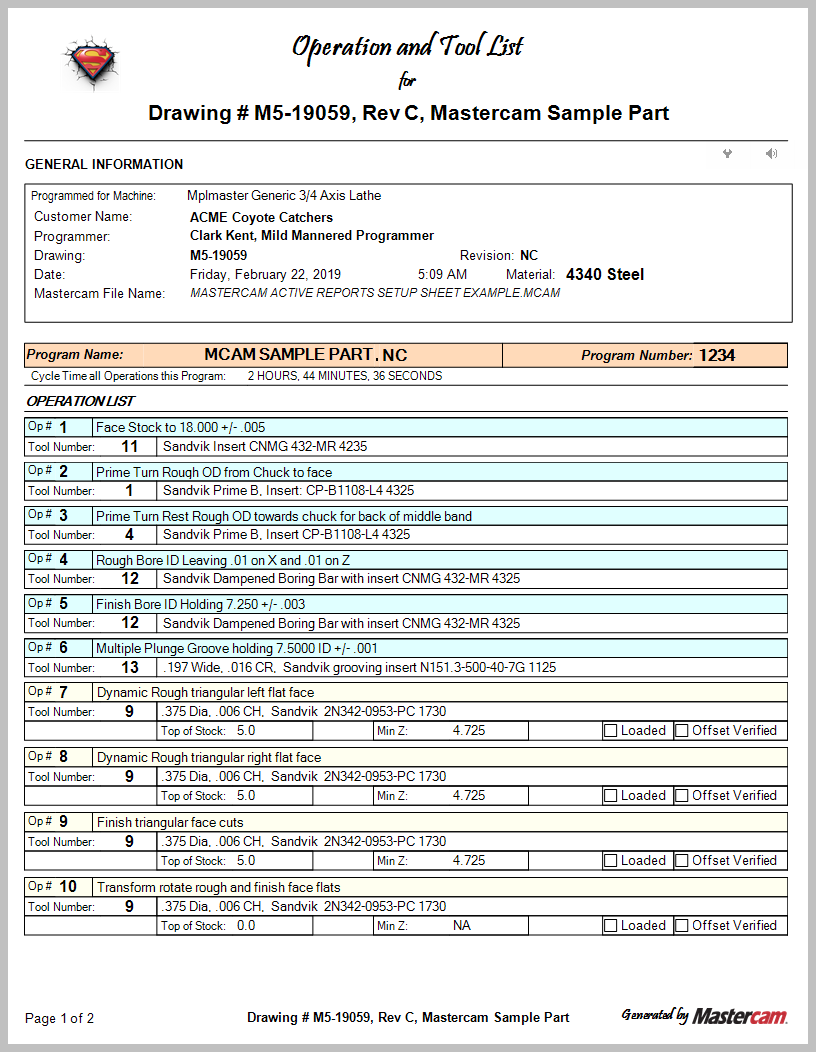
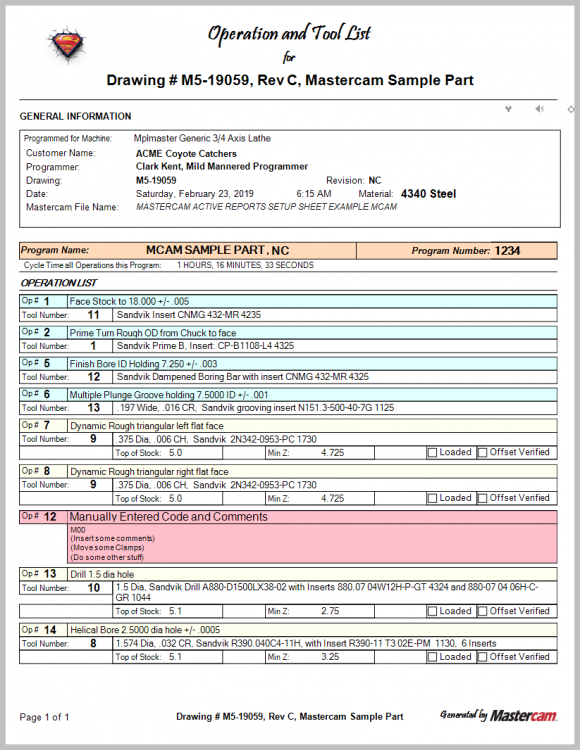
I just took your setup sheets and tried to modify them to output the MIN-Z that you were looking for. (and failed) It took a while for me to get back to this thread. I have been juggling too many chainsaws this week. I have attached an Operation and Tool List report that will work with Mill, Lathe, and Mill/Turn. Also included in the zip file is an installation and configuration doc, a sample Mastercam part file, and a sample report. The hierarchy is very important. For this report, I used the following hierarchy OP and Tool List (MT) short.rpx - OP and Tool List (FILE) Short.rpx - OP and Tool List (OPERATION) Short.rpx - OP and Tool List (OPERATION-L) Short.rpx - OP and Tool List (OPERATION-M) Short.rpx - OP and Tool List (OPERATION-T) Short.rpx - OP and Tool List (MAN-ENT-INFO) Short.rpx and I am outputting sub-reports that don't produce any output, but are critical to gathering the correct data. I added the MIN-Z that you were looking for and I also added the "Top of Stock" data. In some cases the MIN-Z is not below Z zero. A little quick math subtracting the MIN-Z from the top of stock will give the tool stickout that is your ultimate goal. AR is supposed to be able to do calculated fields, but I have not been successful in getting that to work. The sample report below is from a Lathe part with milling. Active_Reports_OP_Tool_List_short.zip
-
Active Reports: Minimum Z depth for each operation
Bill Craven replied to saltedfish's topic in Industrial Forum
The secret handshake only needs to be used when you are in designer and trying to find a specific XML tag. You don't need to change the XML reference every time. I only update it when I want to run the preview. They include sample XMLs in the SST\Samples directory. They even have the "Full" XML file that was created with the secret handshake. It is interesting that your Z depths show up as positives. Is your part set above Z zero and are you using an adjusted WCS? If you have time, try this: Change the depth of one of your operations so that it has a unique number. Like: -1.2345 Run your setup sheet tool list and create a full XML file with the secret handshake. Drop it in Chrome, and then search for that unique depth. Note the XML tag, and then change the MIN-Z tag in your rpx file to match. As you can see, there is more than one MIN-Z. By looking for that unique number, you can quickly find the tag that you are looking for. Without doing the secret handshake you might not see all of the different tags for MIN-Z I like how you are sticking with this and trying to figure this out. Most people get a little ways in and drop it, either because of the complexity or they just don't have the time to spend on this when spindles aren't turning.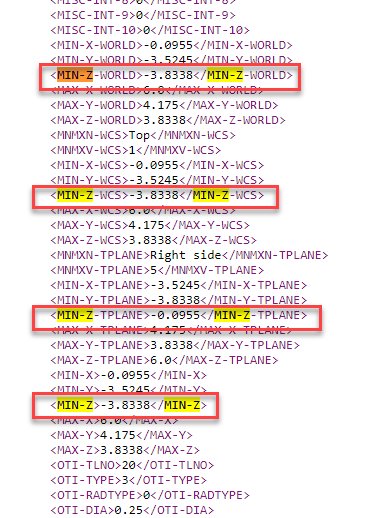
-
Active Reports: Minimum Z depth for each operation
Bill Craven replied to saltedfish's topic in Industrial Forum
Not exactly. When you tell Mastercam to create a setup sheet, it looks at the RPX templates that you have specified and the operations that you selected and ONLY gathers that information from your Mastercam file and dumps that into an XML file. This is why it is so important to be able to force Mastercam to do a complete dump of the data in a Mastercam file via "the secret handshake" I feel your frustration. There are days when AR really aggravates my tourette syndrome. You can get AR to output some of the data that you want without doing a complete set of reports. But if you have a very large file with hundreds of operations, the setup sheet generation time can take a very long time. If you are doing simple every day stuff with 20 operations and 10 tools, it doesn't really matter if it takes several minutes to generate a tool list. I have attached your sample setup sheets that generate the min Z value that you were looking for. Place both of the rpx files in the SSD directory, not the misc directory, and then select setup sheet from the operation manager, (not Tool List) then press F2 to select your test report tool list. See if you get the results that you are looking for. Note that I did not delete all of your old fields, I just turned off the visibility. As far as the truncated boxes that you are seeing, they are only labels showing what data fields you have selected. You can rename them to anything that want. They are only visible in designer. test report.rpx -test subreport.rpx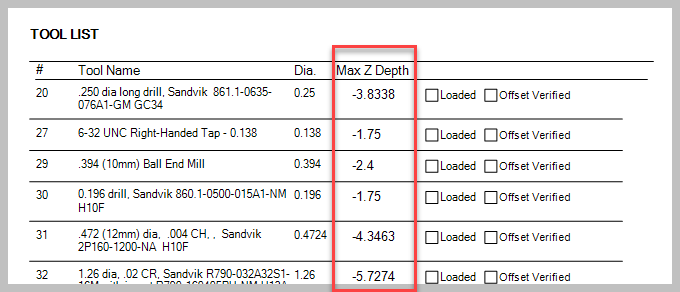
-
Active Reports: Minimum Z depth for each operation
Bill Craven replied to saltedfish's topic in Industrial Forum
The answer to this is: Yes for the best results. One of the reasons that you are seeing inconsistent results from the preview output is that the data that is being used to generate the preview report is an old sample xml file in the samples file directory. It doesn't have your data and the tags could be different or not in that sample xml file. Every time that you run a setup sheet, Mastercam makes a new xml file with the data that you requested via the rpx report. This is not the full data set. It only contains the data that AR (Active Reports) finds xml tags for in your report template (rpx files) To generate a full data set xml file we need to invoke "The Secret Handshake". Right mouse click in the Operations manager and select setup sheet. Select the setup sheet that you want to run. Hold down the control key and click on the Green Check box You will be asked three questions: Deactivate RPX Parser? Answer: No Display messages? Answer: No Write ALL data to XML file? Answer: Yes At this point all of the data from the Mastercam file will be written to the XML file. This may take a while if there are many operations. Normally Mastercam will only write the data needed from the RPX report and leave the rest out. Navigate to c:\Users\Public\Public documents\shared Mcam2019\common\reports\XML Sort by date and locate the XML file that you just created. Open Chrome browser and drag and drop the XML file into Chrome. It may take a few minutes depending on the size, but you should see the XML in a “document tree” format. From here you can search for 1277 (the number that we entered above for the program number) You should see: <PROG-NUM>1277</PROG-NUM> You can also see the hierarchy of where the data is located. In this case the PROG-NUM is located in OPERATION, which is located in NCFILE If you have tried entering just PROG-NUM into the ActiveReports Designer and it doesn’t print out the Program number we will have to go to the next step. In ActiveReports Designer, open the report that you want to modify. Select the report data source icon and then navigate to the XML directory and select the XML file that we created earlier. Click Okay Now go to the Fields branch of the tree and start expanding, Bound, Document, SETUPSHEET, NCFILE, OPERATION You should see the PROG-NUM field listed there. If you want to find the NC file Name without the .NCI, Search in the Chrome XML file for the program name that you entered and you will see several occurrences of it. The one that you want without the .NCI is: NCIFILE-NAME Drag and drop it onto the report. You will see that the path is maintained and shows up as NCFILE/OPERATION/PROG-NUM Sometimes you can get the data that you want to display by putting in extra path statements like: ../ or ../../ or like the sample in the line above. BUT: this can cause AR to start at the beginning and take a screen capture for every operation, every tool, etc. if you have a very large file with lots of operations, it might take half an hour to generate the report. Report hierarchy: One of the things that I have done to help me understand the relationships between the different reports and subreports is to document the outline structure of the reports. I do this by opening up the main setup sheet and then looking at the sub reports and copying down the name of subs (indented), then I open the subs and do the same thing, and keep doing that until I have the complete outline of the report structure. Here is an example of the default MT setup sheet: Setup sheet (MT) Sandvik.rpx -Setup Sheet (SZ) Sandvik.rpx -setup sheet (SZ-M) Sandvik.rpx -setup sheet (SZ-L) Sandvik.rpx -Setup Sheet (FILE) Sandvik.rpx -Setup Sheet (OPERATION) Sandvik.rpx -Setup Sheet (OPERATION-L) Sandvik.rpx -Setup Sheet (TOOL) Sandvik.rpx -Setup Sheet (OPERATION-M) Sandvik.rpx -Setup Sheet (TOOL) Sandvik.rpx -Setup Sheet (OPERATION-T) Sandvik.rpx -Setup Sheet (MAN-ENT-INFO) Sandvik.rpx -Setup Sheet (MAN-ENT-DATA) Sandvik.rpx -Setup Sheet (TOOLS) Sandvik.rpx -setup sheet (Tool) Sandvik.rpx -Setup Sheet (TOOL-M) Sandvik.rpx -Setup Sheet (TOOL-L) Sandvik.rpx -Setup Sheet (LATHE-TOOL-HOLDER) Sandvik.rpx -Setup Sheet (LATHE-TOOL-CUSTOM) Sandvik.rpx -Setup Sheet (LATHE-TOOL-INSERT) Sandvik.rpx -Setup Sheet (LATHE-TOOL-DRILL) Sandvik.rpx -Setup Sheet (OP).rpx When I create a new setup sheet, I typically start by copying all of the existing sheets to a safe location so that after I have buggered up one of the report templates and it no longer works correctly, I can go back and get the original rpx file and see what I did that caused it to stop working. Another strategy that I use is to have several AR designers open with the templates that I am working on. I will make a change but not close designer and try running a report. If it is too messed up, I just click the undo button in designer (as many times as is necessary), save the file and run the report again.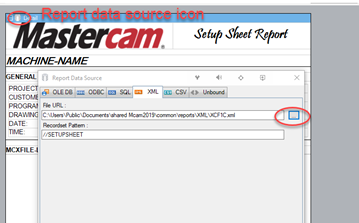
-
lathe tool inspection
Bill Craven replied to Rocketmachinist's topic in Post Processor Development Forum
Thanks Colin. Why didn't you teach me that in one of the classes that I took from you? ( you probably did, I just didn't absorb it ) -
Active Reports: Minimum Z depth for each operation
Bill Craven replied to saltedfish's topic in Industrial Forum
Mr. Fish, There is a Word doc available on Mastercam.com in their 'Mastercam Knowledge Base' called Active Reports Setup Sheets Tips and Tricks It has a lot of very valuable information in it. You are correct in some of your assumptions. Mastercam looks at the .rpx template and only gathers the information that you have requested for the xml file. There is a way of having Mastercam output a complete list of all of the fields to the xml file using "The Secret Handshake". The Word doc has those instructions in it. If you output a complete xml file, you can see fields that you otherwise would not know were there. For example, there are more min/max values than those you have listed in your post. From the tips and tricks doc: Node Hierarchy This is probably the most important rule to follow. Even if you do not use any data from a node, create a subreport that uses the node and calls the subreport of the next node level. Typical problems when nodes are not followed: · Data is repeated. · Data is limited. · Data is missing. · Image captures happen when none are used. For example, if you use no data from the NCFILE, OPERATION, and TOOLS nodes, use subreports with those nodes specified in the Recordset Pattern. Correct: Incorrect: //SETUPSHEET //SETUPSHEET //NCFILE //TOOL //OPERATION //TOOL //TOOLS //TOOL Mastercam also looks at the name of the rpx file and gathers and parses information for a specific product like Mill, or Lathe. You will see the different products in the tree list. for example: Operation-L, or Operation-T (for Text, Manual Entry). I have been successful in outputting min/max values. So much to learn... and I am such a novice.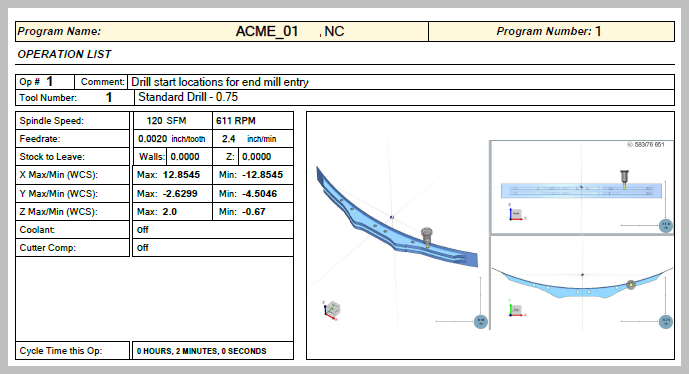
-
MC Postprocessor coolant commands
Bill Craven replied to dragonworks's topic in Post Processor Development Forum
Oops, I mis-read. You want the spindle to turn on after the through coolant. I missed that. Never mind -
MC Postprocessor coolant commands
Bill Craven replied to dragonworks's topic in Post Processor Development Forum
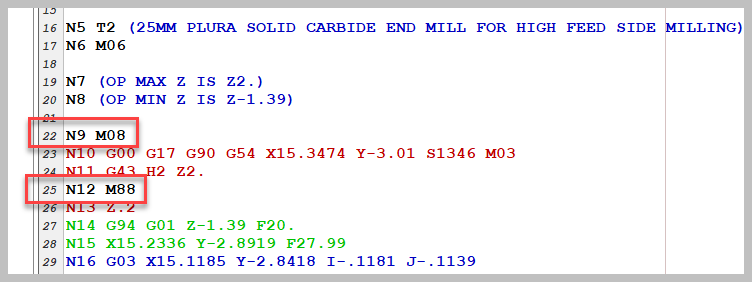
Hi Jerry, Are you using an older post that you have modified over the years? If you are using a modern post and have the option for the coolant backwards compatibility unchecked, you should be able to select 'before', 'with', or 'after' in your coolant parameters and the coolant will be output in the locations as you have indicated above. and the output: I started off with In House Solutions MPMaster post.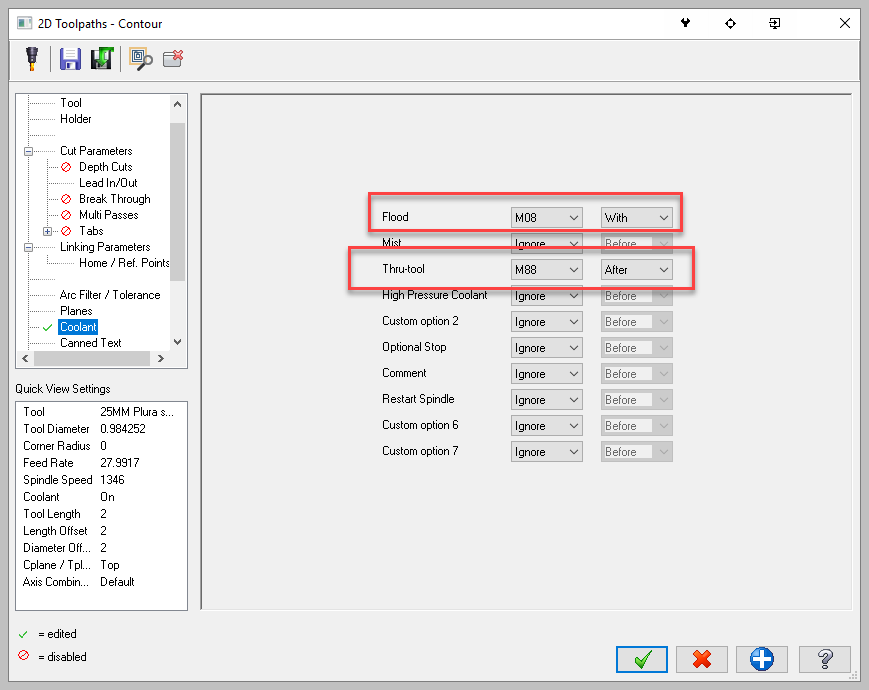
-
lathe tool inspection
Bill Craven replied to Rocketmachinist's topic in Post Processor Development Forum
Search the post for ptool_insp I have my lathe posts set up so that I can stop after a set number of minutes (controlled by Mastercam) and check and index the insert. I also have the block number system set up so that I only output block numbers at tool changes and tool inspections. This makes it easy for the operator to find where to restart if the insert chips and you have to stop before the tool inspection. I also include all of the logic to restart the spindle, feed, planes, etc... Even if they hit the reset button. On a Fanuc style control, you can search for the block number and then just cycle start to continue on. Another advantage that I found was that the operators started communicating between shifts by letting the next shift know that they finished N5, and the new operator should start with N6. I add a few blank lines so that when the operator looks over at the control to see why it has stopped, they can easily see that it is for a Tool Inspection. Here is a sample of some of the stuff that I use for Lathe tool inspection: ptool_insp #Tool inspection point #Modify following lines to customize output for tool inspection points if posttype$ = two, #Lathe tool inspection point [ "M05", e$ "M09", e$ "(TOOL INSPECTION POINT)", e$ #if prmcode$ = 29999, #Only output tool insp comment if one was entered with this insp point sparameter$ = ucase(sparameter$) " ", e$ " ", e$ " ", e$ " ", e$ pbld, n$, *sm00, "( CHECK INSERT )", e$ " ", e$ *n$, " (BLOCK NUMBER FOR RESTART)", e$ !spaces$ spaces$ = zero scomm_str, sopcomm, scomm_end, e$ " ", e$ " ", e$ " ", e$ else, pbld, n$, *sm00, e$ #Output just the stop if no comment pbld, n$, "G0" *toolno, e$ #Restate tool number pbld, n$, pfsgplane, e$ #Restate plane code prpm, pfspindle_l, e$ # pspindle , e$ # Output programmed RPM #Restate spindle pcss, e$ pbld, n$, "G99 ", e$ prv_feed = c9k #Set prv_values to c9k to force them out with next moves prv_gcode$ = c9k prv_workofs$ = c9k if coolant$, prv_coolant$ = c9k ] sample output: G0 X55. Z1. X70. M05 M09 Z3. (TOOL INSPECTION POINT) M00 ( CHECK INSERT ) N6 (BLOCK NUMBER FOR RESTART) (OP 60-7 ROUGH UNDERCUT UPPER OD FLANGE .25 BUTTON CARBIDE) G0T0202 G97S20 M03 G96S145 G99 G0Z1.M8 X55. Z-.6285 -
CREATING MINUS X OUTPUT FOR LATHE
Bill Craven replied to Petreub's topic in Post Processor Development Forum
Most of the settings for reversing sign are in the Machining position turret/spindle array. After you get the X axis to reverse sign, you will probably find that you will have to change the G2 to G3 This area of the post # Decimal (required) # I - Plane 0, X axis, 0 = normal, 1 = switch sign from basic # J - Plane 0, Y axis, 0 = normal, 1 = switch sign from basic # K - Plane 0, Z axis, 0 = normal, 1 = switch sign from basic # L - Plane 1, X axis, 0 = normal, 1 = switch sign from basic # M - Plane 1, Y axis, 0 = normal, 1 = switch sign from basic # N - Plane 1, Z axis, 0 = normal, 1 = switch sign from basic # O - Plane 2, X axis, 0 = normal, 1 = switch sign from basic # P - Plane 2, Y axis, 0 = normal, 1 = switch sign from basic # Q - Plane 2, Z axis, 0 = normal, 1 = switch sign from basic use_only_tl : 1 #Use only Top turret/Left spindle settings (below) for #all Mastercam turret/spindle selections #When configuring for multi-spindle/turret set to 0 #Columns- ABCDEFGH.IJKLMNOPQ #Turret/Spindle #Path Type scase_tl_c1 : "10000222.100100100" #Top turret/Left spindle, Turning cut scase_tl_c2 : "10000012.100100000" #Top turret/Left spindle, Right Face cut scase_tl_c_2 : "10110012.100100000" #Top turret/Left spindle, Left Face cut scase_tl_c3 : "10010102.100100000" #Top turret/Left spindle, Cross cut (cuttype = 3) scase_tl_c3r : "10001102.100100000" #Top turret/Left spindle, Reverse Cross cut (cuttype = -3) scase_tl_c4c : "10000222.100100000" #Top turret/Left spindle, Y axis subs. Cycle scase_tl_c4 : "10000122.100100000" #Top turret/Left spindle, Y axis subs. scase_tl_c5 : "10000222.100100000" #Top turret/Left spindle, Multisurf Rotary -
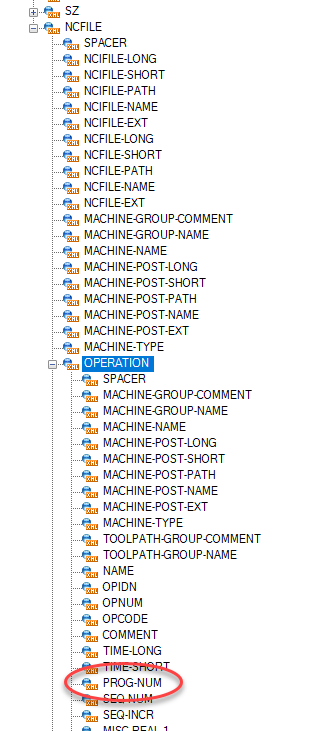
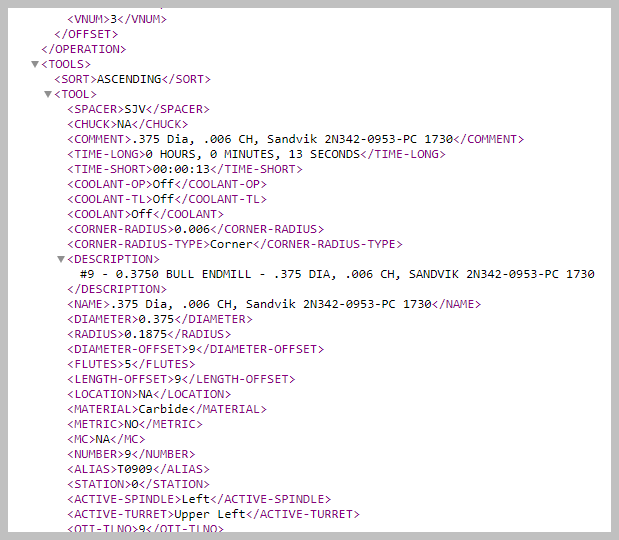
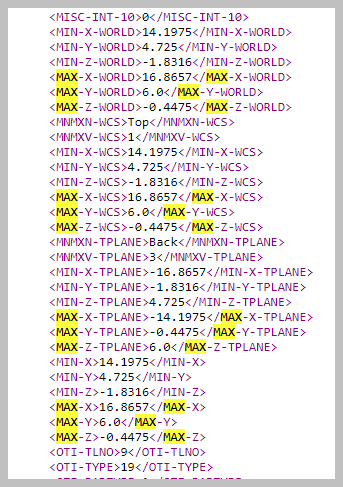
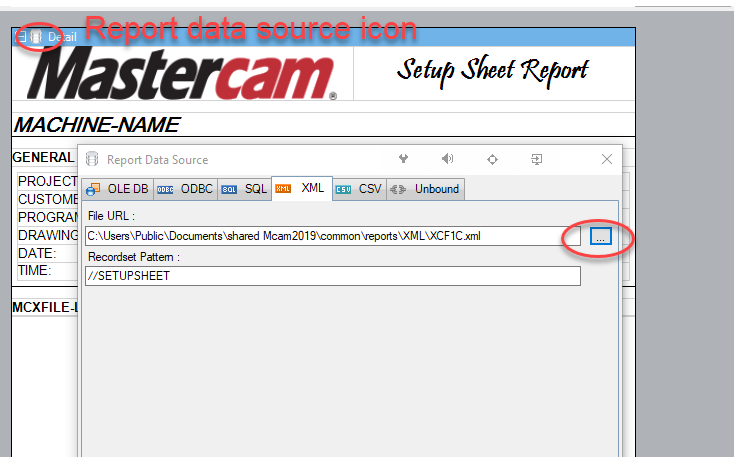
Okay, the short answer should be: NCFILE/OPERATION/PROG-NUM But here is how to find a tag for an XML file. Some of the older reports are using outdated XML tags and I don’t believe that the help file is up to date for 2019 To find and verify a tag name in an XML file for Mastercam Active Reports: For this example we will be looking for a Program number. Select the operations in your Mastercam file and then right click and select “Change program number” Enter 1277 ( a random unique number) Now let’s map the entire data set from a Mastercam file using “The Secret Handshake” Right mouse click in the Operations manager and select setup sheet. Select the setup sheet that you want to run. Hold down the control key and click on the Green Check box You will be asked three questions: Deactivate RPX Parser? Answer: No Display messages? Answer: No Write ALL data to XML file? Answer: Yes At this point all of the data from the Mastercam file will be written to the XML file. This may take a while if there are many operations. Normally Mastercam will only write the data needed from the RPX report and leave the rest out. Navigate to c:\Users\Public\Public documents\shared Mcam2019\common\reports\XML Sort by date and locate the XML file that you just created. Open Chrome and drag and drop the XML file into Chrome. It may take a few minutes depending on the size, but you should see the XML in a “document tree” format. From here you can search for 1277 (the number that we entered above for the program number) You should see: <PROG-NUM>1277</PROG-NUM> You can also see the hierarchy of where the data is located. In this case the PROG-NUM is located in OPERATION, which is located in NCFILE If you have tried entering just PROG-NUM into the ActiveReports Designer and it doesn’t print out the Program number we will have to go to the next step. In ActiveReports Designer, open the report that you want to modify. Select the report data source icon and then navigate to the XML directory and select the XML file that we created earlier. Click Okay Now go to the Fields branch of the tree and start expanding, Bound, Document, SETUPSHEET, NCFILE, OPERATION You should see the PROG-NUM field listed there. Drag and drop it onto the report. You will see that the path is maintained and shows up as NCFILE/OPERATION/PROG-NUM Re run the setup sheet and you should see the program number show up. So the short answer is: NCFILE/OPERATION/PROG-NUM If you want to find the NC file Name without the .NCI, Search in the Chrome XML file for the program name that you entered and you will see several occurrences of it. The one that you want without the .NCI is: NCIFILE-NAME

-
Reporting MISC Integers
Bill Craven replied to John Fredrickson's topic in Post Processor Development Forum
It is possible to build this in to an active report, but you would have to have a good understanding of the XML and the hierarchy. This is from "the secret handshake" capture all of the XML tags. (thanks Ruth) More info is in the ActiveReports Tips and Tricks document available at Mastercam.com. Jim Varco's reports can output that information. Varco Reports is highly recommended and very user customizable. You can have different report templates predefined (one for the programmer, one for the operator, one for the tool setter...) and then select which report you want to use on the fly. X+ is also a great tool. (Thanks Gunther)
-
If I understand your question, yes. If you want to do multiple lines, you can use several of the custom fields. The output will be sequential. I haven't investigated doing this before. I really don't know what the limitations are.
-
Switching from Lathe WCS to mill WCS - analyze retains D
Bill Craven replied to Smit's topic in Industrial Forum
I've had this happen to me lately and found that sometimes I need to go into the Planes manager and right mouse click on the active plane and then select Coordinate display and then Lathe D It doesn't necessarily "stick", but it does allow me to see my diameter values. -
This can be done quite easily without actually editing the post if you are using a modern post If you are using a modern post with the coolant switch NOT set to "support coolant using coolant value in post-processor" Go into the machine definition and then the General Machine Parameters and select the Coolant command tab. Click on one of the unused coolant event and type in something like: Flood with dwell. In the Enable field type in the command the way you want to see it. for example M08 G4 P500 Exit out of the machine Definition, saving as you go and allowing Mastercam to reload the machine definition. Now when you go into the parameters for the operation where you want the coolant to dwell, you can select the coolant option "Flood with dwell" and you probably will want to select "After" so that the coolant on with dwell will be on a line of its own. This is a pretty slick way of doing it, because you can post your coolant command with or without the dwell by operation.
-
If the comments you want to post are truly repetitive, You could hard code it into the post and then use a Misc. real with numbers corresponding to the comment that you want to output in the first operation. For example, setup Misc. real number 5 for the comments that you want to output and then have conditional code in your post so that IF mr5 =1, then it would post the subsequent text. IF mr5 =2 then it would skip the first text and post the next text. I don't think that I am explaining this well, but it is pretty easy to do.
-
It is still there. Go to downloads from the top menu of the site and scroll down on the right side of the screen. MpMaster for most versions are there. They may look grayed out depending on your browser, but they will allow you to download the posts
-
I agree that a custom drill cycle is the way to go. Be very careful. Backplot and verify will not show the actual motion that will be output in the final CNC code. (Don't ask me how I know this)
-
Make the changes shown below: From this: To this:
-
Another method is to select the geometry and then click on the Analyze Database icon (under the Home Tab) then click on Toolpaths. The operations that use that geometry will selected.
-
No, the top would not be easily removable and the lower cross beam is welded in place. The controls are built into the glass top. Amazon sells just the base of the Desk that Ron linked to above, then you could mount your old desktop to it. https://www.amazon.com/gp/product/B01K606UO8/ref=s9_acsd_hps_bw_c_x_2_w
-
For those who are interested, Costco is having a sale on a Tresanti Power Height-Adjustable Tech Desk from Nov. 9th to the 17th. Regularly $299.99. now $199.99 There are some reviews on YouTube. Weight limit is 100 pounds. 4 preprogrammed heights (re-programmable) I bought one for my home office. It is very stout. Bring a friend when you pick it up, the box weighs 106 pounds. I haven't figured out how to get all 6 monitors on it yet. It isn't as deep as my old desk. Before, I was 30 inches from the screens, now about 20. I might have to change my eyeglass prescription.
-
buffer for operation comments
Bill Craven replied to JVizzi's topic in Post Processor Development Forum
This could be easily done with X+: output to Excel and then set up an incrementing column for the block number. I do something similar. I create an operations list with Comment, Stock to leave, Tool #, Tool name, Tool dia, Rpm, Feedxy, and Cycle time.