Richard Thomas - Mastercam UK
-
Posts
967 -
Joined
-
Last visited
-
Days Won
2
Content Type
Profiles
Forums
Downloads
Store
eMastercam Wiki
Blogs
Gallery
Events
Everything posted by Richard Thomas - Mastercam UK
-

Why does mastercam work in reverse?
Richard Thomas - Mastercam UK replied to Cavi Mike's topic in Industrial Forum
If you are using something like Optirough or Area Mill, they assume you are machining out of a rectangular block based on the X/Y extents of your selected geometry, unless you define a tool containment boundary or your job is just a cavity. If you didn't kow this then I would also suggest attending a 3D design/milling training course (but I'd advise a 2D course first if you have no prior training in Mastercam) -
Just to add, in X9 I guess you were using Surface Finish Scallop which allows Check Surfaces. The toolpath you showed above is Surface High Speed Scallop; its a different toolpath and it doesn't support check/avoidance surfaces, even in X9 (or rather, it would let you select them but then machine them as if they were drive surfaces) The old Surface Finish Scallop is still in 2020; you have to right-click in the Toolpaths Manager then go to Mill Toolpaths and Surface Finish.
-
That function doesn't exist anymore - quick history lesson! Around about the X9 period the Create/Point/Grid was removed and rolled into the 2D Drill toolpath as an option called Pattern. Since around Mcam 2018 and the redesign of the drilling dialog that option went away too. If you just want a grid of point entities then the suggestion of heavychevy2155 would be the best way to go I think.
-
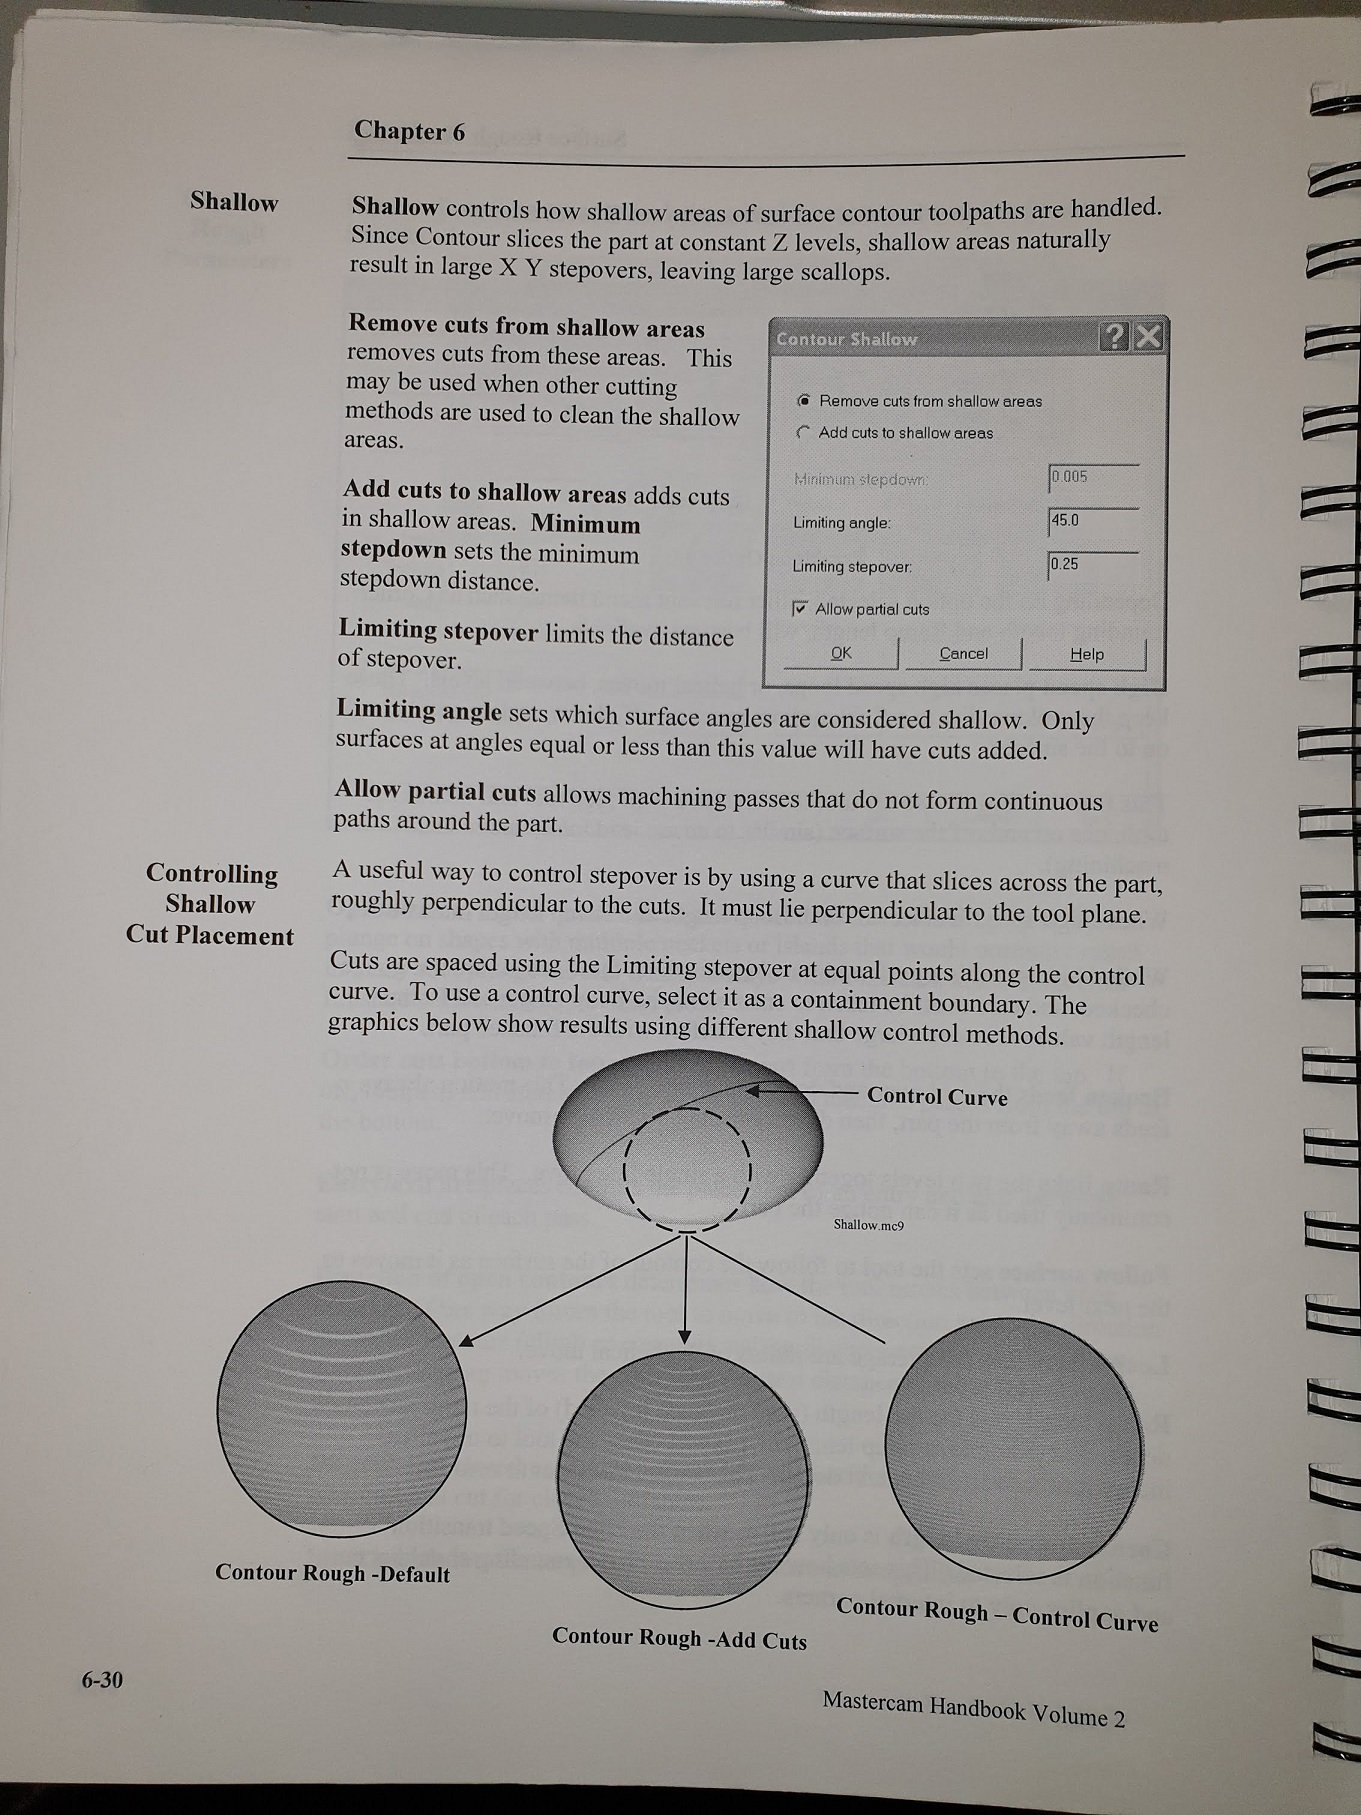
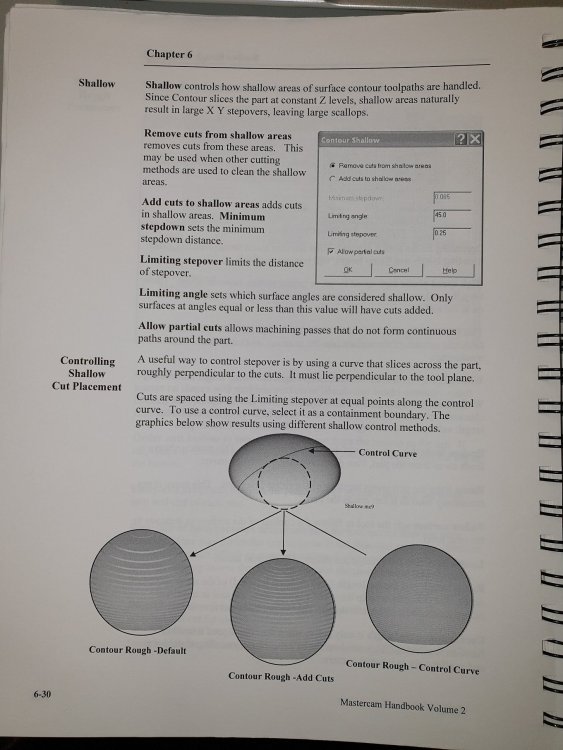
Well well look what I found! The method I suggested was in the Mastercam Handbook Volume 2, circa 2002 written by San Diego CAD/CAM (Charles Davis) for CNC Software. It was discussed as an option to clean up shallow areas of a component.
-
Thanks guys - I'd like to say that I first read about this in a Help file or What's New file dating back to perhaps the V9.1 period... I can't really remember now! I remember the image that was used in an example, it was a bit like a aerosol cap with the "containment boundary" going from the centre out to the edge.
-
Yeah I'll knock one up for you It'll be toolpathed in 2018 so you won't be able to open it in an earlier version. Test_piece2_RT_2018.mcam
-
My Turn! I read many years ago about using a "tool boundary" perpendicular to the cutting direction with Surface Finish Contour. It helps maintain a constant stepover relative to the chain, a bit like Scallop or Flowline. Take a look at the attached file and look at the containment boundary I used. Test_piece2_RT.mcam
-
In the Bounding Box function I find it a tad frustrating that there's no "reset" button if you have been editing the bounding box extents and decide you quickly want to start again from the initial values (no... I haven't logged this as an enhancement request but I will!). I usually select the "manual" button and reselect the geometry I am working with, or press "All shown" if I want to put a box over all the geometry on-screen. However I discovered this week if you just set your Gview to Top, even if you are already in the Top view then it will reset the bounding box values to their original settings. In my limited testing this seems to work best with the Top Gview; Front or Right Side gviews don't seem to reset the values.
-
Modify Probe Backplot Feedrate ?
Richard Thomas - Mastercam UK replied to Alan Chen's topic in Industrial Forum
I can't find an easy way of editing the feedrate either - if you get no other answers I do have a "last resort" you could try! It uses the Toolpath Editor to change the feedrate. Please note that this method then locks the probing operation (you'll be familiar with this if you have used the Toolpath Editor before). Please see the attached video - sorry for hovering the cursor over the "undelete" function near the start of the video, that wasn't intentional! 2019-11-15 10-26-53_Trim.mp4 -
X2MR2 only goes back to MC8 so it's looking like the original X. It's possible that a vanilla version of X2 could do it because I have a vague memory of a Maintenance update changing the oldest supported version of Mastercam files that you could open. Not sure when that happend though. Here are some MC7 sample files in a ZIP if you want to do some testing. SLDQ18M.zip
-
In the configuration (Settings/Configuration), go to the Start/Exit tab. In there you can set the "startup" configuration file - its the first option you can change on that page.
-
SIMULATION ROTATION
Richard Thomas - Mastercam UK replied to Spotterhphc's topic in Industrial Forum
Try going to the Post Settings tab (2nd tab in the 2nd image you posted) and there is a section near the top called "Select between the two solutions for startup". There are several options in the drop-down menu... have a mess around in there! EDIT - although the page is called Post Settings, you don't need to have a post processor attached to it to affect the simulation. Also I presume that you are trying to get the tool to start near the bottom of the workpiece rather than the top in which case those options will hopefefully help. If I misunderstood then I'm sorry about my rather flippant reply above! -
X9 GUI Menus not showing up
Richard Thomas - Mastercam UK replied to Tim Martinez's topic in Industrial Forum
I think what you will need to do - if I remember rightly - is shut down Mcam, is delete the default *.workspace file that the person is using (i.e. Design.workspace) from \Documents\My McamX9\Config\ and then restart. They will lose any modifications to the icons though. -
Lots of good enhancements
Richard Thomas - Mastercam UK replied to gcode's topic in Industrial Forum
Yep I use that button pretty much every day. I teach Mastercam and it's very useful to bring in an old programmed file and clear out all of the previous machining data. You might not see a need for it, but for me using Mastercam would be harder without it -
The Pencil toolpath is designed to clean up the intersections between walls and floors (the ball of tool needs to touch the wall and floor at the same time) and to do this it looks for sharp edges (for example the internal corner of the letter "L"). Basically if it cannot find sharp corners then it won't generate a toolpath. There are execptions to this... if there is a radius in the corners and they are less than the radius of your ballnose tool then you should still get a result. But If the radius in the corners are equal to or greater than your ballnose radius you can use the Overthickness command to trick the toolpath into finding enough material to run the tool between the floor and walls. I can see that you have already tried to use Overthickness so if you make it even bigger (try 0.1 and then re-adjust the stepover and number of passes) then you should get a resonable result.
- 1 reply
-
- 2
-

-
I'm not sure if the post is binned to be honest, I never took a look while I was on site. It might be something I can experiment with if I'm allowed a copy of the post.
-
Hi Terry, The post is from an outside supplier that I'm not even familiar with. Its a suggestion I will make to our customer but as to whether their post people can/will do it is another matter....
-
It's a shame that what became "best practice" in Mastercam wasn't perhaps the best choice... as you know a lot of (but not all!) HMC posts expect the Top/Front approach and don't work properly otherwise, because of this weight of history At least I can be satisfied that I'm not missing a trick with the particular situation the customer find themselves in. Cheers for your responses
-
Hi There, I have a customer who has a number of old Mastercam part-files that were programmed way-back-when in Mastercam X7 for a DMU 70 EVO. These parts typically contain 200+ operations and are a mixture of 2D/3D ops plus Multisurface/Curve/Morph/Swarf 5-axis. For some reason they have decided buy a new machine of a totally different configuration recently to continue making these parts; this machine is a Makino A500z horizontal 5-axis. Now there are several pain-points here! 1) These old files were created before WCS-awareness was introduced and so all 5-axis toolpaths are marked with a red cross and have to be reviewed. 2) Unsurprisingly the Makino has different rotary limits to the DMU, which can create their own issues when it comes to running toolpaths meant for a different machine. For the 2D/3D ops, the customer seems to have got away with setting these up with a new WCS and T/CPlane via Edit Common Parameters rather than transforming the whole job to suit a horizontal machine in Mastercam (i.e. WCS Top and T/CPlane Front = B0) Now when it comes to reviewing a 5-axis toolpath, first of all the operation has to be visually checked to see if there is a problem after switching from a VMC to an HMC, which will involve setting the new WCS and typically setting the T/CPlane to Top, relative to that WCS (assuming you can understand the context of what the original programmer was trying to mill at that point!). If the path isn't correct then you test different solutions. Then that operation needs to be posted and checked in Vericut, along with some previous operations so the rotary angles are correct prior to simulating the op being checked). If Vericut doesn't like the result, you have to go back to Mastercam and rinse and repeat. Then its on to the next operation... there could be 50+ five axis ops in one part and there are a lot of these old parts. Anybody out there got any tips to make the transition from VMC to HMC (and from X7 to 2018) any less challenging?
-
You shouldn't be using the Stock Transfer option to move the stock along - it should ust be used at the end when you want to hold the stock on the right chuck only. You should be able to use the Stock Advance feature to keep moving the stock along and keep the left side chuck active.
- 2 replies
-
- 1
-
-
- nakamura tome
- lathe
- (and 2 more)
-
WTF? Drawing Lines in Mastercam 2020...
Richard Thomas - Mastercam UK replied to Kampfzentrum's topic in Industrial Forum
You haven't accidentally enabled "Snap to Grid" have you? It's in the View ribbon. -
Tools for fixing old corrupted MCX files?
Richard Thomas - Mastercam UK replied to SlaveCam's topic in Industrial Forum
I can suggest sending it to your reseller - they can ask the guys at CNC if there is anything that can be recovered from it. -
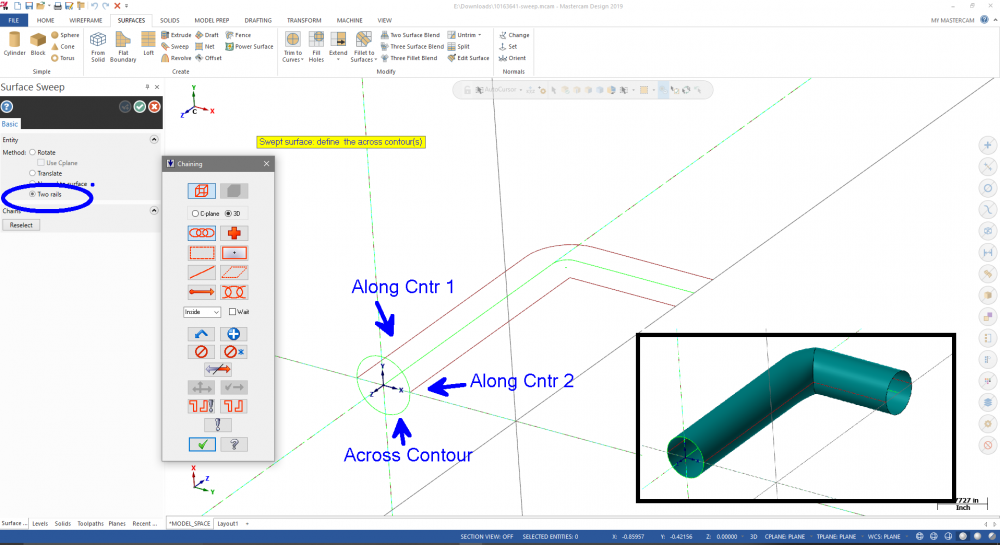
Strangely enough my Sweep surfaces look clean inside - I've trimmed them back to a flat surface in the attached file (the flat surface wouldn't trim so I've deleted it) "Rotate" is always the default option on the Sweep surface - which by the way only uses one Along contour even if you had selected more than one, that goes for Translate too. Glad I was able to help after all 10163641-sweep-RT.mcam
-
Yeah too little too late Seems to work fine if you use surfaces #oldschool p.s. Having re-read your original post something tells me you may have already known this and was more curious as to why the equivalent Solids option wouldn't work. So don't mind me, I'll just be on my way!
-
Got it and installed just fine, thanks