Leon82
-
Posts
2,205 -
Joined
-
Last visited
-
Days Won
13
Content Type
Profiles
Forums
Downloads
Store
eMastercam Wiki
Blogs
Gallery
Events
Everything posted by Leon82
-

PARAMETER FOR ALL DEPTH, FINAL DEPTH
Leon82 replied to PcRobotic's topic in Post Processor Development Forum
There is a percentage of setup people who won't read whatever you put in the program also. I had a guy use an er20 instead of er11 holder once. The setup sheet said er11 and had a picture of one generated from camplete also. -
Pitch in your little gems that make mcam life easier
Leon82 replied to jlw™'s topic in Industrial Forum
You can pin files in with the open icon in the master window also so you don't have to hit file. Also set the number of recent files -
I'm not sure if it's available in canned text but you could use a manual entry before the finish paths
-
I feel that's a way to get extra chatter. I would drill it indersize when it's whole then peck the end mill slow to clean the radius out Or rough, peck, finish with a internal corner radius like .005 or so
-
Make sure your top of thread is correct if it's not it might be leading off before it should be
-
Overcut can be used to add "comp" you can't adjust it at the controller however
-
Our resellert did it I don't remember where but it was in one of the I think format statements for dwell I think he may have changed the value
-
What happens if you were to make each hole it's own op and multi axis link them? I've had a weird thing happen with camplete and 5axis drill and doing this solved it. In the end it's probably the same work to make an individual op or plane
-
Stock to leave on Surface High Speed toolpaths
Leon82 replied to Metallic's topic in Industrial Forum
You can add geometry sets in there with their own check sets(groups) and put all the containments in tool path control. Works good. We went from x9 to 18 so it make multiple features easier to do with one op. I'm not sure when they made the change -
We put our library on the server so when customs are made they are available on each seat.
-
Mastercam 2019 Backplot and Verify times incorrect
Leon82 replied to Corey Hampshire's topic in Industrial Forum
Are there a lot of high speed paths in the program? Some machines will slow down from lookahead -
Saved STL model will only rotate around the base coordinate system!
Leon82 replied to danielm's topic in Industrial Forum
It's possible to change the view and not the wcs so the model movement is not what was expected -
Associative linking points are also available, I haven't used them much but the seem like a good idea for certain things
-
For multiple holes or faces yes, set the depth, top of stock and feed plane incremental. Clearance height is your preference, but on incremental z axis will be moving with every xy rapid move to a different height plane. Nothing wrong with that, just personal preference .
-
Saved STL model will only rotate around the base coordinate system!
Leon82 replied to danielm's topic in Industrial Forum
Ah, I see now -
Saved STL model will only rotate around the base coordinate system!
Leon82 replied to danielm's topic in Industrial Forum
Try setting your stock plane to top in the page for stock setup. You should never really have to move around on STL made in verified as far as I know -
Pitch in your little gems that make mcam life easier
Leon82 replied to jlw™'s topic in Industrial Forum
I had my custom tab going before our retailer finished upgrading all our seats. You can, if you are up to it popilate the small bar where the save and open shortcuts are will all the icons like x9 I think. -
How do I transform an STL file saved from verify?
Leon82 replied to danielm's topic in Industrial Forum
I could have sworn I've turned them into solids before. I think I saved it as it's own file and then did a save as and selected the file type of iges or step Maybe -
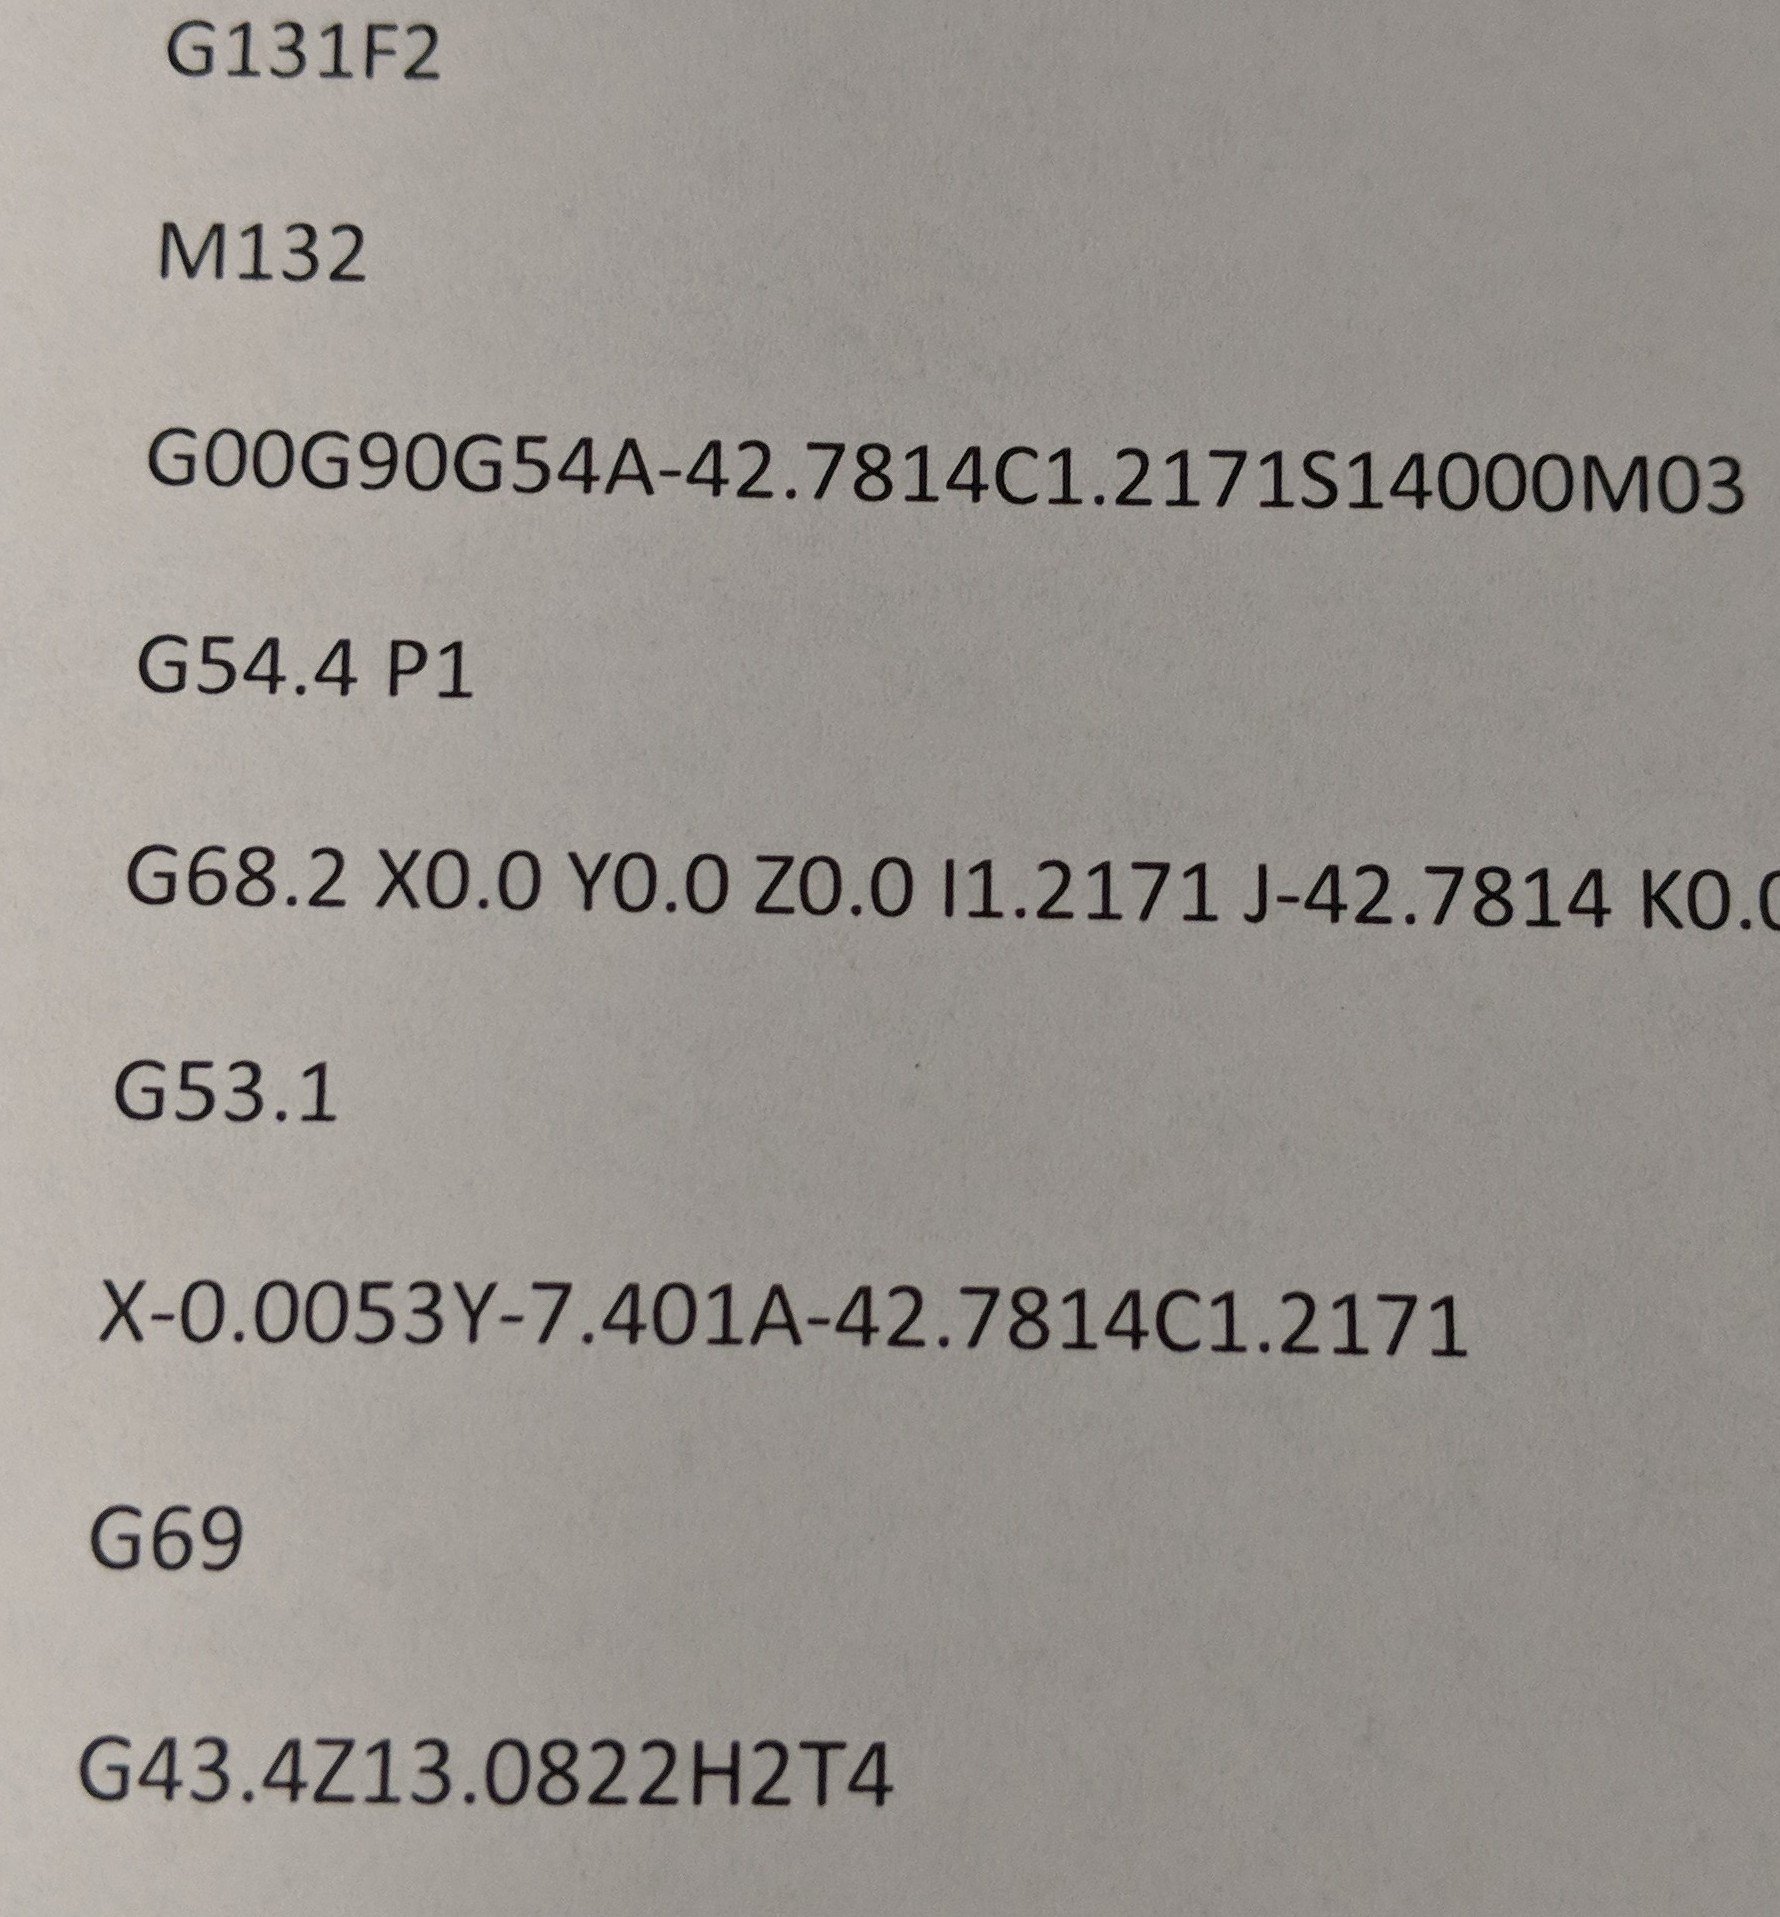
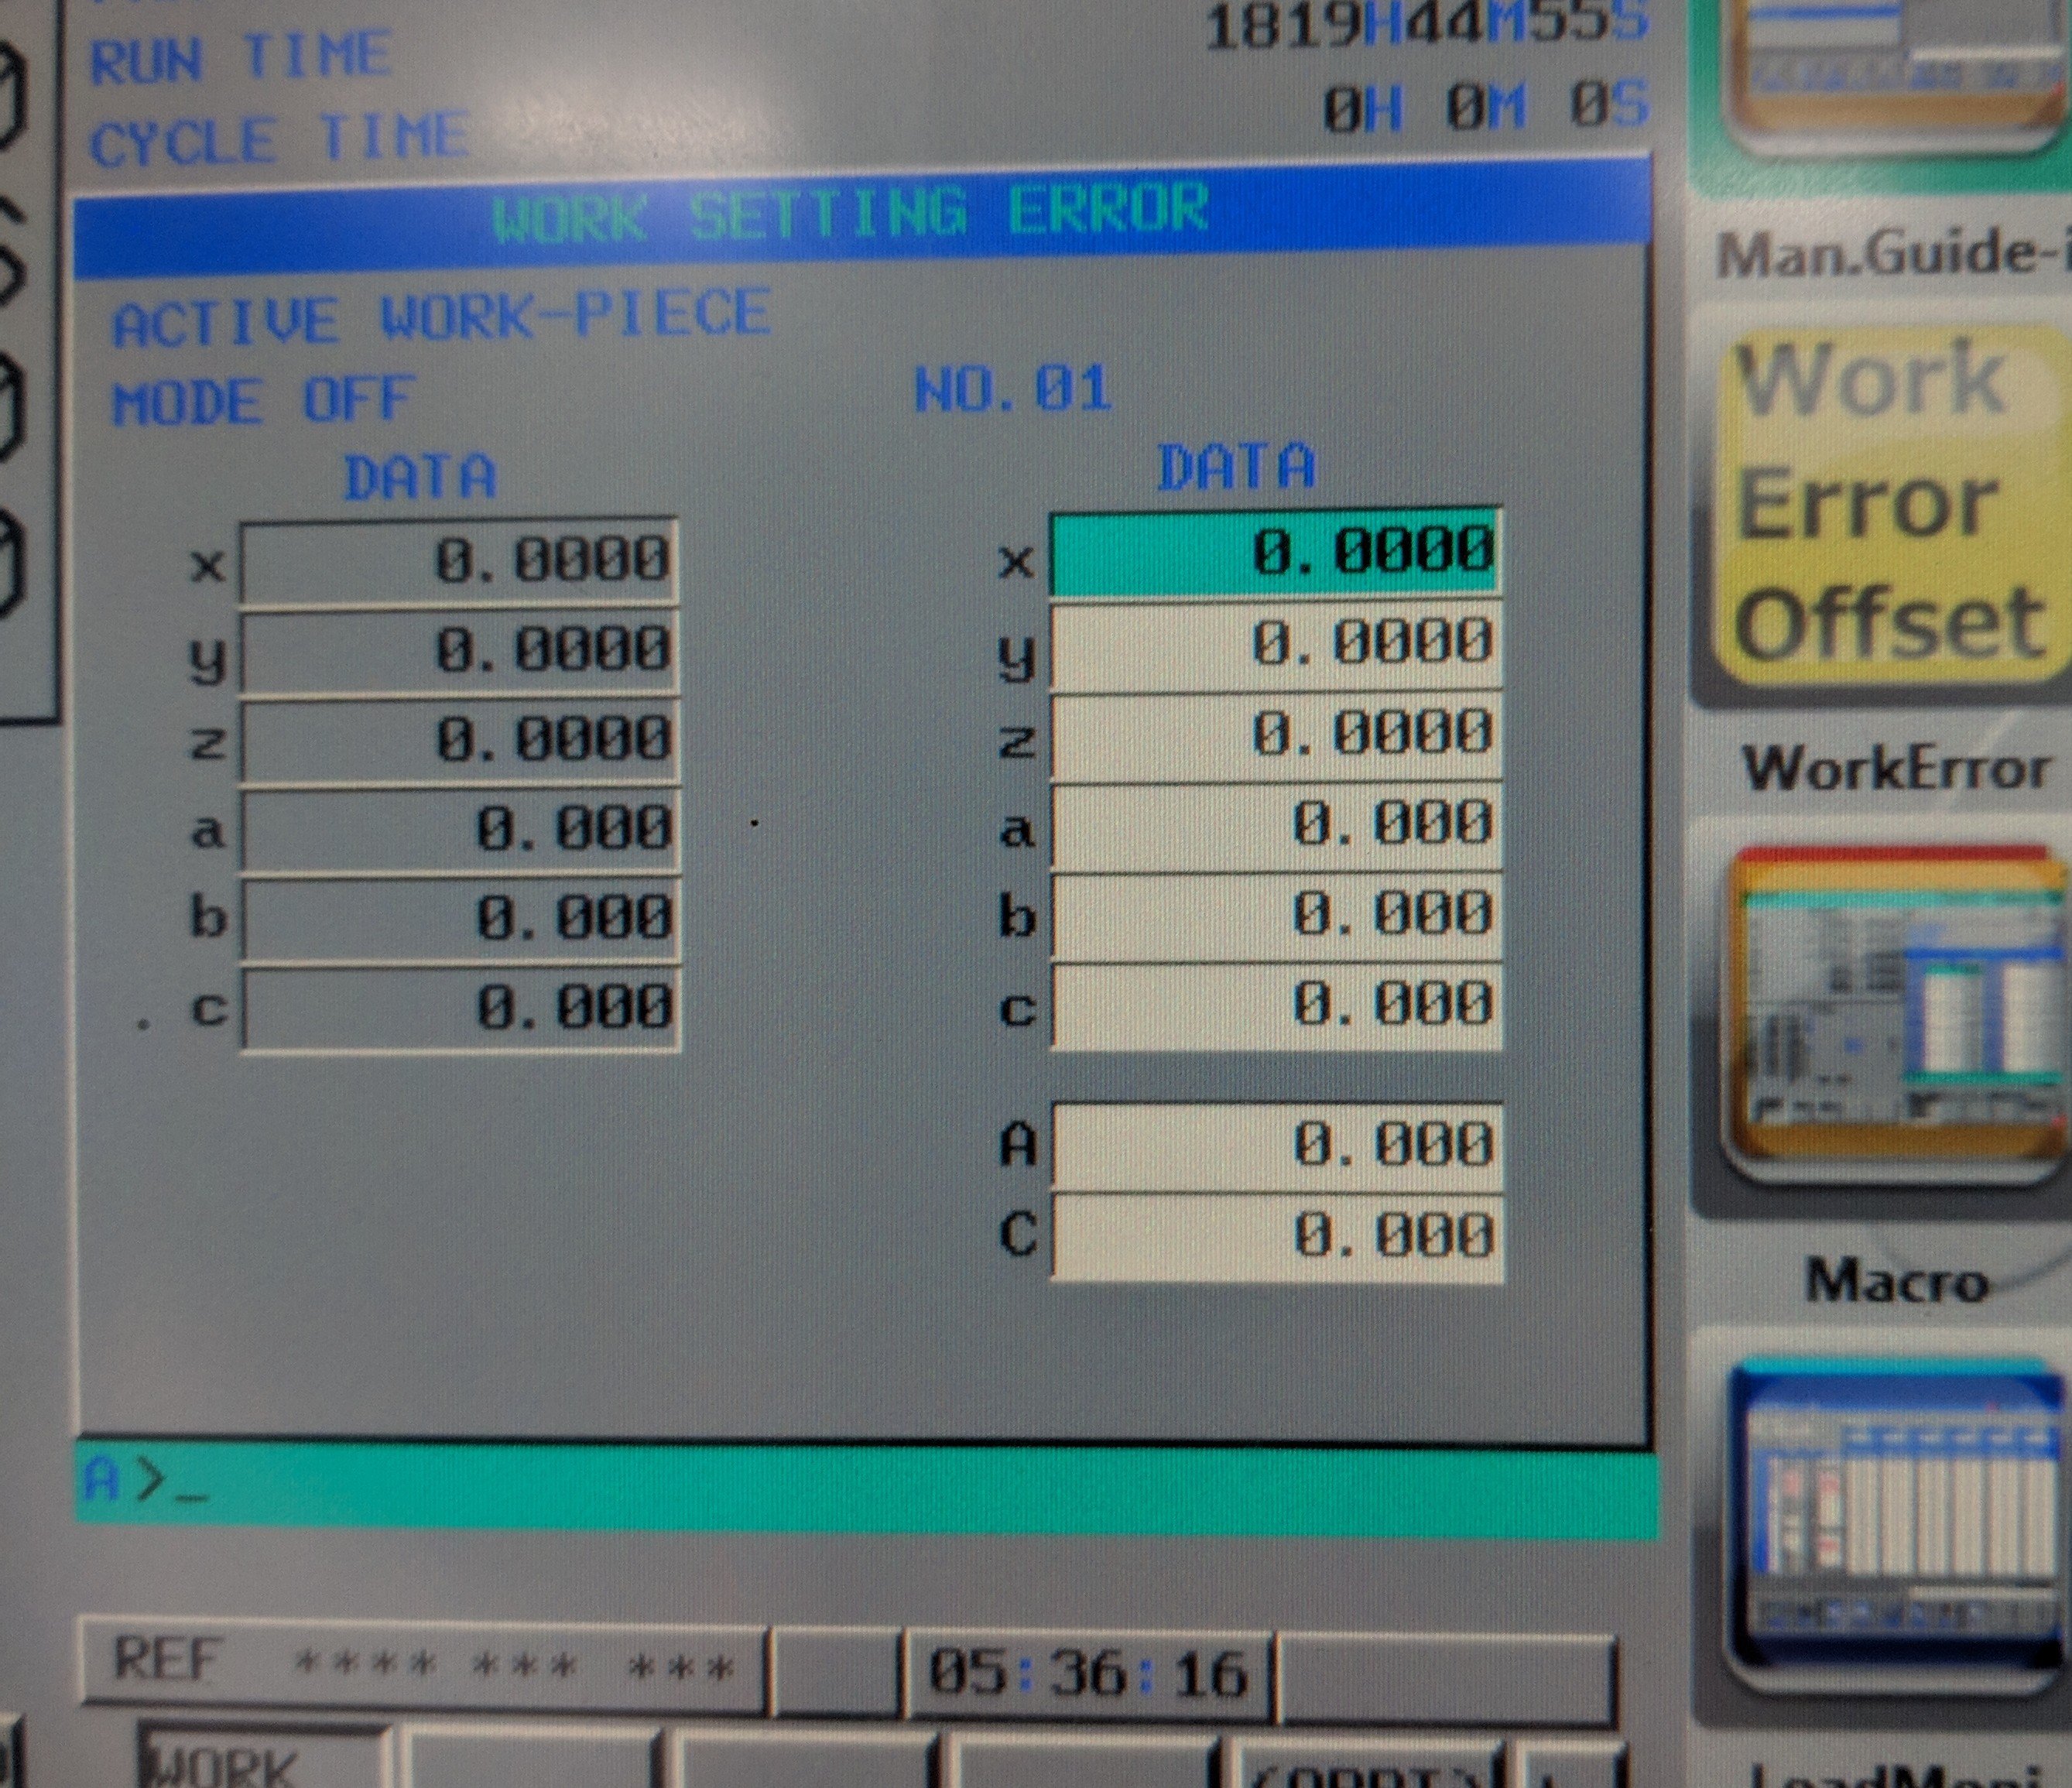
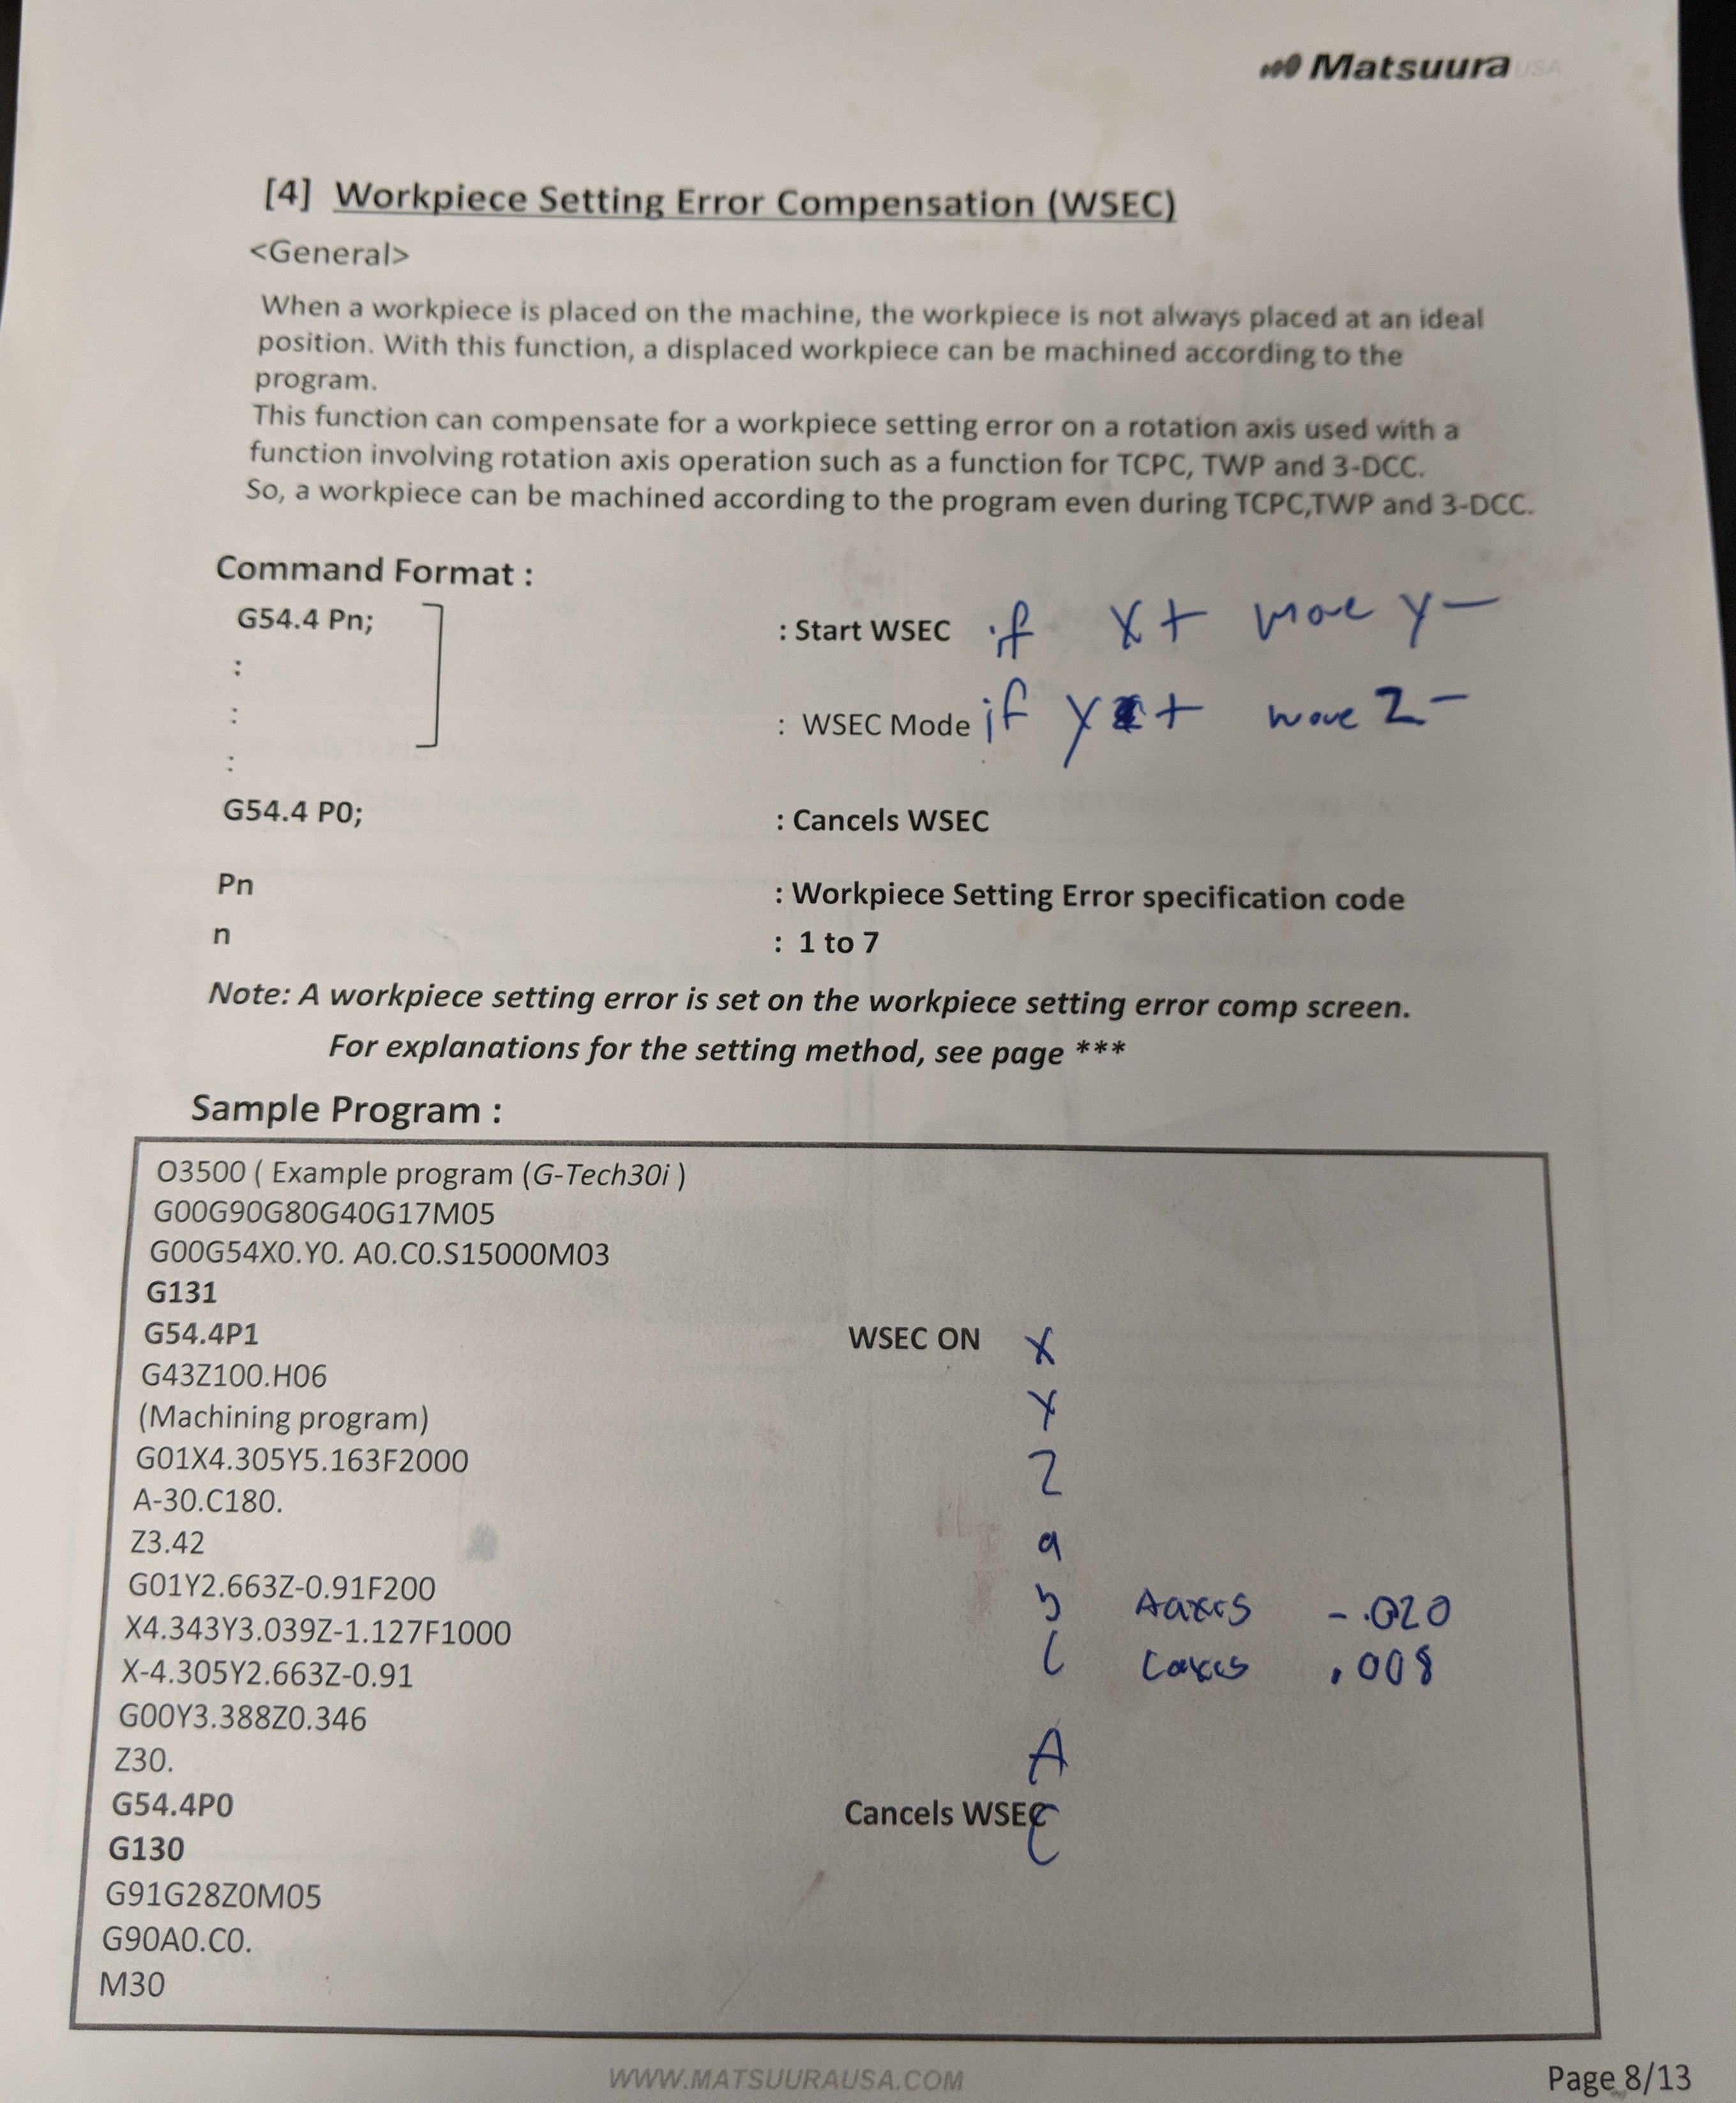
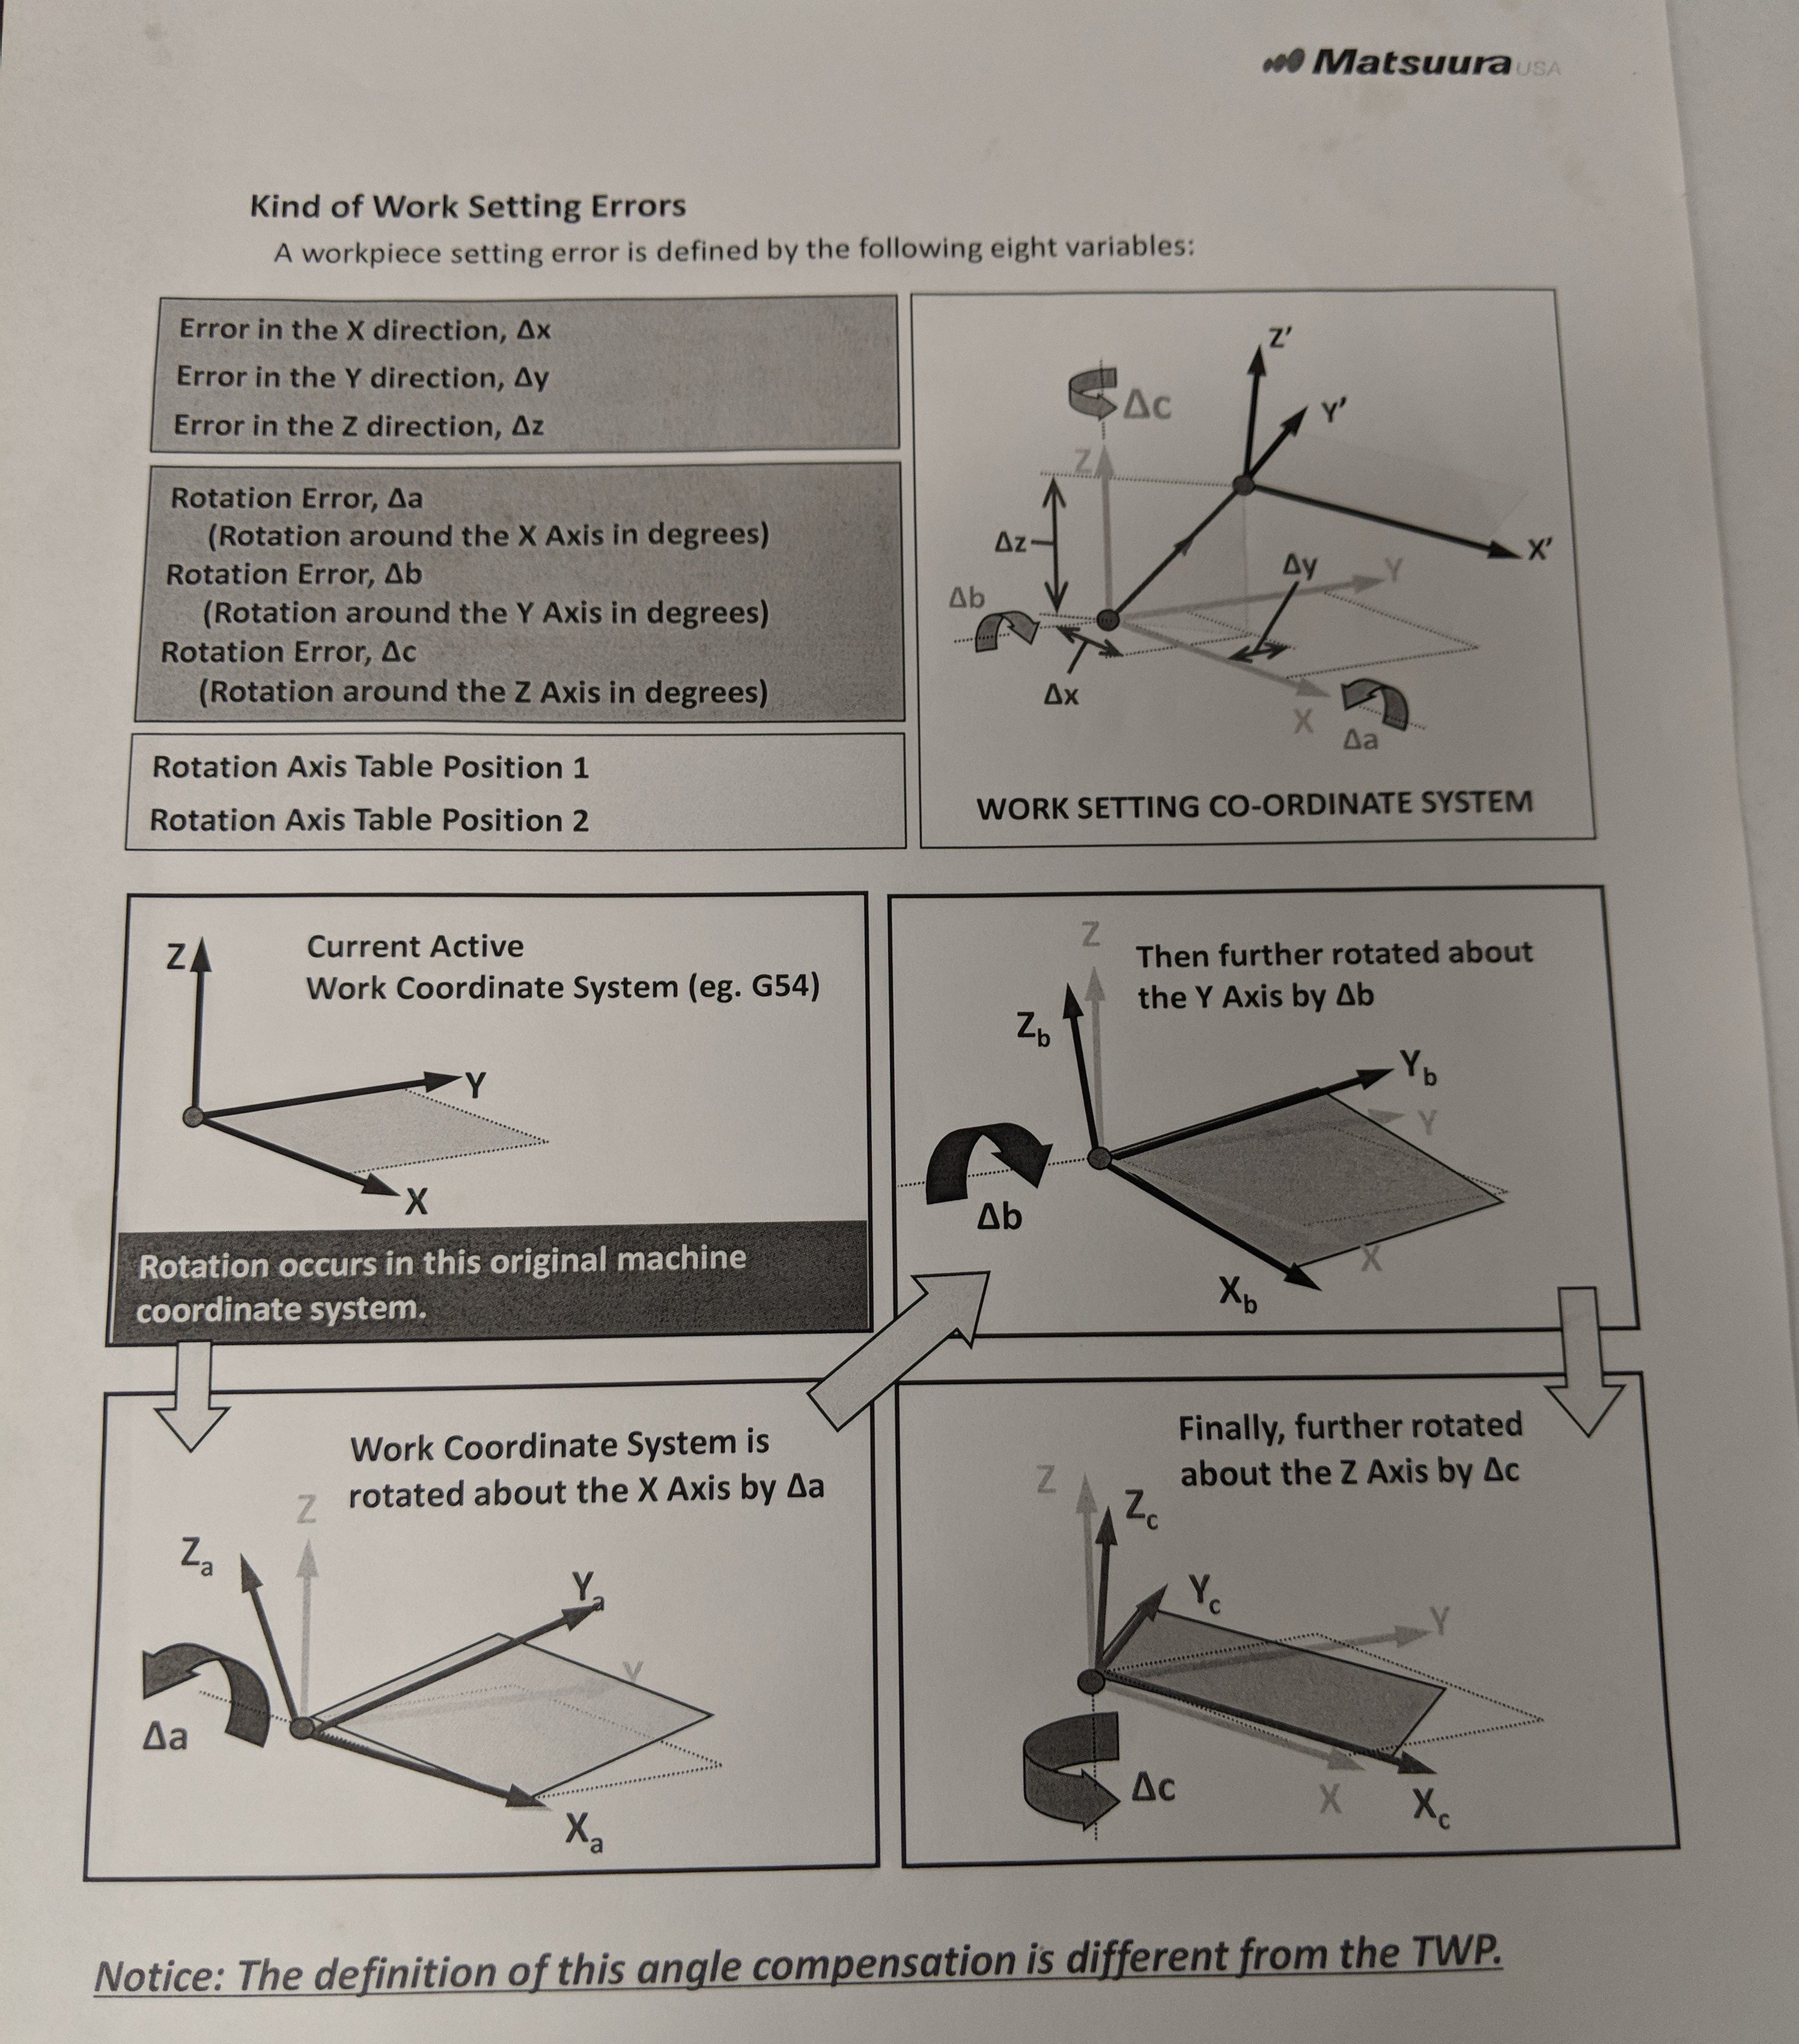
From what I have experimented with on our AC machines. C axis offsets are fine. If a is -90. 5 it stays there at a hundred and eighty degrees also instead of going to 89. 5 Using the 54. 4 it will track a axis correctly In the pictures I posted I was making Corrections and in certain orientations it was unable to compensate so I had to remove my correction ,luckily I had enough tolerance to work with
-
GENERIC HAAS VF-TR_SERIES 5X MILL POST SET-UP
Leon82 replied to cncmillman's topic in Industrial Forum
On a side note you are going to want more contact area on that raptor -
GENERIC HAAS VF-TR_SERIES 5X MILL POST SET-UP
Leon82 replied to cncmillman's topic in Industrial Forum
I think in the machine definition there is a setting to break arks or rotations. Not sure if it will help -
So you would you want to use the 54. 4 if you have an angle error. With a table table machine. It's possible to try to correct an error that the machine is incapable of rotating to. You may get over travels or unpredictable machine motion to check if you have the option you can go to your work offset page and use the right soft Arrow key to scroll through past the macro you should see the work setting error button
-
Our Nakamura can run as 3 axis. There is an mcode to unlock the y of you want to set the tool location in y axis. I think, I've never run them. I think there is a milling m code as well