


AHarrison1
-
Posts
580 -
Joined
-
Last visited
-
Days Won
7
Content Type
Profiles
Forums
Downloads
Store
eMastercam Wiki
Blogs
Gallery
Events
Everything posted by AHarrison1
-

Threads - "Spring pass" wipes out threads
AHarrison1 replied to ThickChips's topic in Industrial Forum
One thing I have noticed is your A value being different to mine. Your A value is pulled from the lead in angle of 29 deg, mine is pulled from the included angle of 60 deg. As for which one is right I don't know. -
Threads - "Spring pass" wipes out threads
AHarrison1 replied to ThickChips's topic in Industrial Forum
This is normal with the 29 deg lead in angle. If posted out longhand the Z value changes with each pass. Most of the cutting is done with the leading edge of the insert. -
Threads - "Spring pass" wipes out threads
AHarrison1 replied to ThickChips's topic in Industrial Forum
Change the NC code format from canned to longhand, re-post then compare the values of the last pass to the spring pass. They should be the same. I think the issue lies in the canned cycle... just guessing here. -
Depth cuts/Multi passes
AHarrison1 replied to Justin Beebe at Folsom Tool's topic in Industrial Forum
Pffft.... Blow the "easy button" Why cant the software just read my mind remotely with out me having to get out of bed. Just seems like too many steps are needed to get anything done. -
You can also highlight address right click and 3rd option down 'go to HTTP.....'
-
Your best bet is to look up the grade of inserts and see what the manufacturer's speed and feed recommendations are.
- 1 reply
-
- 1
-

-
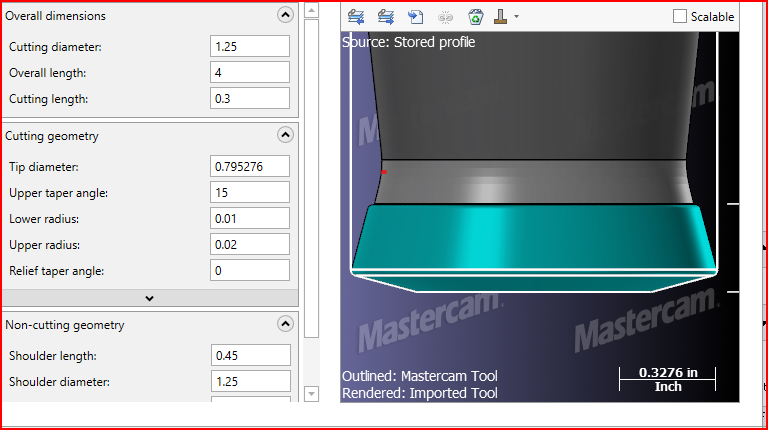
As Gcode mentioned above, I cheated a little with cut length but the rest of the tool geometry is straight from STL. I have used this with good effect in both dynamic and 'straight line' programming. what I have come across is that the tool does not like machining over pre-drilled holes.
-
The above would be 1 scenario where you have holes on various Z levels but all the same depth. Scenario 2 Same size diameter holes on the same Z level but with different depths then pick the bottom of the holes Clearance - on or off makes no difference Retract - Absolute Z distance above selected point Top Of Stock - Absolute Z 0 Depth - Incremental Z 0 (or minus a little for drill point If Different Diameter holes then it will be different ops
-
In Linking Parameters Set as follows Clearance - Absolute - Initial Z usually above top of stock Retract - Incremental Z distance above selected point Top Of Stock - Incremental Z height position of point Depth - Incremental Z depth from selected point If all holes are the same depth
-
I have yet to have any issues, apart from the initial stock set up thing.
-
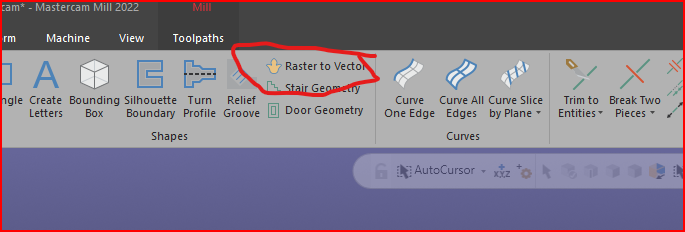
On the wireframe tab there is raster to Vector
-
Haas Lathe - Cross Drill G83/G87 behavior
AHarrison1 replied to ThickChips's topic in Industrial Forum
For radial drilling Haas has seperate G-Codes G83 for face drilling G243 for radial https://www.haascnc.com/content/dam/haascnc/en/service/reference/programming-workbooks/shop-notes---machinist%27s-cnc-reference-guide.pdf https://www.haascnc.com/service/online-operator-s-manuals/lathe-operator-s-manual/lathe---introduction.html My post has been set up to respect what is found in the above links. In-House actually provided the post for our DS-30Y but the above info was provided to them to achieve this. You will also find some HAAS Lathe posts on the Tech Exchange https://community.mastercam.com/techexchange#files -
To add more points just simply click the points to add. By 're-selecting' points already in the list what it does is actually remove them, so click a point it adds click again it removes. To remove all and re-select, right click in points list and delete all.
-
For speeds and feeds start by looking at tool manufacturer recommends. For e.g. Imco 3 flute streaker 1/2" dia non-coated sfm 500 for slotting, 575 for peripheral roughing and feed per tooth of .004 to .005"
-
I have just come across an odd issue with 2022. I can drag and drop to open a new part and it opens fine. When I try to merge a part into an existing file I get 'Cannot find Parasolid data in SOLIDWORKS file'. We have just recently upgraded to Solidworks 2022. Works as it should in Mastercam 2023
-
puff puff pass is the general rule of thumb... not puff puff puff puff puff..uhm my etch -a-sketch is broken :)
-
Arc Polar wants to place arc at center, no matter where I select
AHarrison1 replied to JB7280's topic in Industrial Forum
I have tried this in 2020, 2022, 2023, used lines , splines and I could not replicate what you are getting. Searched through the config and nothing jumped out as far as arc/entity creation was concerned. -
Arc Polar wants to place arc at center, no matter where I select
AHarrison1 replied to JB7280's topic in Industrial Forum
When placing the gnomon have you tried hitting "E" for endpoint or "M" for mid-point? -
when changing views or planes the rotating busy cursor pops up
AHarrison1 replied to Leon82's topic in Industrial Forum
One of the very 1st things I turned off...it was like a flashlight hitting your eyes every time my mouse got remotely close to the solid. -
New lathe work holding tips - jaws
AHarrison1 replied to ThickChips's topic in Machining, Tools, Cutting & Probing
Most manufacturers will say that the max workpiece dia should not exceed the dia of the chuck or the T-slot nut should not over shoot the T-slot or that the outer extents of the jaws does not exceed the chuck dia. Ive heard or read all three at some point or another. There is a difference between chuck dia and chucking dia, in my opinion anyway. The Samchully link you shared earlier to me says that the max chuck size is 6". Speak to your tool provider/sales rep. They will do the leg work for you as far as research and providing solutions go. ( underlined because it is probably the most sensible advise a can give you) Speaking to them also helps preventing you from dis-appearing down a rabbit hole. My setup here is Royal collet on main spindle up to 3" (max bar stock for this machine). With 1/2" dia increments in collet sizes. Anything over 3" and I swap out the collet system for the 3 jaw chuck and soft jaws. Sub-spindle is 8" 3 jaw chuck with a master soft jaw size of 3" dia. I then have interchangeable ALU inserts that are 3" od to fit the master jaw and then bored to whatever finish dia I need. -
This guy sounds more german, maybe easier for you to understand. https://www.youtube.com/watch?v=W5SctTmLeU8 This guy is north american i think https://www.youtube.com/watch?v=MfeVHEfGHkg
-
New lathe work holding tips - jaws
AHarrison1 replied to ThickChips's topic in Machining, Tools, Cutting & Probing
It will depend on how much travel the t-nut has, I would hazard a guess and say about 2 " travel which would give you a range of 4" to 8". On our 10" chuck the t-nut only has a travel of +/- 0.85". I don't know if the t-slot length increases as you go up in chuck size. So then yes, sets of various max diameters would probably be your best bet. Hopefully others more in the know might chime in. -
New lathe work holding tips - jaws
AHarrison1 replied to ThickChips's topic in Machining, Tools, Cutting & Probing
Your 'quick change' solution would be a collet style chuck system https://royalproducts.com/product-line/royal-cnc-collet-chucks/quick-grip/ This is what we have installed on our lathe with collets ranging from 1/2" dia to 3" dia. Anything above that then I am putting the 3 jaw back on. The jaws you showed will work very well as the hardened teeth tend to bite into the workpiece. Another plus to those is that your jaw limit is dictated by how much travel the t-nut has in the slot. Another option https://schunk.com/fileadmin/pim/docs/IM0019026.PDF -
It will follow the chain in the finishing pass, it still has to rough out all that material. To see the tool just follow the chain then turn off roughing in the toolpath parameters (check box i believe). By default the tool will finish the groove starting at both end and working in to overlap in the center of the groove.
-
From what i can see, according to your geometry selection, the toolpath is behaving as it should within the constraints of what you have selected. Re-select the chain starting from the origin.

