


AHarrison1
-
Posts
580 -
Joined
-
Last visited
-
Days Won
7
Content Type
Profiles
Forums
Downloads
Store
eMastercam Wiki
Blogs
Gallery
Events
Everything posted by AHarrison1
-

Question for people who use Wire and Mill
AHarrison1 replied to volitan71's topic in Industrial Forum
Reads more like a hardware issue than a 'spoiled brat' issue -
After download just right-click and run as administrator https://spaces.hightail.com/receive/BpF63w0ZYK This has fixed the crashing issue for me. Credit to GBouman for the fix
-
I will see if i can get permission from the original poster to post the fix here
-
This was discussed on the main 'My Mastercam ' forum with a fix. See below 2 links (highlight link, right click, choose 3rd option to follow link) https://forum.mastercam.com/Topic46263.aspx#46264 https://forum.mastercam.com/Topic45606.aspx
-
See here https://www.emastercam.com/forums/topic/103575-anyone-else-keep-losing-custom-configs/#comment-1326075
-
That's about as deep as my floating ring will let me go. Perhaps someone with a few more brain cells will chime in. For the 2 and 3 axis stuff I do the simple verify I use is more than good enough for me.
-
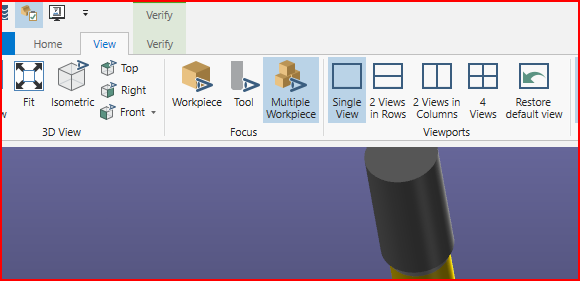
In Simulation I had to choose just workpiece, not multiple workpiece to get the desired effect.
-
In Simulator - goto view and choose either workpiece or multiple workpiece, multiple works for multi ops on a part
-
Operation Stuck In Multi Threading Manager Can't Delete
AHarrison1 replied to dlewis1000's topic in Industrial Forum
Fella is 4 posts in and already branded...maybe he just know any better. -
That's exactly how I read it... then giggled like a school girl for the next half an hour.
-
After watching this https://www.youtube.com/watch?v=AUdpPwQin4s Rather incomplete product by the sounds of things
-
To expand on this... To be able to search for a tool and have relevant part files come up or where/what file the tool was previously used in to copy parameters, etc.
-
Buttress Thread - OD Turning application - Questions
AHarrison1 replied to ThickChips's topic in Industrial Forum
The direction of the insert i don't think is important as far as actual machining is concerned. The problems I generally come up with is gauge point of the insert which for threading inserts is the tip. Nine times out of ten I have to alter the z depth of the threading op, especially up against a shoulder. -
Buttress Thread - OD Turning application - Questions
AHarrison1 replied to ThickChips's topic in Industrial Forum
In thread operation choose select from table then drop down to buttress
-
Buttress Thread - OD Turning application - Questions
AHarrison1 replied to ThickChips's topic in Industrial Forum
You should have a Buttress thread insert option when creating a new thread tool.
-
You could also use show Gnomons or show axis for visual reference


-
See Page 89 and onwards for steady rest info. https://whatsnew.mastercam.com/pdfs/whatsnew_2022.pdf. Contact your re-seller and see what they can do for you.
-
Programming Tip - Helix Bore "depth cuts" - Faster solution?
AHarrison1 replied to ThickChips's topic in Industrial Forum
Are you not able to hook up an airline to blow down the tool for chip evac? -
Are their any downsides to Dynamic Milling?
AHarrison1 replied to monkeyman's topic in Industrial Forum
This times 1000, if your co-worker cannot see the light then let him/her/it bury him/her/it-self in their own ignorance. -
Inconel threadmilling
AHarrison1 replied to So not a Guru's topic in Machining, Tools, Cutting & Probing
How deep are you looking to go? Walter tools have some option with thru- tool coolant https://www.walter-tools.com/en-gb/search/pages/default.aspx/threading/thread-milling?r=%7B%22Taxonomy%22:%5B%22threading%7C%7Cthread-milling%22%5D,%22PossibleForImg%22:%5B%22S%22%5D,%22ThFtFilter%22:%5B%22UNF%22%5D,%22TdzFtdz%22:%5B%22UNF%205%2F16-24%22%5D,%22Cxsc%22:%5B%221%22%5D%7D (have fun with that link...so glad things are 'stream-lined' here) -
Lathe Groove - Cut in one direction only (no overlap)
AHarrison1 replied to ThickChips's topic in Industrial Forum
Yes, sorry, finish operation. To add to the above, set clearance angles in punge paramaters to zero. 2nd or 3rd option for Plunge cutting. -
Lathe Groove - Cut in one direction only (no overlap)
AHarrison1 replied to ThickChips's topic in Industrial Forum
Use normal contour operation. If it needs to be roughed out 1st, then use groove operation and turn off finishing, then follow with contour. Play with Plunge parameters to get the desired result. -
3+2 Milling / Top=G54 Front=G55 Right=G56 etc. etc.
AHarrison1 replied to Jespertech's topic in Industrial Forum
I think your planes within the operation need to match, but I could be wrong though.
-
There is a few things That needed to be done apart from what JParis stated above. I reversed the plunge/cut direction to respect side and end angles, re-set tool width. Changed wall back off to distance and .005 (groove and tool width are too close). Added .02" rads to get rid of burr creation and to make it pretty looking. Groove-aa attached Groove-aa.mcam


-
So instead of makijng a snip then copy paste we have to make snip, save said snip, drag said save to attach or browse to said save to upload... OH boy oh boy oh boy, I can so see the anti extra mouse clicks brigade going absolutely spare about this.


