ajmer
-
Posts
504 -
Joined
-
Last visited
-
Days Won
1
Content Type
Profiles
Forums
Downloads
Store
eMastercam Wiki
Blogs
Gallery
Events
Everything posted by ajmer
-
couple things you can do change to absolute cut depths or change inc depth to force "keep top cut at max step down" options will change depending on which toolpath you are using
-
try checking the stepover, there is an option for diameter or flat section of the tool
-
You could also create view sheets to do this
-
Probably is a font that the cad guy used that you don't have on your computer
-
yes it is just download any windows fonts and they will sow up in the create letters dialog box
-
you could have used a circle the size of the drill and used that as air region if you wanted. this way you wouldn't have to use rest machining
-
Look for newfs some where in the post. This is new format statement And look for it with the arc, it's probably changing the fs on you
-
try setting it to what you want then saving it to defaults in the operation it has worked for me in the past this way
-
use the quick mask bar you can select all or only surfaces
-
moldplus has tools to change flowline direction http://www.moldplus.com/videos/Change_Uv_Direction_x6/change_uv_direction.html CHANGE UV DIRECTION This function is used to edit the surface parameters to align the U and V directions of a surface patch. In other words, this function will allow you to change the ‘grain direction’ of a surface. Aligning the U and V directions will result in better finishes in certain toolpaths such as flowline machining. Note that in some cases, manipulating the UV direction of the faces will still not give the desired result in machining!
-
make sure that function lock is enabled on the keyboard
-
or what about going into the tool manager and "SELECT FILE FOR TOOL IMPORT" it makes a library, but it will do what you want
-
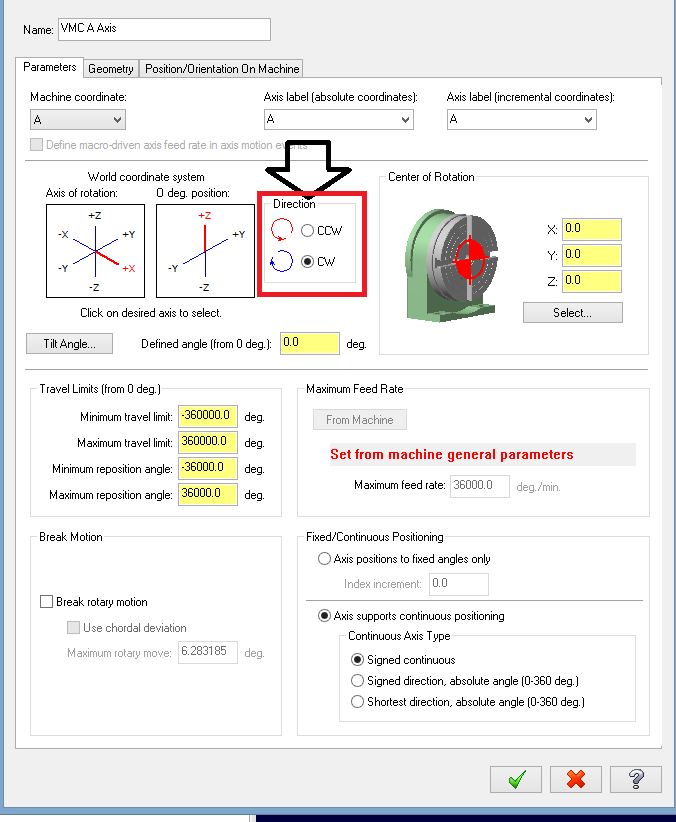
check the rotation in the MMD in the attached pic

-
try right clicking on the mastercam icon and run as administrator when mastercam opens, change the verisurf setting to thte way you want close mastercam turn on mastercam the regular way that is the only way I can make those settigns stick
-
i am having the same issues with X8, cant exactly figure out what causes it. Frustrating!!
-
If you have curve 5 axis you can do that 3d chamfer pretty well. Set the output to 3 axis
-
Ctrl-alt-shift
-
you must have uninstalled Code meter codemeter is required to run mastercam download it here http://codemeter.com/us/service/downloads.html
-
Force B Axis Output When Posting 1 Tool
ajmer replied to DPARKS's topic in Post Processor Development Forum
try this in mpmaster pwrtt$ # Write tool table, scans entire file, null tools are negative if rotaxis$ > 0 | rotary_type$ > 0 | mill5$ <> 0, [ sav_rot_on_x = rot_on_x output_z = no$ ] if vmc = 0 & tlplnno$ <> 2, sav_rot_on_x = rot_on_x if vmc = 1 & tlplnno$ > 1, sav_rot_on_x = rot_on_x #sav_rot_on_x = rot_on_x #Uncomment this line to output rotary axis value even when it's not used <--------uncomment this line t$ = wbuf(4,wc4) #Buffers out tool number values if tool_table = 1, ptooltable if tool_table = 2, ppredtool if tool_table = 3, pmetatool if t$ >= zero, tcnt = tcnt + one ptravel pwritbuf5 -
how did you start the cut, did you make another path to get into the material and then run the peel mill?
-
create thread point in center of arcs by window
ajmer replied to Tim Pruett's topic in Industrial Forum
on the bottom of your mastercam screen beside the word attributes there is a point icon hit the dropdown beside it and change it to thread point first and then create the arcs -
create thread point in center of arcs by window
ajmer replied to Tim Pruett's topic in Industrial Forum
what if you change the type of point to a thread point before you create the points -
check your misc values should be something in there to switch from positive to negative rotation
-
if you looked a few threads down you would have found your answer http://www.emastercam.com/board/index.php?showtopic=76347
-
what about the dealer that gave you codes?